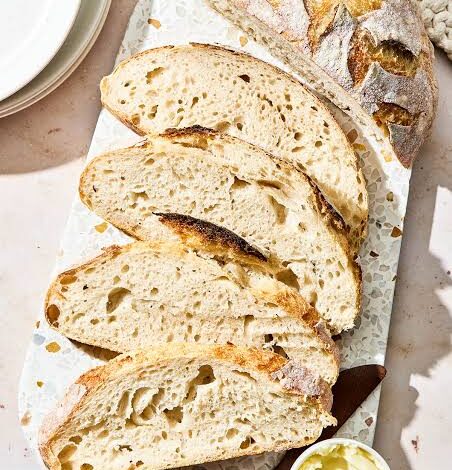
Welcome to the wonderful world of baking your very own homemade sourdough bread without any of the hard work that usually scares beginners away. If you have ever looked at a traditional sourdough recipe and felt completely overwhelmed by terms like stretch and fold or coil fold, you are certainly not alone in this journey. This recipe completely changes the game by removing all those complicated physical steps while still giving you that gorgeous golden crust and chewy crumb you dream about. You no longer need to spend your entire day tied to the kitchen counter timing your dough folds every thirty minutes just to get a decent loaf of bread. By using a clever and simplified approach, you can mix your ingredients together and simply walk away until it is time to bake. It is the ultimate kitchen hack for busy people who love the rich and tangy flavor of real fermented bread but simply do not have the hours to spare for traditional maintenance.
People absolutely fall in love with this specific method because it takes all the intimidation out of artisanal bread baking and replaces it with pure joy and relaxation. Traditional recipes often make you feel like you are doing a complex science experiment that might fail at any moment if you miss a single step or misjudge the temperature. With this no manipulation style, the natural magic of fermentation does all the heavy lifting for you while you sleep or go about your daily routine. You get to enjoy the incredible aroma of freshly baked bread filling your home without feeling exhausted or stressed out by the process. It proves that you do not need to be a professional pastry chef with years of experience to create something truly magical in your own regular kitchen oven. The sense of accomplishment you feel when you pull that beautiful rustic loaf out of the hot pot is something special that keeps bakers coming back every single week.
There is never a wrong time to bake a loaf of this incredible bread, but it is especially rewarding on busy weekends when you want to treat your family to something wholesome. You might choose to make it because you are craving the deep and complex flavor of sourdough that you simply cannot buy at the regular grocery store. From a fitness and wellness perspective, many people adore sourdough because the long fermentation process breaks down gluten and phytic acid much better than commercial yeast does. This makes the bread significantly easier on your digestion, allowing you to enjoy your toast every morning without feeling heavy or bloated afterward. It is also an amazing emotional outlet after a long and tiring work week, letting you slow down, use your hands simply, and focus on creating physical nourishment. Sharing a warm slice slathered in butter with the people you love creates warm memories that anchor you deeply to the simple pleasures of home.
Embarking on this baking adventure will quickly teach you that perfection is a myth and that deliciousness is the only goal that truly matters in your kitchen. You do not need expensive professional bakery equipment to get stunning results because your standard everyday mixing bowl and a heavy iron pot will do the job. As you mix your flour and water and bubbly starter together, you are participating in an ancient tradition that connects you to generations of home cooks who came before. This recipe strips away all the modern noise and confusion, leaving only the pure and satisfying essence of flour and water and time working in harmony. So put on your favorite apron, clear off a corner of your counter, and get ready to discover how wonderfully easy homemade sourdough can really be for you. Your future self will thank you every single time you slice into a warm loaf and taste the fruits of your effortless labor.
Ingredients You Will Need
To bake this wonderful loaf of bread, you only need a few simple and pure ingredients that you might already have sitting in your pantry.
-
Active Sourdough Starter: 100 grams of bubbly and fed starter that has doubled in size
-
Unbleached All Purpose Flour: 450 grams for the main dough structure
-
Whole Wheat Flour: 50 grams to add a lovely nutty flavor and extra nutrition
-
Warm Water: 375 milliliters to hydrate the flour properly
-
Fine Sea Salt: 10 grams to enhance the overall flavor and strengthen the gluten network
Step by Step Method
Begin your wonderful baking journey by taking your active sourdough starter and measuring out the exact amount you need into a large mixing bowl. Make sure your starter is bubbly and active, which means it should float in a small cup of water before you use it in this recipe.
Pour your warm water directly into the bowl with the sourdough starter and use a sturdy wooden spoon or your clean hand to stir them together gently. You want the starter to dissolve completely into the water until the liquid looks milky and slightly cloudy with tiny bubbles floating around.
Measure out your all purpose flour and your whole wheat flour in a separate container and mix them together briefly to distribute the different grains evenly. Dump the dry flour mixture all at once into your bowl containing the water and starter mixture until no dry flour patches remain visible.
Use your hands or your spoon to mix everything thoroughly into a shaggy dough mass, making sure all the flour absorbs the liquid properly. Because we are skipping the stretch and fold steps entirely, you want to ensure there are no pockets of dry flour hiding at the bottom of your bowl.
Sprinkle your fine sea salt evenly right across the top of your shaggy dough mass and pour just a tiny splash of water over the salt. Use your fingers to pinch and knead the salt directly into the dough for about one minute until it feels fully integrated and smooth.
Cover your mixing bowl tightly with a clean kitchen towel or a plastic wrap sheet to keep the moisture locked inside while the dough rests. Place the covered bowl in a warm spot in your kitchen and let it sit undisturbed for your initial bulk fermentation period of about eight hours.
Once the bulk fermentation time has passed, you will notice your dough has grown in size and shows lovely little bubbles trapped underneath the shiny surface. Gently turn your bowl upside down over a lightly floured clean counter to release the soft dough without defusing too much of its precious air.
Shape your dough into a smooth round ball by pulling the edges toward the center and rolling it gently against the counter with your cupped hands. Flip the shaped loaf upside down into a cloth lined basket or a bowl dusted generously with rice flour to prevent any sticky disasters.
Cover the shaped loaf and place it inside your refrigerator for a cold retard overnight, which usually takes anywhere from twelve to twenty four hours to develop flavor. This cold rest helps the dough firm up nicely and creates that amazing sour tang while making the loaf much easier to score with a razor blade.
When you are ready to bake the next morning, place your heavy iron pot with its matching lid right inside your oven and preheat to 450 degrees. Let the pot heat up thoroughly inside the hot oven for at least forty five minutes so it retains enough thermal energy to bake the bread.
Carefully take your hot pot out of the oven, remove the heavy lid, and invert your chilled loaf of dough gently out of its basket into the pot. Use a sharp razor blade to make one swift and confident slash across the top of your dough to allow steam to escape during the baking process.
Put the heavy lid back on your pot and place it carefully back into the hot oven to bake undisturbed for twenty minutes to trap internal steam. This steaming phase allows your bread to expand to its maximum height and creates a gorgeous blistered crust that looks like it came from a bakery.
Remove the heavy lid from your pot after the first twenty minutes have passed to let the surrounding heat toast your crust to a deep golden brown. Continue baking for another twenty to twenty five minutes until the crust looks rich and mahogany colored and the bottom sounds hollow when tapped.
Carefully lift your freshly baked loaf out of the hot pot using heat resistant oven mitts and transfer it to a wire cooling rack on your counter. Resist the temptation to cut into the hot bread immediately because letting it cool completely ensures the interior crumb sets up properly without getting gummy.
Why This Recipe Is Special
This unique recipe stands out from the crowd because it proves that great baking does not require endless hours of physical labor in the kitchen. By eliminating the traditional stretch and fold routine, it opens the door for beginners who felt intimidated by the technical rules of artisanal bread making. You save precious time while still enjoying the incredible health benefits of slow fermented sourdough that is much gentler on your digestive system than regular bread. The natural acids in the ferment break down gluten proteins extensively, which many people find helpful for avoiding that sluggish feeling after eating wheat products. Taste wise, you get a deeply satisfying flavor profile with a crispy exterior crust and a soft airy interior that melts in your mouth. It is truly the best of both worlds, combining professional quality results with a foolproof process that fits smoothly into any modern lifestyle.
Extra Tips for Better Taste
To elevate your homemade loaf to the next level, consider experimenting with different types of flour like rye or spelt for a richer flavor profile. If you love a bit of texture, you can fold a handful of roasted seeds or chopped walnuts into your dough right before the final shaping stage. Always make sure your sourdough starter is at its absolute peak of activity before mixing, as this directly affects how high your bread rises in the oven. Using a digital kitchen scale for your measurements guarantees consistent results every single time, since baking is truly a science that relies on exact ratios. Letting your baked bread cool completely on a wire rack before slicing is crucial because it allows the interior moisture to distribute evenly throughout the crumb. If your kitchen is particularly cold during the winter months, find a cozy spot near a warm appliance to help your bulk fermentation move along at a steady pace.
Final Thoughts
Baking your own sourdough bread without any stretch and folds is a delightful journey that brings immense satisfaction and delicious rewards to your daily life. You do not need to be a perfectionist or spend years studying baking theory to create a loaf that makes your entire household feel warm and loved. Every time you bake, you learn a little bit more about the rhythms of yeast and flour, turning a simple kitchen task into a mindful ritual. Embrace the small imperfections of your homemade loaves because they are proof that your bread was crafted by human hands with care and patience. We hope this simple guide inspires you to preheat your oven and start your very own sourdough adventure today with total confidence and joy.
Nutrition Details
To help you keep track of your daily wellness goals, here is a breakdown of the estimated nutritional information per serving for this delicious sourdough recipe. Please keep in mind that these numbers can vary slightly depending on the exact brands of flour you use and how thick you slice your loaf.
| Nutritional Component | Amount Per Serving |
| Calories | 160 kcal |
| Total Fat | 1.0 grams |
| Saturated Fat | 0.0 grams |
| Sodium | 290 milligrams |
| Total Carbohydrates | 32.0 grams |
| Dietary Fiber | 2.0 grams |
| Sugars | 0.0 grams |
| Protein | 5.0 grams |
Disclaimer
The nutritional information and health benefits discussed in this article are provided for general informational and educational purposes only and should not replace professional medical advice. Every person’s body and digestive system is entirely unique, which means individual physical reactions to fermented foods and grains can vary significantly from person to person. If you have specific dietary restrictions, severe allergies, or underlying medical conditions regarding gluten or wheat consumption, you should consult with a qualified healthcare professional before making major changes. The author and publisher of this recipe disclaim any liability for adverse reactions or outcomes resulting from the preparation or consumption of the food described herein.