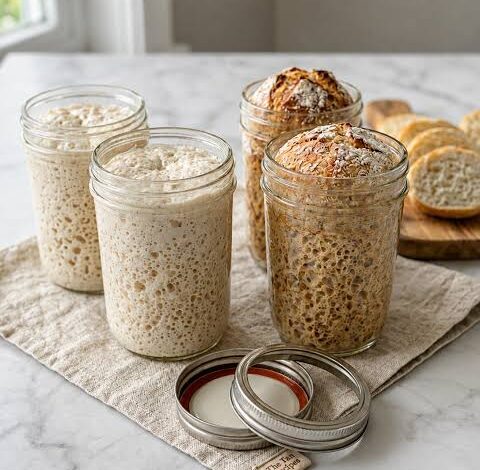
Sourdough bread in a jar is a delightful and clever twist on traditional baking that brings the rustic charm of homemade bread right into a compact glass container. This unique method involves creating and baking individual portions of hearty sourdough directly inside heat safe mason jars, making the entire process fun, visual, and surprisingly simple. Baking inside a jar traps the steam close to the dough during the initial minutes of cooking, which creates an amazingly crispy outer crust while keeping the interior crumb soft, airy, and wonderfully moist. It eliminates the need for expensive Dutch ovens, complex bread shaping techniques, or specialized baking equipment that often intimidate beginner bakers. Whether you are a complete novice trying your hand at wild yeast fermentation for the first time or a seasoned baker looking for a convenient way to make single portion loaves, this recipe offers a foolproof route to success.
People absolutely adore this recipe because it combines the nostalgic goodness of fresh baked bread with modern convenience and aesthetic charm. The individual jars look incredibly cute on a dining table, making them a massive hit for dinner parties, holiday gatherings, and thoughtful gift giving. Beyond the charming appearance, people love the control it offers over portion sizes, allowing everyone to enjoy their own personal loaf without worrying about a giant bread loaf going stale on the counter. The process of watching the dough rise through the clear glass of the jar is deeply satisfying and offers a front row seat to the magic of sourdough biology. It brings a cozy, old fashioned warmth into any kitchen while keeping messy flour cleanup to an absolute minimum, which is something every home cook can truly appreciate.
You should make this recipe whenever you desire the deep, soulful comfort of warm bread without committing to a full day of traditional artisan loaf shaping. It is perfect for weekend brunches with close friends, cozy rainy afternoons spent indoors, or meal prepping healthy carbohydrates for the week ahead. From an emotional perspective, kneading and watching your natural yeast dough grow creates a grounding sense of mindfulness that helps melt away daily stress and anxiety. From a health and fitness viewpoint, long fermented sourdough is much easier on the digestive system than commercial store bought white bread, thanks to natural enzymes that break down gluten during the slow fermentation period. It provides sustained energy without sharp blood sugar spikes, making it a delicious, nutrient dense choice for fitness enthusiasts and healthy eaters alike.
Making your own jarred sourdough also opens up a world of culinary creativity that allows you to customize each single serving loaf to your exact personal taste preferences. You can keep one jar simple and classic, while adding fresh herbs, cracked black pepper, garlic, or shredded cheddar cheese to another jar in the same batch. This flexibility ensures that everyone in your family gets the exact flavor profile they crave without extra effort. It is also an ideal cooking project to do with kids, as it teaches them about natural food chemistry in a visual, hands on way that feels more like an exciting science experiment than a kitchen chore. Once you experience the golden crust, rich aroma, and deep savory flavor of fresh sourdough baked right in a glass jar, it will quickly become a favorite ritual in your weekly cooking routine.
Ingredients You Will Need
Active sourdough starter that is bubbly and fed, 100 grams Unbleached all purpose flour or bread flour, 250 grams Warm pure water around 80 degrees Fahrenheit, 175 grams Fine sea salt or pink Himalayan salt, 5 grams Pure olive oil or avocado oil for greasing the jars, 10 grams
Step by Step Method
Step 1: Preparing Your Starter Make sure your sourdough starter is active, healthy, and very bubbly before you begin your recipe. Feed your starter about four to six hours before you plan to mix your dough, keeping it in a warm spot in your kitchen. You will know it is ready to use when it has doubled in size and looks filled with small air bubbles. If you drop a small spoonful of starter into a bowl of room temperature water and it floats on top, it is perfectly ready for baking.
Step 2: Mixing the Main Dough In a clean medium glass mixing bowl, pour in the warm pure water and add your active sourdough starter. Stir the mixture gently with a wooden spoon or spatula until the starter dissolves into the water, creating a milky white liquid. Add the flour and sea salt into the bowl. Stir everything together until all the dry flour disappears and a shaggy dough forms. Cover the bowl loosely with a clean damp kitchen towel and let it rest undisturbed for 30 minutes. This resting phase helps the flour fully absorb the water and makes the dough much easier to handle.
Step 3: Stretching and Folding Instead of heavy traditional kneading, sourdough loves a gentle technique called stretching and folding. After the 30 minute rest, wet your hands with a little water to keep the dough from sticking to your fingers. Reach down into the side of the bowl, grab one edge of the dough, gently stretch it upward toward the ceiling, and fold it over the center of the dough mass. Rotate the bowl a quarter turn and repeat this stretching and folding motion. Do this four times until you have stretched all four sides of the dough. Cover the bowl again and repeat this stretch and fold process three more times, spacing each session 30 minutes apart over the course of two hours. You will notice the dough getting smoother, glossier, and more elastic after each round.
Step 4: The Main Bulk Fermentation Once you finish your last stretch and fold, cover the bowl tightly with plastic wrap or a bowl cover. Set the bowl in a cozy, draft free place in your house to rise naturally. Let the dough ferment for four to six hours, depending on how warm your home is. The dough is finished with bulk fermentation when it has grown by about 50 percent in volume, shows visible air bubbles on the surface, and jiggles slightly when you shake the bowl gently.
Step 5: Preparing the Jars Choose two wide mouth heat safe mason jars that can safely withstand high oven temperatures. Wide mouth jars are essential because they allow the finished bread to slide out easily without getting stuck inside. Using a pastry brush or clean paper towel, coat the entire inside surface of each jar thoroughly with oil. Make sure you cover the bottom and all the inner sides evenly so the bread does not stick during the baking process.
Step 6: Portioning and Final Rise Gently tip your fermented dough out onto a lightly floured clean counter. Divide the dough into two equal portions using a bench scraper or knife. Gently shape each piece of dough into a smooth round ball by rolling it lightly on the counter surface. Lift each dough ball carefully and place one into each greased wide mouth jar. Cover the top of each jar loosely with a damp cloth or plastic wrap. Let the dough undergo its final rise inside the jars for one to two hours, until it reaches about two thirds of the way up the sides of the jar and looks nice and puffy.
Step 7: Preheating and Baking Preheat your oven to 420 degrees Fahrenheit. Remove the cloth or plastic wrap from the tops of your jars. Using a sharp razor blade or knife, cut a small slash across the top of each dough ball inside the jars to help control how the bread expands as it bakes. Place the open jars carefully on a baking sheet and slide them onto the middle rack of your oven. Bake at 420 degrees Fahrenheit for 30 to 35 minutes until the tops are deep golden brown and the interior reaches an internal temperature of 205 degrees Fahrenheit.
Step 8: Cooling Down Using thick oven mitts, carefully remove the hot baking sheet with the jars from the oven and set it on a wire cooling rack. Let the jars cool down for at least 20 minutes until they are comfortable to handle. You can run a thin butter knife around the inside edges of the jar to loosen the crust if needed, then gently tip the jar upside down to slide out your beautiful single portion sourdough bread. Allow the bread to cool completely on a wire rack before slicing to prevent the inside from becoming gummy.
Why This Recipe Is Special
This sourdough in a jar recipe is special because it completely removes the high barrier to entry that usually stops people from baking artisan sourdough at home. Standard sourdough baking often requires long hours of manual shaping, expensive specialized baskets, heavy cast iron cookware, and advanced kitchen skills. By utilizing a common glass jar, the dough receives direct support along its sides as it rises and bakes, ensuring a tall, round, gorgeous lift every single time without requiring complex shaping techniques. It is an extremely forgiving method that delivers professional bakery quality results right in your own home kitchen.
From a health perspective, natural sourdough fermentation offers incredible nutritional benefits that standard commercial bread simply cannot match. The wild yeast and lactic acid bacteria present in the sourdough starter work together over many hours to break down phytic acid, an antinutrient naturally found in grain that can block mineral absorption in the human digestive system. This long fermentation process neutralizes phytic acid, making essential minerals like iron, zinc, magnesium, and calcium far easier for your body to absorb. Additionally, the bacteria partially digest the gluten proteins in the flour, making sourdough much gentler on sensitive stomachs that often experience bloating or discomfort from fast acting commercial bread yeast.
The unique taste profile of jar baked sourdough is another major reason this recipe stands out from the rest. Because the dough bakes inside a tall, enclosed vessel, the bottom and sides develop a satisfyingly crisp, buttery crunch, while the top forms a classic rustic crust. The inside crumb stays remarkably moist, soft, and chewy with a tangy, complex flavor profile that only slow natural fermentation can create. It offers a wonderful balance of rich savory notes and mild sourness that elevates simple toast, sandwiches, and soup pairings into a gourmet dining experience.
Extra Tips for Better Taste
Boost the flavor profile of your jar sourdough by adding delicious savory mix in ingredients during your final stretch and fold step. Fold in a quarter cup of shredded sharp cheddar cheese, finely chopped fresh rosemary, roasted garlic cloves, or sun dried tomatoes into the dough. The heat inside the jar during baking melts the cheese and infuses the aromatic herbs directly into the crumb, creating an incredibly flavorful bread that tastes amazing completely on its own with a light smear of butter.
For an extra crispy and golden top crust, spray a tiny fine mist of clean water onto the top of the dough right before you slide the jars into the hot oven. The water droplets create immediate steam on the surface of the dough, which delays crust setting for a few minutes and allows the loaf to achieve a maximum rise while producing a blistered, crunchy outer texture. You can also sprinkle coarse sea salt flakes, sesame seeds, or poppy seeds on top of the slashed dough for added crunch and visual appeal.
If you enjoy a much stronger, tangier sourdough flavor, you can utilize cold temperature fermentation. After placing your dough balls into the oiled glass jars, cover them securely and place the jars inside your refrigerator overnight for 12 to 18 hours instead of letting them rise at room temperature. The chilly environment slows down the yeast while allowing the beneficial lactic acid bacteria to keep producing rich sour flavors. Bake the jars directly from the fridge the next morning, adding just five extra minutes to your total baking time.
Final Thoughts
Baking sourdough bread in a jar is a deeply rewarding kitchen activity that brings simplicity, joy, and incredible flavor back to home baking. It takes away the stress of complex bread making while delivering perfect single portion loaves that feature an amazing texture and rich health benefits. Whether you are baking for yourself, sharing a unique homemade meal with loved ones, or gifting a cute jar loaf to a friendly neighbor, this recipe is guaranteed to bring warmth and happiness to your home. Give it a try this week and enjoy the cozy aroma of fresh bread filling your kitchen.
Nutrition Details
Below is the estimated nutritional breakdown for this sourdough bread in a jar recipe. The table provides clear information for the total recipe yield as well as per individual serving jar.
Nutritional Content Table
Nutrient Component | Amount Per Single Jar Serving | Total Recipe Amount Two Jars Calories | 460 kcal | 920 kcal Total Carbohydrates | 92 grams | 184 grams Dietary Fiber | 4 grams | 8 grams Sugars | 1 gram | 2 grams Protein | 13 grams | 26 grams Total Fat | 6 grams | 12 grams Saturated Fat | 1 gram | 2 grams Monounsaturated Fat | 4 grams | 8 grams Sodium | 980 milligrams | 1960 milligrams Calcium | 25 milligrams | 50 milligrams Iron | 4 milligrams | 8 milligrams Potassium | 140 milligrams | 280 milligrams
Disclaimer
Every human body reacts uniquely to different foods, ingredients, and natural fermentation levels. The health information and nutritional estimates provided in this article are intended for general educational purposes only and should not replace professional medical advice, diagnosis, or treatment. If you have severe gluten sensitivities, celiac disease, or specific metabolic health conditions, please consult with a qualified healthcare professional or registered dietitian before introducing new fermented foods into your daily diet.