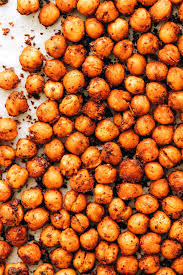
Welcome to the ultimate guide on roasting a batch of remarkably crunchy, deeply savory chickpeas right in your own home kitchen. This recipe focuses completely on showing you how simple and exceptionally rewarding it is to transform a humble can of beans into a premium, snack-able masterpiece without any complicated kitchen gadgets, deep fryers, or expensive store-bought bags. Many home cooks feel a bit frustrated when trying to make roasted chickpeas because the beans often turn out chewy, soft, or completely unevenly cooked. This guide takes away all those common kitchen frustrations by introducing a precise drying and roasting technique that unlocks an incredible, shatteringly crisp texture every single time. You are going to learn how a few basic pantry staples can combine under the perfect heat to create a beautiful, golden-brown snack featuring a loud, satisfying crunch and a rich, spice-infused finish. By following these clear and simple instructions, you will discover that making your own wholesome, high-fiber comfort snack is actually an effortless journey that anyone can master.
It is no secret that people absolutely love this particular recipe because it delivers a massive amount of satisfying, crunchy comfort with very little active effort. There is no need for deep-frying oil, heavy batters, or constant stove-top monitoring, meaning you can easily whip this up while working from home or relaxing on a quiet weekend afternoon. Snack lovers from all around the world adore this approach because it is highly customizable and fits seamlessly into any modern lifestyle focused on clean eating or mindful meal prep. The dry-roasting process inside a hot oven drives out the internal moisture of the beans, hardening the outer skins into thousands of brittle, crispy pockets that hold onto spices beautifully. People also appreciate the complete transparency of knowing every single whole food ingredient that goes into their snack bowl, providing total peace of mind for the entire family. There are absolutely no chemical preservatives, artificial flavor powders, or hidden hydrogenated oils tucked inside these roasted chickpeas—just pure, honest goodness you can feel incredibly proud to share.
There is a beautiful emotional magic that happens when the warm, savory aroma of toasted cumin, garlic, and sea salt begins to fill your entire home on a cozy evening. Making a large tray of these crispy chickpeas is the perfect activity for a casual movie night, a backyard gathering, or a quiet Sunday afternoon when you want to set yourself up with nutritious snacks for the busy week ahead. From a health and fitness perspective, this homemade option is a spectacular choice because chickpeas are naturally packed with a massive amount of clean, plant-based protein, complex carbohydrates, and essential dietary fiber to keep you feeling full and satisfied. Eating a handful of these real, roasted whole foods provides your body with steady, long-lasting energy to fuel your active day without causing the uncomfortable blood sugar spikes and crashes associated with highly processed potato chips. Whether you are looking for a satisfying post-workout recovery crunch or simply desire a fun, flavorful topping to elevate your evening soup or salad, this recipe fits every occasion beautifully, keeping your body thoroughly nourished and deeply satisfied.
Roasting your own chickpeas also establishes a wonderful connection to timeless Mediterranean and Middle Eastern snack traditions, where whole legumes are treated with simple respect, patience, and true culinary flair. This versatile recipe serves as a brilliant creative canvas, allowing you to easily experiment with a massive array of different flavor profiles—from sweet cinnamon-sugar to fiery hot chili-lime—once you become completely comfortable with the basic roasting structure. Taking a beautifully golden-brown, loudly crackling baking sheet out of a hot oven gives you a massive sense of personal achievement that tearing open a factory-processed plastic snack bag can never match. It encourages a much healthier and happier relationship with cooking because you realize that incredible, addictive crunch can be achieved through minimal processing and mindful attention from scratch. Your loved ones will rush straight to the kitchen counter the moment they hear the distinctive, musical rattle of the crisp chickpeas hitting the serving bowl, promising a fantastic shared snacking experience. This simple kitchen project transforms an ordinary, budget-friendly pantry staple into an extraordinary modern masterpiece that will quickly become a cherished favorite in your household’s routine.
Ingredients You Will Need
-
2 cans (15 ounces each) of chickpeas (also known as garbanzo beans)
-
2 tablespoons of extra virgin olive oil or avocado oil
-
1 teaspoon of garlic powder
-
1 teaspoon of smoked paprika
-
1 half teaspoon of ground cumin
-
1 half teaspoon of fine sea salt
-
1 quarter teaspoon of freshly cracked black pepper
Step by Step Method
Step One Rinsing and Draining
Start by opening your two cans of chickpeas and pouring them directly into a large mesh colander in your kitchen sink. Run cold, fresh tap water over the beans for about one full minute, stirring them gently with your hands to thoroughly wash away the thick, starchy canning liquid (aquafaba) and any excess sodium. Let the colander sit undisturbed in the sink for five minutes, allowing the bulk of the water to drain away naturally from the bottom of the pile.
Step Two The Ultimate Drying Phase
Dump the drained chickpeas directly onto a large, clean kitchen towel or several layers of sturdy paper towels spread flat across your counter. Roll the beans around gently beneath your hands, using a second towel to pat them firmly until the outer skins are completely dry to the touch. This drying phase is the single most important secret trick of the entire recipe; any trapped surface moisture will cause the chickpeas to steam inside the hot oven rather than roast, resulting in a soft, chewy texture instead of a uniform, loud crunch.
Step Three Peeling the Loose Skins
As you gently rub the chickpeas dry, you will notice that some of the translucent, paper-thin outer skins will naturally slide right off the beans. Take a quick minute to pick through the pile and discard any of these loose, detached skins. You do not need to meticulously peel every single chickpea by hand, but removing the loose skins that separate naturally helps prevent them from burning on the baking sheet and allows the oil and spices to adhere directly to the smooth surface of the bean.
Step Four The Initial Naked Roast
Turn your oven on to preheat to 400 degrees Fahrenheit so it reaches the perfect temperature while you finish preparing your workspace. Grab a large, rimmed metal baking sheet and spread your completely dry chickpeas across the surface in a single, flat layer, making sure the beans are not piled on top of each other. Slide the naked, dry tray onto the middle rack of your preheated oven and bake them completely bare for exactly fifteen minutes. This initial roast drives out any remaining internal moisture before any oil is applied.
Step Five Coating with Oil and Spices
Carefully remove the hot baking sheet from the oven using heat-resistant mitts. Drizzle the two tablespoons of extra virgin olive oil uniformly over the warm chickpeas, then sprinkle the garlic powder, smoked paprika, ground cumin, fine sea salt, and freshly cracked black pepper across the entire tray. Use a wide spatula or spoon to toss the beans vigorously directly on the hot sheet pan until every single chickpea is thoroughly coated in a glossy, beautiful layer of savory spiced oil.
Step Six The Final Crunch Roast
Spread the seasoned chickpeas back out into a strict single layer and slide the tray back into the 400-degree oven for an additional fifteen to twenty minutes. Every ten minutes, give the baking sheet a firm, gentle shake to roll the chickpeas around, ensuring that all sides hit the hot metal surface evenly. Watch closely during the last five minutes as the beans turn a deep golden-brown color and shrink slightly. Remove the pan from the oven and let the chickpeas cool completely on the tray for ten minutes, where they will finish crisping up into perfect, brittle, crunchy nuggets ready to be enjoyed.
Why This Recipe Is Special
This oven-roasted crispy chickpea recipe is exceptionally special because it provides an ingenious culinary shortcut that delivers a spectacular multi-sensory snack experience with zero processed chemical guilt. By utilizing a deliberate two-stage roasting method—baking the beans completely dry first before introducing the oil—you cleverly trap the heat to evaporate internal moisture, securing a genuine potato-chip-like crunch from a healthy legume. The recipe highlights the magnificent efficiency of simple pantry assembly, proving that deep-frying oil and commercial starches are entirely unnecessary when you master basic temperature control. It offers an incredible flavor profile that perfectly balances the earthy, nutty core of the garbanzo bean with the warm, smoky depth of paprika and aromatic garlic. Because the process requires no wheat-based coatings or gluten additives, it stands out as an outstanding, naturally vegan and gluten-free snack option that keeps the focus entirely on whole-food nutrition. This magnificent snack represents the ultimate expression of modern health-conscious comfort, bringing pure satisfaction to your pantry shelves.
Extra Tips for Better Taste
If you want to introduce a wonderful sweet and savory contrast to your roasted chickpeas, try replacing the savory spices with a mix of one tablespoon of coconut sugar and one teaspoon of ground cinnamon during the coating phase. For a lovely, bright kick that tingles your tongue, you can toss the hot chickpeas with a teaspoon of fresh lime zest and a tiny pinch of cayenne pepper immediately after they emerge from their final oven roast. You can also mix in a half cup of raw pumpkin seeds or sliced almonds during the last ten minutes of baking to create a magnificent, multi-textured, high-protein trail mix. Make sure not to overcrowd your baking sheet; if you are doubling the recipe for a massive party crowd, use two separate trays to ensure the hot air can circulate freely around each bean, preventing a soft texture. If you have leftovers, store them in a loose glass jar or a paper bag rather than a tightly sealed plastic container, as airtight plastic traps residual humidity and will cause the chickpeas to lose their signature crunch over time. Serving these hot, loud nuggets as a crispy crouton alternative over a bowl of creamy tomato soup introduces a magnificent contrast that will completely delight your family.
Final Thoughts
Roasting your own rustic tray of crispy chickpeas at home is a deeply satisfying and liberating culinary experience that brings pure simplicity, exceptional health, and incredible flavor back into your routine cooking. It stands as a beautiful testament to the idea that you do not need expensive specialty ingredients or complex kitchen machinery to produce a magnificent, crowd-pleasing snack that your loved ones will absolutely adore. As you watch the humble canned beans transform into a beautiful, golden masterpiece inside your oven and hear that crisp, musical crunch with every single bite, you will find genuine happiness in the peaceful art of whole-food cooking. This recipe is bound to become an absolute staple in your weekly meal prep schedule, bringing bright smiles, clean physical energy, and true satisfaction to your snack bowl. So open a couple of cans of chickpeas, dry them thoroughly with your favorite kitchen towel, toss them in savory spiced oil, and take your first step toward mastering this beautiful, effortless homemade masterpiece today.
Nutrition Details
The following nutrition information is based on an average estimate per individual serving when the completed two-can recipe is divided equally into four large, generous snack portions. Actual nutritional values can vary slightly depending on the specific brand of canned beans and the exact amount of olive oil used on your baking sheet.
| Nutrient Type | Amount Per Serving | Daily Value Percentage |
| Calories | 190 calories | 10 percent |
| Total Fat | 8 grams | 10 percent |
| Saturated Fat | 1 gram | 5 percent |
| Sodium | 340 milligrams | 15 percent |
| Total Carbohydrates | 22 grams | 8 percent |
| Dietary Fiber | 6 grams | 21 percent |
| Sugars | 1 gram | 0 percent |
| Protein | 7 grams | 14 percent |
Disclaimer
Please understand that every single human body is completely unique and individual nutritional requirements, metabolic speeds, or digestive health responses can vary significantly from person to person. The wellness insights and nutritional estimates shared throughout this article are intended strictly for general educational and informational purposes and must never be treated as official medical or professional dietary advice. If you have unique dietary restrictions, high-fiber sensitivities, or specific medical conditions related to sodium and carbohydrate management, please consult with a qualified doctor or certified dietitian before making significant changes to your eating routine. The creator of this recipe is an enthusiastic home cook sharing personal kitchen triumphs and does not claim to provide official medical or professional nutritional counseling.