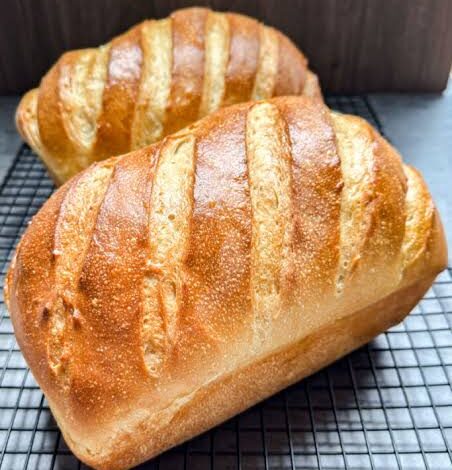
Welcome to the ultimate guide for making soft, fluffy, and delicious sourdough sandwich bread right in your home kitchen. This recipe is designed to help you create a loaf that has all the tangy flavor of traditional wild yeast baking while keeping the classic, soft slice structure that you want for daily sandwiches. Many people think that natural baking must result in a rock hard crust with huge holes that let all your favorite spreads drop through, but this recipe changes everything. You are going to learn how simple ingredients combine with natural fermentation to form a glorious loaf that holds together beautifully. Every single slice brings a gentle sour notes paired with a tender crumb that melts in your mouth, making your morning toast or afternoon lunch feel like a special event. Taking time to craft your own food from scratch brings a deep feeling of satisfaction that store bought items can never match.
People around the world are absolutely in love with sourdough sandwich bread because it brings back the joy of real, slow food in a fast moving world. Traditional artisan boules are wonderful, yet they are often tricky to cut into uniform shapes for school lunches or quick morning breakfasts. This sandwich style loaf gives you the best of both worlds by combining the health advantages of long fermentation with the convenient shape of a classic pan loaf. Home bakers adore how forgiving this soft dough can be once you understand the basic rhythm of mixing, resting, and baking. The aroma that fills your entire home while this bread rises and cooks is warm, comforting, and deeply inviting for your whole family. Kids love the soft texture that does not hurt their mouths, while adults appreciate the rich depth of flavor that only real sourdough starter can provide. It quickly becomes a beloved staple item in every household that tries it.
Making this loaf is an incredible choice whether you are seeking emotional comfort, unbelievable taste, or better physical fitness and health. From an emotional perspective, kneading and shaping dough is a wonderful way to slow down, clear your mind, and reduce daily stress after a busy workday. Tasting a warm slice fresh out of the oven with a generous layer of creamy butter is pure bliss for your taste buds. On the fitness and wellness side, naturally fermented bread is much easier on your digestive system compared to commercial loaves loaded with fast acting yeast and chemical preservatives. The slow fermentation process breaks down gluten proteins and phytic acid, allowing your body to absorb essential nutrients like iron, magnesium, and zinc much more effectively. If you want to feed your family clean, wholesome food that supports gut health while tasting extraordinary, this recipe is your perfect solution.
You will find that taking on this baking project creates wonderful memories and brings a genuine sense of accomplishment to your daily routine. Imagine waking up on a quiet weekend morning knowing that your fermented dough is ready to bake into a golden, delicious creation. The soft crumb inside stays fresh for days longer than ordinary homemade bread because the natural acids act as a biological preservative. Sharing a loaf with neighbors or serving it at a family gathering brings people together around honest, wholesome food. Beginners often feel nervous about working with natural starters, but this step by step approach breaks down every single phase into clear, easy tasks. By following these clear instructions, you will gain confidence, build your baking skills, and never need to buy processed store bread again.
Ingredients You Will Need
To make one full sized loaf of soft sourdough sandwich bread, gather the following simple and clean ingredients:
- Active and bubbly sourdough starter: 150 grams (fed within 4 to 8 hours)
- Warm water: 250 grams (filtered water works best)
- Unbleached bread flour: 500 grams (high protein flour gives the best rise)
- Whole milk: 60 grams (slightly warmed to keep dough happy)
- Unsalted butter: 30 grams (softened at room temperature)
- Pure honey or maple syrup: 25 grams (adds a tiny touch of sweetness)
- Fine sea salt: 10 grams (enhances flavor and strengthens gluten)
Step by Step Method
Step 1: Prepare Your Active Starter
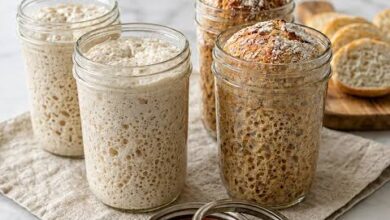
Make sure your sourdough starter is fully active and bubbly before you begin your mix. Feed your starter around four to eight hours before you plan to make your dough, keeping it in a warm spot in your kitchen. You will know it is ready when it has doubled in size, looks filled with small air bubbles, and smells pleasantly sweet and sour.
Step 2: Mix the Liquid Base
Take a large mixing bowl and add your active starter, warm water, warm milk, and honey. Stir these ingredients together gently using a wooden spoon or a dough whisk until the starter completely dissolves into a creamy liquid. This step ensures that your wild yeast is distributed evenly throughout the entire mixture before flour is introduced.
Step 3: Combine Flour and Form Dough
Add the unbleached bread flour into your liquid mixture. Stir well with your spoon or hands until all the dry flour is fully absorbed and a shaggy dough forms. Cover the bowl with a clean kitchen towel and let it sit undisturbed for thirty minutes. This quiet resting period is called autolyse, and it allows the flour to hydrate fully while making the dough much easier to handle.
Step 4: Add Salt and Soft Butter
Uncover your bowl and add the fine sea salt along with the softened unsalted butter. Work the butter and salt into the dough by squeezing and folding it with your hands. At first, the dough might feel slippery or separated, but keep working for about five minutes until the butter is fully incorporated and the dough becomes smooth and cohesive.
Step 5: Perform Stretch and Folds
Instead of intense traditional kneading, perform stretch and fold movements to build strength gently. Reach down to the bottom of the bowl, grab one side of the dough, stretch it upwards gently, and fold it over the top toward the center. Rotate the bowl a quarter turn and repeat this motion three more times until you complete a full circle. Do this set of stretches every thirty minutes for two hours, completing four sets total.
Step 6: First Bulk Fermentation
Cover your bowl tightly with plastic wrap or a wet cloth to prevent the surface from drying out. Place the bowl in a warm area in your house to rise for four to six hours. The exact time depends on the temperature of your home. You want the dough to grow by about fifty percent in volume, look slightly rounded on top, and show air bubbles under the surface.
Step 7: Shape the Sandwich Loaf
Lightly grease a standard nine by five inch bread loaf pan with butter or oil. Turn your fermented dough out onto a clean, lightly oiled workspace. Gently press the dough into a flat rectangle shape, pushing out any massive air bubbles. Fold the left side inward to the center, then fold the right side over it like a letter. Roll the dough up tightly from top to bottom into a firm log shape. Pinch the bottom seam closed with your fingers.
Step 8: Final Proof in the Pan
Place your shaped log of dough seam side down into your prepared loaf pan. Cover the pan loosely with a clean towel or plastic cover. Let the loaf proof at room temperature for two to four hours until the top of the dough rises about one inch above the rim of the pan. Alternatively, you can place it in the refrigerator overnight for a deeper sour flavor and bake it the next morning.
Step 9: Preheat Your Oven
When your loaf has finished rising and looks soft and puffy, preheat your oven to 375 degrees Fahrenheit or 190 degrees Celsius. Placing a small oven safe dish filled with water on the bottom rack creates a little steam, which helps the bread rise higher before the top crust sets.
Step 10: Bake to Golden Perfection
Place your loaf pan on the middle rack of your preheated oven. Bake for thirty five to forty minutes. The top of the loaf should turn a rich golden brown color. If you tap the top of the crust gently, it should sound hollow. If the top browns too quickly during baking, lay a small sheet of foil loosely over the top for the last ten minutes.
Step 11: Cool Completely Before Slicing
Remove the bread pan from the oven and let it sit for five minutes. Carefully tip the loaf out of the pan and place it onto a wire cooling rack. Allow the bread to cool completely for at least two hours before slicing into it. Slicing warm sourdough releases trapped steam and causes the inside crumb to become gummy, so patience is key for the best texture.
Why This Recipe Is Special
This sourdough sandwich bread recipe stands out because it blends healthy living with amazing flavor and convenient everyday use. Traditional bakery sourdough can sometimes have an intense crust that is tough to chew, making it difficult for children or older adults to enjoy as daily toast. This recipe solves that problem by adding small amounts of milk and butter, which softens the gluten structure without compromising the natural fermentation process. You get a light, cloud like interior crumb combined with a delicate golden crust that slices effortlessly into thin, even pieces for all your favorite sandwich creations.
From a wellness perspective, this recipe offers incredible advantages over commercially produced white or wheat bread. Modern factory bread relies on fast artificial yeast, chemical conditioners, and heavy preservatives that bypass the slow digestive work of nature. In contrast, this recipe relies on wild yeasts and beneficial lactic acid bacteria that slowly transform the flour over many hours. This natural process pre digests tough starches and breaks down complex proteins like gluten, making the final loaf gentle on delicate stomachs. People who often feel bloated after eating regular store bought bread frequently discover that they can enjoy this naturally fermented loaf without any discomfort.
The taste profile of this sandwich bread is another reason why it deserves a top spot in your baking routine. It carries a balanced flavor profile that is pleasantly rich, lightly buttery, and subtly sour without overpowering your sandwich fillings. The slight sweetness from the honey pairs beautifully with natural sea salt, creating a rich taste that elevates simple ingredients like turkey, cheese, peanut butter, or fresh avocado. Additionally, the natural acidity acts as a fresh keeping agent, allowing your loaf to stay soft on your counter for several days without going stale or developing mold prematurely.
Extra Tips for Better Taste
- Use warm milk instead of cold milk to keep your dough temperature warm and encouraging for wild yeast growth.
- Swap honey for maple syrup or brown sugar if you want a slightly different molasses note in your final loaf.
- Brush the top of your loaf with melted butter right after taking it out of the oven for an extra soft and shiny crust.
- Add a handful of mixed seeds like sunflower seeds, sesame seeds, or flax seeds over the top before baking for a wonderful nutty crunch.
- Keep your active starter happy by using clean, unchlorinated water, as chlorine can slow down natural bacteria.
- If you love a deeper sour flavor, let your shaped dough sit in the refrigerator overnight before baking it the following morning.
- Slice your loaf using a sharp serrated bread knife in a smooth sawing motion to prevent crushing the soft crumb.
- Store your sliced bread in an airtight container or cotton bread bag at room temperature to preserve fresh moisture.
- Freeze extra slices with small pieces of parchment paper between them so you can pop single slices straight into your toaster.
Final Thoughts
Baking your own sourdough sandwich bread is one of the most rewarding culinary journeys you can start in your home kitchen. It turns simple pantry staples like flour, water, and salt into an incredible staple food that nourishes your body and delights your senses. Do not worry if your very first loaf looks a little imperfect or rises slightly less than expected, because every attempt teaches you valuable lessons about temperature, timing, and dough texture. Enjoy the relaxing process of creating fresh food with your hands, and savor the unbeatable feeling of serving clean, homemade bread to those you love.
Nutrition Details
Here is the estimated nutritional breakdown for this sourdough sandwich bread recipe.
Recipe Total and Per Serving Overview
Nutritional MetricAmount Per Serving (1 Slice)Amount For Whole Loaf (12 Slices)
| Serving Size | 1 Slice (about 65g) | Entire Loaf (about 780g) |
| Calories | 165 kcal | 1980 kcal |
| Total Fat | 3 grams | 36 grams |
| Saturated Fat | 1.5 grams | 18 grams |
| Cholesterol | 7 milligrams | 84 milligrams |
| Sodium | 330 milligrams | 3960 milligrams |
| Total Carbohydrates | 29 grams | 348 grams |
| Dietary Fiber | 1.5 grams | 18 grams |
| Total Sugars | 2.5 grams | 30 grams |
| Protein | 5 grams | 60 grams |
| Calcium | 20 milligrams | 240 milligrams |
| Iron | 1.8 milligrams | 21.6 milligrams |
Disclaimer
This article is provided for informational and educational purposes only and should not be taken as professional medical or nutritional advice. Every individual body is unique, and individual health results or dietary tolerances may vary based on personal health conditions. While long fermentation reduces gluten levels and improves digestability for many people, this bread is not gluten free and is not suitable for individuals with celiac disease. Always consult with a qualified healthcare provider or registered dietitian regarding specific dietary needs or health concerns.