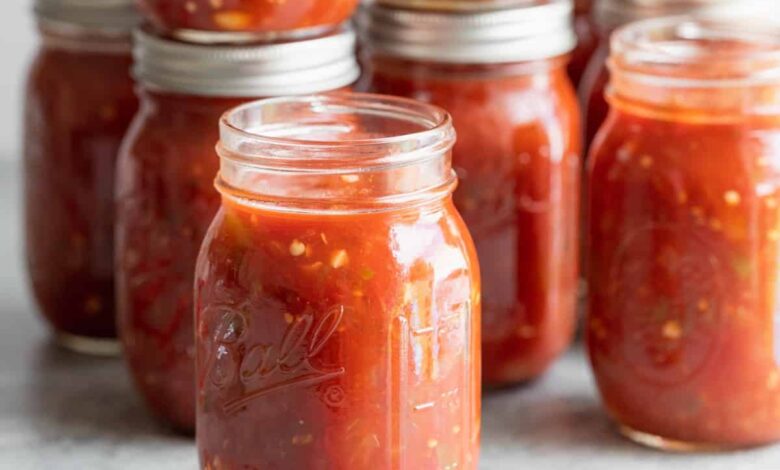
Canning homemade salsa is one of the most rewarding kitchen projects you can undertake when fresh garden vegetables are everywhere. When late summer arrives, gardens and local markets burst with ripe red tomatoes, crisp green peppers, sharp onions, and fragrant fresh cilantro. Taking all those fresh vegetables and turning them into shelf stable jars of delicious salsa allows you to capture the sunny taste of summer long after the cold winter months have set in. Making your own canned salsa at home means you know every single ingredient that goes into your food, leaving behind all the artificial preservatives, excess sodium, and mysterious gums often found in store bought options. This process blends simple cooking with a touch of basic science to create a rich, savory, and zesty condiment that brings instant flavor to any meal. Whether you are a seasoned gardener looking to preserve a bumper crop or a beginner cook curious about home food preservation, learning this process gives you complete control over your food supply and fills your pantry shelves with gorgeous, colorful jars you can truly be proud of.
People absolutely love homemade canned salsa because the depth of fresh flavor is completely unbeatable when compared to mass produced grocery store brands. Commercial salsas are often cooked down into a flat, overly sweet puree or packed full of sodium to extend their shelf life, which masks the vibrant taste of real, garden fresh produce. When you make salsa in your own kitchen, you get to experience the juicy burst of ripe tomatoes, the aromatic bite of freshly chopped garlic, and the bright, tangy kick of pure lime juice or vinegars. Beyond the incredible taste, there is a deep feeling of satisfaction and comfort that comes from popping open a jar of food you preserved with your own hands. Serving a bowl of homemade salsa to family and friends during game night, holiday parties, or simple family dinners always brings instant smiles and non stop compliments. The rich colors of bright red tomatoes and dark green peppers sparkling inside clean glass jars also make your kitchen feel warm, cozy, and well stocked, reminding everyone of traditional home cooking at its absolute best.
There are so many wonderful reasons and special occasions to start canning your own batch of delicious homemade salsa. For many home cooks, the primary motivation is emotional and seasonal, as it creates a beautiful family tradition of gathering in the kitchen to chop, simmer, and preserve summer produce together. For health conscious individuals and fitness lovers, homemade salsa is a true superfood companion because it is naturally low in calories, completely free of fat, and packed full of essential vitamins, antioxidants, and fiber. Instead of adding heavy, calorie dense sauces or sugary condiments to your daily meals, a big spoonful of fresh canned salsa adds huge flavor to lean grilled chicken, egg whites, rice bowls, and roasted vegetables without ruining your healthy lifestyle goals. Making salsa in large batches is also a smart financial choice that saves money on your monthly grocery bill while providing you with thoughtful, impressive handmade gifts for neighbors, teachers, and loved ones during holidays or special housewarming celebrations.
Embarking on this fun culinary adventure brings a wonderful sense of pride, healthy eating, and pure deliciousness into your daily routine. Every single jar represents time well spent, careful preparation, and a commitment to wholesome food made with real love. Once you experience the incredible difference between store bought versions and the homemade alternative, you will never want to go back to processed dips again. The gentle pop of sealing jar lids in your kitchen brings a rewarding sense of accomplishment that connects you to generations of home cooks who knew the value of preserving real, honest food. As you read through the step by step guidelines below, you will see how accessible, safe, and enjoyable home canning can be, even if you have never processed a single jar in your life. Get your cutting boards ready, sharpen your favorite chef knife, and get prepared to fill your home with the amazing aromas of simmering tomatoes, fresh garlic, and delightful spices that will make your mouth water.
Ingredients You Will Need
To make a safe, delicious, and high quality batch of canned salsa, you must use fresh ingredients along with the correct acid levels for safe preserving. Here is everything you need:
-
8 cups ripe tomatoes, peeled, cored, and finely chopped (about 4 pounds of fresh tomatoes)
-
2.5 cups green bell peppers, cored, seeded, and finely chopped
-
2 cups yellow onions, peeled and finely chopped
-
1 cup jalapeno peppers, seeded and finely chopped (adjust quantity slightly for heat preferences)
-
6 cloves fresh garlic, peeled and finely minced
-
0.5 cup commercial bottled lime juice or bottled white vinegar with 5 percent acidity
-
2 teaspoons canning salt or pure sea salt without iodine
-
1 teaspoon ground cumin
-
1 teaspoon black pepper
-
0.5 cup fresh cilantro, finely washed and chopped
-
1 tablespoon granulated white sugar (optional, to balance tomato acidity)
Step by Step Method
Canning homemade salsa at home is easy when you follow clear, simple steps. Safe home canning relies on proper cleanliness and correct heating, so make sure to take your time and follow these instructions carefully.
Preparing Your Tools and Jars
Before touching any food, set up your workspace and canning equipment properly.
-
Gather six pint sized canning jars, along with six brand new flat canning lids and metal screw bands.
-
Wash the jars, lids, and bands thoroughly in hot, soapy water, rinsing them completely clean.
-
Place your empty clean jars standing upright into a large water bath canner filled with hot water.
-
Turn the stove heat to medium high and allow the water to warm up so the jars stay hot, which prevents the glass from cracking when hot salsa is added later.
Prepping the Vegetables
Preparing your fresh vegetables correctly ensures your salsa has the best texture and proper balance.
-
Bring a large pot of plain water to a rolling boil on your stove, and prepare a separate large bowl filled with cold water and ice cubes.
-
Cut a small X mark on the bottom of each tomato using a sharp knife.
-
Lower the tomatoes into the boiling water for about 30 to 60 seconds until you see the skins start to split open.
-
Lift the tomatoes out using a slotted spoon and plunge them directly into the ice water bowl.
-
Peel away the loosened skins using your fingers, slice out the tough core center, gently squeeze out excess seeds, and chop the remaining tomato flesh into small, uniform pieces.
-
Chop your green bell peppers, onions, jalapenos, and garlic into small, neat pieces. Wear gloves while cutting jalapenos so the chili oils do not irritate your hands.
Simmering the Salsa Mixture
Cooking the ingredients brings out rich flavors and ensures the salsa reaches a uniform temperature before filling the jars.
-
Combine the chopped tomatoes, bell peppers, onions, jalapenos, and garlic inside a large, heavy bottomed stockpot.
-
Pour in the commercial bottled lime juice or white vinegar, making sure not to reduce this amount because acid is necessary for safe canning.
-
Add the canning salt, ground cumin, black pepper, and granulated sugar if you prefer a subtle hint of sweetness.
-
Stir all the ingredients together thoroughly using a long wooden spoon.
-
Turn the burner heat to medium high and bring the entire salsa mixture to a full, rolling boil while stirring continuously.
-
Reduce the stove heat slightly to medium low, add the chopped fresh cilantro, and let the mixture simmer gently for about 10 minutes so all the flavors blend together nicely.
Filling the Canning Jars
Proper filling techniques prevent trapped air and allow jars to seal correctly.
-
Carefully lift one hot glass jar out of the warm water canner using a jar lifter tool, setting it down onto a clean kitchen towel placed on your counter.
-
Place a clean canning funnel into the top opening of the warm jar.
-
Ladle the hot salsa into the jar, leaving exactly one half inch of empty space between the top of the salsa and the top rim of the jar. This empty space is called headspace.
-
Slide a clean plastic bubble remover tool or a smooth butter knife down inside the jar walls to release any trapped air bubbles.
-
Recheck the headspace and add or remove a small spoon of salsa if necessary to keep that precise one half inch space.
-
Dip a clean paper towel into warm water and wipe the top glass rim of the jar completely clean so no food particles prevent a tight seal.
-
Center a clean flat lid on top of the jar, then screw the metal band over the lid until it is fingertip tight, meaning you turn it until you meet light resistance without forcing it super hard.
Processing in the Boiling Water Bath
Heat processing destroys microscopic organism spores and creates a vacuum seal on your jars.
-
Place the filled jars upright back into your water bath canner rack, ensuring the jars do not knock against each other.
-
Check that the warm water level covers the tops of all jars by at least one to two inches, adding extra warm water if necessary.
-
Put the heavy lid on your water bath canner pot and turn the heat to high until the water reaches a vigorous, rolling boil.
-
Begin your timer once the water reaches a continuous full boil, processing pint jars for exactly 15 minutes (adjust time upward if you live at high altitudes above 1,000 feet).
-
Turn off the stove burner after 15 minutes, remove the canner lid carefully away from your face, and let the jars sit undisturbed in the hot water for 5 extra minutes to cool down slightly.
Cooling and Checking Seals
Allowing jars to cool without interference creates strong, lasting vacuum seals.
-
Use your jar lifter tool to gently lift each hot jar straight up out of the canner, keeping them level so hot salsa does not touch the inner lid seal area.
-
Place the jars upright onto a thick towel on your kitchen counter, leaving two inches of space between each jar so air circulates freely.
-
Allow the jars to cool undisturbed at normal room temperature for 12 to 24 hours without touching, tightening, or pushing on the center of the lids.
-
Listen for rewarding little popping noises as the jars cool, which signals that a strong vacuum seal has formed successfully.
-
Test the seals after 24 hours by pressing down on the middle of each metal lid; if the lid stays firm and flat without flexing up and down, your jar is safely sealed.
-
Unscrew the outer metal bands, wipe the glass clean, label each jar with the current date, and store your sealed salsa in a cool, dark pantry for up to one year. Any unsealed jars must go into your refrigerator to be eaten right away.
Why This Recipe Is Special
This homemade canned salsa recipe stands out because it offers a perfect balance of traditional flavor, crisp vegetable texture, and uncompromising home safety standards. Many home recipes end up watery or overly acidic, but this formula achieves a thick, restaurant style consistency naturally without needing artificial thickeners or extra chemicals. The careful balance of natural tomato juices combined with controlled acidity creates a bright, fresh taste profile that appeals to adults and children alike. Cooking everything together for a short time keeps the peppers and onions delightfully tender while allowing the garlic and cumin to infuse deeply into every spoonful.
From a health standpoint, this salsa is a nutritional powerhouse packed with real wellness benefits. Tomatoes are exceptionally rich in lycopene, an important antioxidant that supports heart health and overall cell protection, which becomes even more accessible to your body after light cooking. Jalapenos and bell peppers deliver high amounts of vitamin C and vitamin A, boosting your immune system naturally with every single serving. Because you control the salt levels at home, this recipe contains significantly less sodium than commercial packaged dips, making it ideal for anyone monitoring their blood pressure. It contains zero processed oils, zero high fructose corn syrup, zero artificial colorings, and zero animal products, making it naturally vegan, gluten free, and low carbohydrate.
The taste profile of this salsa is wonderfully complex yet comforting. It begins with the rich sweetness of ripe summer tomatoes, moves into the savory warmth of garlic and onions, and finishes with a gentle, satisfying heat from fresh jalapenos alongside the crisp citrus notes of pure lime juice. It transforms simple, budget friendly meals into vibrant culinary experiences without requiring complex cooking skills. Knowing that you created such a flavorful, healthy, and high quality food product completely from scratch provides a genuine sense of emotional warmth and culinary satisfaction every single time you pop open a jar.
Extra Tips for Better Taste
Taking your homemade salsa from good to extraordinary requires just a few easy, expert tricks that food bloggers use to elevate their home recipes.
Choose Meatier Tomato Varieties
Using plum tomatoes like Roma or San Marzano makes a huge difference in texture. These tomato varieties contain far fewer seeds and significantly less water than standard beefsteak or slicer tomatoes. Using meatier tomatoes ensures your salsa naturally thickens up without having to simmer it for hours, keeping your vegetable pieces intact and crisp.
Roast Your Vegetables First
For a deeply smoky, authentic flavor, roast your tomatoes, peppers, and onions on a baking sheet under your oven broiler before chopping them. Charring the outer skins until they show dark spots caramelizes the natural sugars inside the vegetables, giving your finished canned salsa a fantastic depth of flavor that mimics traditional open flame Mexican cooking.
Keep Acid Levels Safe
Never reduce the total amount of bottled lime juice or commercial white vinegar specified in the recipe. Home canning requires a safe low pH level to prevent dangerous bacteria growth in shelf stable storage. Always use commercially bottled lime juice rather than fresh squeezed lime juice because bottled versions have a guaranteed, uniform acidity level required for safe food preservation.
Adjust Spice Levels Wisely
You can customize the heat levels easily without changing the safety of the recipe. If you prefer a mild salsa, replace some of the spicy jalapeno peppers with an equal amount of sweet mild bell peppers. If you love spicy food, leave the jalapeno seeds inside or swap out one jalapeno for a hotter serrano pepper, as long as the total volume of chopped peppers stays exactly the same.
Let Flavors Meld Before Judging
Salsa always tastes much better after sitting in sealed storage jars for a couple of weeks. While fresh salsa straight out of the pot tastes wonderful, allowing the canned jars to rest in your dark pantry gives the spices, garlic, acidity, and tomato juices time to blend into a unified, harmonious flavor profile.
Final Thoughts
Canning your own homemade salsa is a delightful journey that combines garden fresh produce, fun kitchen prep, and the ancient art of home food preservation. There is truly nothing quite like walking into your pantry on a cold day, grabbing a clear glass jar of bright red salsa made during the heat of summer, and sharing it with people you love. It turns simple tortilla chips, weekly taco nights, morning scrambled eggs, and plain baked chicken breasts into memorable, flavor packed meals. By following basic canning safety rules, using simple clean ingredients, and giving yourself time to enjoy the process, you create something far superior to any store bought alternative. Gather your fresh vegetables, set up your boiling water bath canner, and enjoy the wonderful satisfaction of filling your home shelves with delicious, healthy, custom crafted salsa today.
Nutrition Details
Here is the estimated nutritional breakdown for a standard serving size of homemade canned salsa. Values may vary slightly depending on your specific tomato variety and exact vegetable proportions used.
| Nutrient Name | Quantity Per Serving (2 Tablespoons / 30g) | Daily Percentage Value |
| Calories | 15 kcal | 1 percent |
| Total Fat | 0.1 grams | 0 percent |
| Saturated Fat | 0 grams | 0 percent |
| Trans Fat | 0 grams | 0 percent |
| Cholesterol | 0 milligrams | 0 percent |
| Sodium | 140 milligrams | 6 percent |
| Total Carbohydrates | 3.5 grams | 1 percent |
| Dietary Fiber | 0.8 grams | 3 percent |
| Sugars | 2.1 grams | 0 percent |
| Protein | 0.6 grams | 1 percent |
| Vitamin A | 350 International Units | 7 percent |
| Vitamin C | 12 milligrams | 15 percent |
| Calcium | 10 milligrams | 1 percent |
| Iron | 0.3 milligrams | 2 percent |
| Potassium | 125 milligrams | 3 percent |
Disclaimer
This article is provided strictly for educational, informational, and culinary entertainment purposes. Every individual human body is unique, and personal health reactions, dietary requirements, or nutritional needs may vary based on existing medical conditions. Always exercise standard kitchen safety practices when handling hot liquids, sharp knives, and boiling water canning equipment. Ensure you strictly follow tested, safe food preservation guidelines regarding acidity levels and processing times to maintain food safety in shelf stable storage. If you have specific dietary restrictions, severe food allergies, or medical concerns regarding sodium or acidic foods, consult a qualified medical professional or registered dietitian before introducing new preserved foods into your regular daily diet.