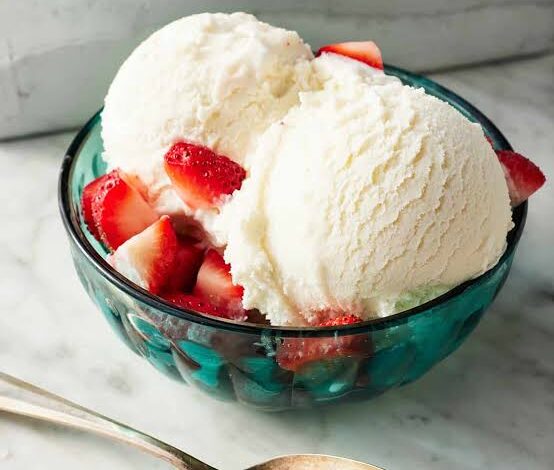
Homemade ice cream is a magical treat that brings absolute joy to anyone who gets to enjoy a cold scoop on a warm day. There is something deeply satisfying about making your own frozen desserts from scratch because you control every single ingredient that goes into the bowl. Many people think that making ice cream at home is too difficult or requires expensive machines that take up too much space on the kitchen counter. This recipe changes that belief completely because it shows you how to create a rich and velvety treat using simple tools you already own. The result is a smooth texture that melts beautifully on your tongue without any of the artificial preservatives found in store bought tubs. It has a pure clean taste that will make you appreciate the simple beauty of fresh dairy and sweet vanilla working together in harmony. If you want to impress your family or just treat yourself to a fun kitchen project this recipe is the perfect place to start.
People absolutely love this recipe because it is incredibly versatile and delivers a level of freshness that you simply cannot buy at a grocery store. When you make ice cream yourself you get to decide exactly how sweet it is and what fun mix ins to add during the freezing process. Beyond the amazing taste the actual process of watching liquid cream transform into a thick frozen treat feels like a beautiful science experiment. It is a wonderful activity to do with children or friends because everyone loves to watch the ingredients come together before choosing their favorite toppings. This recipe uses a classic base that is incredibly forgiving which means you do not have to worry about complex cooking techniques or burning a delicate custard. It is the kind of basic recipe that quickly becomes a staple in your household because it satisfies your sweet tooth perfectly every single time.
There are so many wonderful reasons and special occasions to make this beautiful dessert for yourself and the people you love. If you are celebrating a summer birthday or hosting a backyard barbecue a bowl of homemade ice cream makes the event feel ten times more special and memorable. On the other hand you might want to make it simply because you want a comforting sweet treat after a long and busy week at work. Making your own dessert allows you to customize the ingredients to fit your lifestyle which is great if you want to use organic dairy or alternative sweeteners. It brings back wonderful childhood memories of summer days and ice cream trucks while allowing you to create new traditions with your own family today. Choosing to create this treat is a beautiful act of love that fills your home with happiness and brings people together around the kitchen island.
The magic of this recipe lies in how peaceful and rewarding it is to create a decadent dessert from such simple everyday ingredients. Baking can sometimes feel stressful because you have to measure everything to the exact gram or risk ruining the entire cake in the oven. Ice cream making is much more relaxed because it is all about blending rich cream and sweet sugar to create the perfect flavor balance. As you whisk the cold cream and see the tiny specks of vanilla mix throughout the liquid you can feel yourself slowing down and enjoying the present moment. When you finally open the freezer and scoop out your first perfectly frozen batch you will feel a wonderful sense of pride in what you created. Sharing a bowl with a friend over a good conversation is a simple pleasure that makes life feel sweet slow and full of joy.
Ingredients You Will Need
To make this smooth and creamy homemade ice cream you will need to gather a few simple ingredients from the dairy aisle. Please make sure your heavy cream and whole milk are completely cold before you begin because cold dairy whips much better.
For the classic vanilla ice cream base you will need:
-
Two cups of heavy whipping cream with a high fat content
-
One cup of whole milk preferably full cream milk
-
Three quarters of a cup of white granulated sugar
-
One tablespoon of pure vanilla extract or vanilla bean paste
-
One tiny pinch of fine sea salt to balance the sweetness
For the optional classic mix ins you will need:
-
Half a cup of semi sweet chocolate chips or crushed sandwich cookies
-
Half a cup of fresh chopped strawberries or rainbow sprinkles
Step By Step Method
Please follow these detailed steps carefully to ensure your ice cream turns out perfectly smooth without forming large ice crystals during the freezing process.
Whisking the Sugar and Milk
Start by grabbing a large mixing bowl and pouring in the one cup of cold whole milk and the three quarters of a cup of white granulated sugar. Use a hand whisk to stir the milk and sugar together vigorously for about three to four minutes. You want to keep whisking until you can no longer see the sugar crystals at the bottom of the bowl because fully dissolved sugar ensures a smooth texture. Add the tiny pinch of fine sea salt and the tablespoon of pure vanilla extract to the milk mixture and whisk for one more minute until fully combined.
Adding the Heavy Cream
Pour the two cups of cold heavy whipping cream directly into the sweetened milk mixture in your large bowl. Stir everything together very gently with a spatula or a spoon just until the liquids are combined into a rich white base. Be careful not to whisk too hard at this stage because you do not want to whip the heavy cream into a thick structural cream just yet. Cover the mixing bowl tightly with plastic wrap and place it in the deepest part of your refrigerator for at least thirty minutes to make sure the entire base is completely chilled.
Churning with a Machine
If you are using an electric ice cream machine take your chilled base out of the refrigerator and give it one quick stir. Turn your ice cream machine on first then slowly pour the cold liquid base into the freezing bowl of the machine while it is running. Let the machine churn the mixture for about twenty to twenty five minutes according to the manufacturer instructions. Watch the liquid transform into a thick soft serve consistency that holds its shape beautifully on the moving paddle of your machine.
Freezing Without a Machine
If you do not own an ice cream machine pour your chilled liquid base directly into a deep stainless steel baking pan or a plastic container. Place the uncovered container into your freezer for about forty five minutes until the edges just begin to freeze and turn firm. Take the container out of the freezer and use a hand mixer or a strong fork to beat the mixture vigorously to break up any ice crystals that formed. Repeat this freezing and beating process every thirty minutes for about three hours total until the mixture becomes thick and creamy.
Adding the Fun Mix Ins
Right before your ice cream finishes churning or during your last hand mixing session it is time to add your favorite toppings and flavors. Gently fold in your half cup of chocolate chips crushed cookies or fresh fruit pieces so they are distributed evenly throughout the thick cream. Use a spatula to make sure the mix ins do not all sink to the bottom of the container. If you prefer a simple classic vanilla flavor you can skip this step entirely and leave the ice cream plain.
Hardening and Storing
Spoon the soft ice cream out of your machine or mixing pan and transfer it into a freezer safe container or a loaf pan. Press a piece of wax paper or plastic wrap directly onto the surface of the ice cream to prevent any ice crystals or freezer odors from forming on top. Place the container in the coldest part of your freezer and let it cure for at least four to six hours until it is completely firm and scoopable. When you are ready to serve let the container sit on the counter for two minutes to make scooping even easier.
Why This Recipe Is Special
This specific recipe is incredibly special because it relies on the perfect ratio of heavy cream to milk to create a luxurious texture without using raw egg yolks. Traditional ice cream recipes often require you to make a cooked custard on the stove using many egg yolks which can be very difficult for beginners because the eggs can easily scramble if the heat is too high. This egg free version bypasses that stressful step entirely making it a fast safe and foolproof method for anyone to try at home. It keeps the flavor incredibly clean and allows the true aromatic beauty of the vanilla extract to take center stage.
Another reason this recipe shines is because it teaches you how to control the texture of frozen desserts using simple physics and kitchen tools. By dissolving the sugar completely and keeping the dairy ice cold you prevent large water molecules from binding together into crunchy ice sheets. This ensures that even without fancy commercial equipment your final dessert remains velvety soft and premium in quality. It gives you the confidence to stop relying on store bought tubs that are often packed with corn syrup artificial dyes and gums.
Finally this recipe is special because it acts as a perfect canvas for your creative culinary imagination. Once you master this simple white base you can create hundreds of different flavors by simply swapping out the extracts or adding different swirls of caramel and chocolate sauce. It is a foundational recipe that opens up a whole new world of home dessert creation. It allows you to tailor your treats to match the season whether you want fresh peaches in the summer or crushed peppermint candy during the winter holidays.
Extra Tips for Better Taste
If you want to make your homemade ice cream taste like it came from an expensive artisan shop there are a few wonderful tricks you can try. First you can try upgrading your vanilla by using a real vanilla bean pod instead of standard liquid extract. Carefully split the bean pod open with a knife and scrape the tiny black seeds directly into your milk mixture to create beautiful visual flecks and a deeply complex woody flavor. You can also toast your mix ins like chopped pecans or walnuts in a dry skillet for two minutes before adding them to the cream to give them an amazing nutty crunch.
Another great tip is to keep your mixing bowls and storage containers inside the freezer for twenty minutes before you start working with the ingredients. Keeping your equipment freezing cold prevents the heavy cream from warming up while you mix which helps maintain the delicate air bubbles that make the ice cream fluffy. If you find that your homemade ice cream freezes a bit too hard in your freezer you can add one tablespoon of vegetable glycerin or a splash of standard vodka to the base liquid. Alcohol does not freeze which keeps the ice cream slightly softer and much easier to scoop straight out of the freezer.
For a fun flavor upgrade you can brown your butter in a saucepan and let it cool before whisking it into the milk base to create a rich butter pecan flavor. You can also steep fresh mint leaves or coffee beans in the warm milk for twenty minutes then strain them out before mixing in the heavy cream. This infuses the dairy with incredible natural flavors without changing the smooth texture of the dessert. Do not be afraid to taste your liquid base before freezing it to make sure the flavor profile is exactly where you want it to be.
Final Thoughts
Making your own homemade ice cream is a joyful journey that rewards your patience with a bowl of pure sweet comfort. This simple recipe proves that you do not need complicated factory processes or mysterious ingredients to create a dessert that tastes absolutely heavenly. It is an honest and delightful treat that brings a smile to people of all ages from young children to grandparents. I hope you enjoy the peaceful process of whisking the fresh cream and watching it turn into a beautiful frozen masterpiece. Grab your favorite spoon and share a batch with the people who bring sweetness to your life today.
Nutrition Details
Here is an estimated breakdown of the nutrition facts for one standard scoop of this delicious homemade vanilla ice cream. Please remember that adding extra mix ins like chocolate chips or cookies will increase these numbers accordingly.
| Nutrient Type | Amount Per Serving |
| Calories | Three hundred and ten calories |
| Total Fat | Twenty two grams of fat |
| Saturated Fat | Fourteen grams of fat |
| Carbohydrates | Twenty four grams of carbs |
| Total Sugars | Twenty three grams of sugar |
| Total Protein | Three grams of protein |
| Cholesterol | Eighty milligrams of cholesterol |
| Calcium | Eight percent of daily value |
Disclaimer
Please keep in mind that everyone has a unique body with different digestive system needs and health goals. This recipe is intended for general enjoyment and culinary education and should not take the place of professional medical advice or dietary planning. The nutritional numbers provided are close estimates calculated using standard dairy databases and your personal numbers may change based on the specific fat content of your milk and cream. If you have severe lactose intolerance dairy allergies or specific health conditions please consult with a qualified doctor or dietitian before enjoying this treat. Listen to your body and enjoy your sweet dessert journey safely and responsibly.