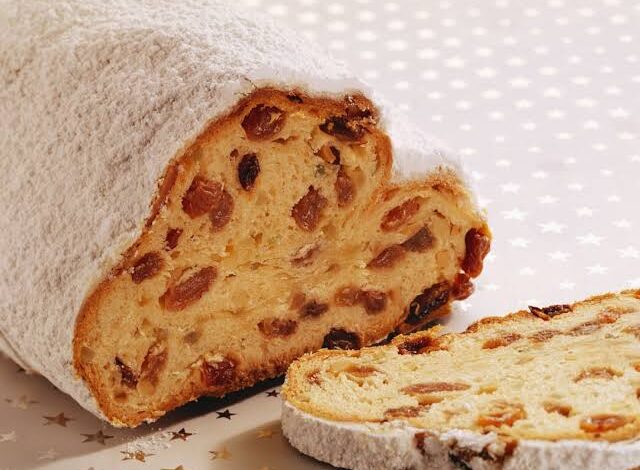
Butterstollen is one of the most classic and cherished holiday treats that people look forward to enjoying during the cozy winter months. This traditional German Christmas bread is packed with dried fruits, nuts, aromatic spices, and plenty of rich, high quality butter that gives it a wonderfully luxurious texture. When you take a bite of a freshly sliced piece, you immediately taste the warm flavors of orange peel, lemon zest, sweet raisins, and roasted almonds seamlessly blending together. What makes this recipe truly unique and magical is its remarkable ability to improve over time as it rests in a cool place. Instead of going stale or dry like ordinary baked goods, this sweet loaf grows more moist, tender, and deeply flavorful as the days go by. Baking this wonderful bread fills your entire kitchen with an irresistible sweet scent that immediately evokes warm memories of joyful holiday gatherings, bustling festive markets, and comfortable nights spent indoors with loved ones.
People all across the world absolutely fall in love with this special fruit bread because it offers an incredible depth of flavor that modern fast baked pastries simply cannot recreate. The secret behind its rich taste lies in the generous application of clarified butter melted over the warm surface and a heavy coating of powdered sugar. This sweet outer barrier acts as a protective shield that locks in all the moisture while allowing the internal ingredients to age gracefully over several weeks. Beginners and seasoned home bakers alike adore this recipe because it teaches patience and rewards your effort with a soft, rich slice of bread that tastes better with every passing day. Every bite delivers a harmonious blend of crunchy nuts, chewy fruit, soft yeast dough, and velvety sugar that melts effortlessly on your tongue. It provides an authentic experience of old world holiday baking that brings genuine happiness to the dining table during cold winter mornings or evening tea times with family and friends.
Preparing this classic Butterstollen is far more than just following a standard cooking recipe because it creates a deeply emotional and rewarding festive experience. Many families choose to bake their traditional loaves several weeks before the holiday season actually begins, establishing a meaningful tradition that brings people together in the kitchen. The slow process of chopping dried fruits, soaking them in fragrant liquids, gently kneading the rich yeast dough, and waiting patiently for it to mature creates a comforting sense of mindful calm. Enjoying a slice of this magnificent treat provides a cozy moment of sweet comfort during busy winter schedules, offering a delightful treat that pairs perfectly with warm coffee, spicy chai, or hot cocoa. Even for individuals who closely monitor their diet, this nutrient dense holiday loaf contains wholesome ingredients like crunchy almonds, fiber rich dried fruits, and real butter that provide clean energy and lasting satisfaction when enjoyed in thoughtful moderation.
This particular recipe is designed to be completely approachable for absolute beginners who might feel intimidated by complex yeast doughs or traditional holiday baking steps. You do not need any advanced culinary training or specialized commercial bakery equipment to create a gorgeous, bakery quality loaf right in your own kitchen home. The simple guidelines provided in this guide ensure that your yeast rises reliably, your fruit stays evenly distributed, and your crust develops the exact golden brown finish required for proper aging. By taking your time and allowing the simple, natural ingredients to harmonize over several days, you will produce a stunning centerpiece that serves as a magnificent gift for neighbors, coworkers, and cherished family members. Celebrating the holidays with a homemade treat that actually improves in quality as time passes brings a unique feeling of pride and genuine satisfaction that store bought sweets can never duplicate.
Ingredients You Will Need
To prepare two large, rich traditional loaves, you will need to gather the following simple and delicious ingredients in your kitchen:
-
500 grams of all purpose wheat flour
-
100 grams of fine granulated white sugar
-
42 grams of fresh compressed baker yeast or 14 grams of dry yeast
-
200 milliliters of whole lukewarm cow milk
-
250 grams of high quality unsalted butter softened at room temperature
-
1 half teaspoon of fine sea salt
-
1 whole teaspoon of pure vanilla extract
-
1 whole teaspoon of ground cinnamon
-
1 half teaspoon of ground cardamom
-
1 quarter teaspoon of ground nutmeg
-
1 quarter teaspoon of ground cloves
-
1 tablespoon of freshly grated orange zest
-
1 tablespoon of freshly grated lemon zest
-
200 grams of dark sweet raisins
-
100 grams of golden sultanas
-
100 grams of chopped candied orange peel
-
100 grams of chopped candied lemon peel
-
100 grams of blanched almonds finely chopped
-
50 milliliters of orange juice or dark rum for soaking the fruits
-
100 grams of melted clarified butter for brush coating
-
150 grams of powdered confectioner sugar for dusting
Step by Step Method
Preparing the Dried Fruit Mixture
Start your baking process one full day before you plan to make the yeast dough so that the dried fruits can absorb plenty of moisture. Place the dark raisins, golden sultanas, candied orange peel, and candied lemon peel into a large glass mixing bowl. Pour the orange juice or dark rum directly over the dried fruits and mix everything thoroughly using a large wooden spoon. Cover the bowl tightly with plastic wrap and let the mixture sit at room temperature overnight so the fruits become delightfully soft, plump, and juicy. Soaking the fruit prevents it from absorbing moisture from your dough later, ensuring your finished bread remains incredibly soft for weeks.
Activating the Fresh Yeast
Take your whole lukewarm cow milk and pour it into a medium sized measuring cup, making sure the liquid is warm to the touch but not uncomfortably hot. Crumble the fresh yeast directly into the warm milk and add one tablespoon of the granulated white sugar from your measured portion. Stir the liquid gently using a fork until the yeast dissolves completely into a smooth mixture. Place the cup in a warm spot on your kitchen counter for roughly ten to fifteen minutes until tiny bubbles appear on top and a thick foam forms over the surface, showing that your yeast is alive and fully active.
Mixing the Main Yeast Dough
Sift your all purpose wheat flour into a very large stainless steel or ceramic mixing bowl to remove any heavy lumps and create a light texture. Form a wide deep well right in the center of the flour using your fingers or the back of a large spoon. Pour the bubbly activated yeast liquid directly into the well along with the remaining white sugar, fine sea salt, vanilla extract, cinnamon, cardamom, nutmeg, and ground cloves. Add the freshly grated orange zest, lemon zest, and the soft room temperature unsalted butter cut into small equal cubes around the edges of the flour well.
Kneading the Dough
Use your clean hands or a electric stand mixer fitted with a sturdy dough hook attachment to combine all the ingredients together into a cohesive ball. Knead the dough steadily for about ten full minutes until it becomes exceptionally smooth, elastic, and completely releases from the sides of your mixing bowl. If the dough feels overly sticky during kneading, add one small tablespoon of extra flour at a time until it handles comfortably without clinging to your palms. The final dough should feel rich, supple, moderately firm, and warm under your hands.
Incorporating Fruits and Almonds
Uncover your soaked fruit mixture and drain away any tiny drops of excess unabsorbed liquid if necessary. Scatter the soaked fruits along with the chopped blanched almonds over your freshly kneaded dough ball inside the bowl. Gently work the fruits and nuts into the dough using your hands, folding the dough over itself repeatedly until every piece of fruit is evenly distributed throughout the batch. Take care not to crush the plump raisins excessively while folding the ingredients together into a single uniform loaf mass.
First Dough Proofing
Shape the fruit filled dough into a neat round ball and keep it inside the large mixing bowl. Cover the top of the bowl with a clean, slightly damp cotton kitchen towel to prevent the outer surface from drying out. Place the covered bowl in a warm, draft free location inside your home, such as an unheated oven with the interior light turned on. Allow the heavy dough to rest undisturbed for about one to two full hours until it visibly expands in volume and feels noticeably light and puffy when gently touched.
Shaping the Traditional Loaves
Transfer the rested dough onto a clean, lightly floured wooden work surface and divide it evenly into two equal sized portions using a bench scraper or sharp knife. Take one portion of dough and gently press it down into a thick oval shape using your palms. Create a long shallow indentation along the length of the dough oval using the side of your hand or a wooden rolling pin, slightly off center. Fold the smaller side of the dough over the larger side, leaving a distinct ridge running along the top length to form the iconic shape that mimics a swaddled infant. Repeat this exact shaping process with the second portion of dough.
Final Proofing and Baking Setup
Line a large heavy baking sheet with a sheet of high quality parchment paper to prevent sticking during baking. Carefully transfer both shaped loaves onto the prepared baking sheet, leaving at least four inches of empty space between them so they have plenty of room to expand. Cover the loaves loosely with a dry cloth towel and let them rest at room temperature for another thirty to forty five minutes until they swell slightly. While the loaves undergo their final rest, preheat your oven to 180 degrees Celsius or 350 degrees Fahrenheit with a rack placed directly in the middle position.
Baking the Loaves
Place the baking sheet with the raised loaves into the hot preheated oven and bake them for roughly forty to forty five minutes. Keep a close watch on the loaves after thirty minutes of baking time to check their surface color. If the tops begin to turn dark brown too quickly due to the natural sugars in the fruit, loosely lay a sheet of aluminum foil over the loaves to protect them while they finish cooking through the center. The loaves are fully baked when they display a deep golden brown crust and sound hollow when tapped lightly on the bottom.
Buttering and Sugaring Process
Remove the baked loaves from the oven and immediately place the pan on a heat resistant surface. While the loaves are piping hot, take a wooden toothpick and gently scrape off any burnt raisins sticking out on the outer crust to prevent any bitter tastes. Generously brush the entire hot surface of both loaves with melted clarified butter using a soft silicone pastry brush, ensuring the liquid soaks deep into every crevice. Dust a heavy layer of granulated white sugar over the buttered surface, followed immediately by a thick, heavy layer of sifted powdered sugar until the entire loaf is completely coated in a dense white blanket.
Aging and Storing the Bread
Allow the heavily sugared loaves to cool down completely to room temperature on a wire cooling rack over several hours. Once cooled, wrap each loaf tightly in a layer of parchment paper, followed by a double layer of sturdy aluminum foil to seal in all the rich aromas. Store the wrapped loaves in a cool, dark, dry area such as a pantry, cellar, or cold storage cabinet for at least one full week before slicing. As the days pass, the sugar layer absorbs the rich butter and natural fruit moisture, transforming the internal crumb into an unbelievably tender, rich, and flavorful delicacy that improves with every single day.
Why This Recipe Is Special
This wonderful holiday recipe holds a very warm place in traditional European baking culture because it celebrates the art of slow food and simple natural preservation. Unlike modern commercial breads filled with artificial preservatives, chemical stabilizers, and quick rising agents, this recipe relies on rich natural fats, wholesome dried fruits, and natural sugar to keep the bread fresh and soft over extended periods. As the butter and sugar sink deep into the baked crumb over several days, they create an exceptional texture that remains delightfully moist without ever becoming soggy or dense. The long aging process allows the complex essential oils from cardamom, cinnamon, cloves, citrus peel, and vanilla to slowly marry together, creating a rich flavor profile that tastes exponentially better on day ten than it does on day one.
From a nutritional perspective, enjoying a slice of this homemade bread offers many wholesome benefits when compared to standard processed store bought treats. The recipe includes substantial amounts of real nuts like blanched almonds, which provide healthy heart friendly fats, dietary fiber, plant protein, and important minerals like magnesium and vitamin E. The generous variety of dried fruits delivers natural fruit sugars alongside beneficial antioxidants and digestion aiding fiber that offer steady, long lasting energy. Furthermore, making this treat at home allows complete control over the quality of every single ingredient, ensuring you avoid hidden artificial colors, hydrogenated trans fats, and synthetic flavorings commonly found in mass produced holiday baked goods.
Extra Tips for Better Taste
-
Always choose high quality whole milk butter with a high fat content because the fat plays a critical role in preserving moisture and creating a rich melt in your mouth texture.
-
Clarify your butter before brushing it onto the hot baked loaves by gently melting it and removing the white milk solids that float to the surface, which prevents the crust from spoiling during long storage.
-
If you prefer a completely alcohol free version, soak your dried fruits in hot freshly squeezed orange juice, apple juice, or warm black tea for rich flavor and tenderness.
-
Be sure to brush the butter and apply the sugar while the loaf is piping hot right out of the oven so the sweet coating adheres firmly and forms a protective shell.
-
Toast your chopped blanched almonds lightly in a dry skillet over low heat for three minutes before adding them to the dough to release their rich nutty aromas.
-
Store your wrapped loaves in a cool room with a steady temperature around fifteen degrees Celsius for the absolute best texture development over time.
-
Never store your aging loaf in the refrigerator because cold, dry air speeds up starch recrystallization and dries out the soft interior crumb quickly.
-
Dust a fresh layer of bright white powdered sugar over the loaf right before slicing and serving to give it a beautiful, freshly fallen snow appearance on your table.
Final Thoughts
Baking a traditional Butterstollen at home is a truly magical culinary journey that fills your heart and home with warmth, delicious aromas, and sweet anticipation. Taking the time to craft something so special with your own hands reminds us of the true beauty found in slow, thoughtful home cooking. Whether you share these beautiful loaves with your immediate family during holiday breakfasts or give them as thoughtful wrapped gifts to beloved neighbors, this recipe guarantees genuine smiles and memorable moments around the table. Be sure to give your baked loaf plenty of time to age in a cool quiet spot, because as the classic saying goes, this incredible butter bread truly gets better with every single day that passes.
Nutrition Details
The following table provides estimated average nutrition values for the entire completed batch of two loaves as well as for an individual single serving slice.
| Nutrient Component | Value Per Entire Recipe Batch | Value Per Single Serving Slice |
| Total Servings | 24 Slices Total | 1 Individual Slice |
| Calories | 7200 Kilocalories | 300 Kilocalories |
| Total Carbohydrates | 864 Grams | 36 Grams |
| Dietary Fiber | 48 Grams | 2 Grams |
| Natural Sugars | 432 Grams | 18 Grams |
| Total Fat | 360 Grams | 15 Grams |
| Saturated Fat | 204 Grams | 8 point 5 Grams |
| Plant and Dairy Protein | 120 Grams | 5 Grams |
| Sodium | 1200 Milligrams | 50 Milligrams |
Disclaimer
The nutritional information provided in this article is intended for general educational and informational purposes only and represents an approximate calculation based on standard raw ingredients. Individual dietary needs, metabolic rates, health conditions, and physical activity levels vary significantly from person to person, meaning results and dietary impacts will differ for everyone. If you have specific dietary restrictions, severe food allergies, diabetes, or underlying medical conditions, please consult with a qualified healthcare professional or registered dietitian before introducing rich baked goods into your regular meal plan.