Rosemary Garlic Sourdough Bread Recipe
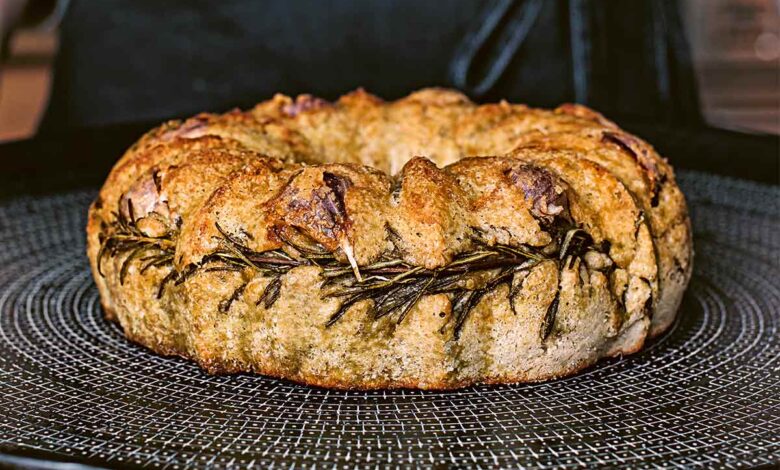
Baking bread at home is one of the most rewarding kitchen experiences you can ever have in your whole life. This particular rosemary garlic sourdough bread recipe brings together the deep tradition of classic sourdough baking with two rich natural aromatic ingredients that completely transform simple dough into something extraordinary. When you mix fresh rosemary herbs and roasted garlic cloves into a bubbly natural starter dough, you create a rustic loaf that looks like it came straight out of an old Italian bakery shop. The process of making this bread is slow and gentle, allowing natural wild yeasts and beneficial bacteria to work together over many hours to transform raw flour and clean water into a beautifully risen loaf. The outer crust bakes into a deep golden brown color that makes a wonderful crunchy crackling sound when you slice through it with a sharp serrated knife. Inside, the soft bread crumb is open, airy, fluffy, and filled with tiny specks of vibrant green herbs and fragrant soft garlic pockets. Every single bite offers a perfect balance of subtle natural tangy sourdough notes along with warm savory herbal warmth that fills your whole mouth. Learning how to craft this loaf step by step allows you to master fundamental artisan baking techniques while producing something genuinely nourishing and delightful for your loved ones.
People all across the world absolutely fall in love with this savory herbal bread recipe because of its incredible comfort and unforgettable flavor profile. There is a deeply satisfying sensory joy associated with baking sourdough that modern fast lifestyle habits often completely miss out on. As the loaf bakes inside a hot covered iron pot in your oven, your kitchen slowly fills with an irresistible homey smell of caramelizing garlic, warm toasted herbs, and freshly baked wheat flour that brings instant happiness to everyone nearby. Unlike plain standard white loaves bought from store shelves, this loaf carries real depth of character because long fermentation breaks down gluten and natural starches in a very gentle way. The texture is contrastingly wonderful, featuring a thick crispy outer skin alongside an tender moist soft interior that melts effortlessly on your tongue. People also love how versatile this bread is at any meal time throughout the week. You can toast a thick slice in the morning with simple salty butter, use it to build the ultimate gourmet melted cheese sandwich at lunch, or serve it alongside a warm bowl of hearty winter soup during cold dinner evenings. It is a true crowd pleaser that turns simple everyday meals into special memorable family dining moments.
There are so many wonderful reasons and special occasions that make baking this specific sourdough loaf a perfect activity for your week. On a quiet weekend morning, engaging in the calm ritual of stretching, folding, and shaping dough provides a peaceful grounding experience that lowers stress levels and brings true mindfulness to your mind. If you care deeply about healthy living and proper digestion, long natural sourdough fermentation is a massive benefit because wild cultures help pre digest complex starches, making nutrients easier for your body to absorb without feeling heavy or bloated. For food lovers who prioritize clean organic ingredients, baking your own loaf ensures complete control over what goes into your body, keeping out artificial preservatives, strange dough conditioners, extra sugars, and unwanted chemicals. From an emotional perspective, sharing a freshly baked, warm, fragrant loaf of homemade artisan bread with close friends or visiting family members creates a strong feeling of hospitality, togetherness, and love. Whether you are celebrating a cozy holiday dinner, hosting a relaxed Sunday brunch, or simply seeking a fun creative kitchen project to build your cooking confidence, this bread delivers unmatched taste, deep pride, and healthy wholesome energy every single time.
Starting your artisan sourdough journey with this particular savory flavor combination is an incredible choice for both absolute beginners and experienced home bakers alike. Many people initially feel nervous about working with wild natural yeast starters, fearing that sourdough baking is far too complicated, sensitive, or unforgiving for casual home kitchens. However, this straightforward recipe breaks down the entire procedure into soft, clear, manageable actions that anyone can follow with great success. Garlic and fresh rosemary work almost like magic together in this dough because their natural oils and savory characteristics enhance the tangy notes of sourdough without overwhelming the clean taste of wholesome fermented flour. As you follow the gentle schedule of mixing, resting, and shaping, you will quickly learn to read the signals of your dough through touch and visual cues rather than relying strictly on strict clock timers. Watching simple humble ingredients transform through natural biology into a massive golden artisan masterpiece is one of the most exciting kitchen transformations you will ever see. Once you pull your first steaming golden loaf out of the hot baking pot, you will feel an overwhelming sense of culinary accomplishment that inspires you to keep baking and sharing fresh wholesome bread forever.
Ingredients You Will Need
To achieve the absolute best flavor and perfect structural texture for your rustic savory loaf, gather these high quality basic ingredients with precise measures:
-
Active and Bubbly Sourdough Starter: 100 grams (fed about 4 to 6 hours before mixing so it is fully doubled and floating)
-
Unbleached Bread Flour: 400 grams (high protein wheat flour gives the best chewy bread structure)
-
Whole Wheat Flour: 100 grams (adds rich earthy flavor and healthy extra fiber to the crumb)
-
Clean Lukewarm Water: 350 grams (filtered water works best without harsh chlorine treatments)
-
Fine Sea Salt or Kosher Salt: 10 grams (enhances all rich savory flavors and strengthens gluten threads)
-
Whole Garlic Cloves: 1 medium whole head or 8 to 10 individual cloves (roasted gently until sweet and soft)
-
Fresh Rosemary Leaves: 2 tablespoons of finely chopped fresh leaves (dried rosemary can be tough, so fresh is best)
-
Pure Extra Virgin Olive Oil: 1 tablespoon (used to roast the garlic cloves and keep them juicy)
Step by Step Method
Step 1: Roasting the Sweet Soft Garlic
-
Preheat your standard cooking oven to 200 degrees Celsius or 400 degrees Fahrenheit.
-
Peel the loose outer paper layers off your whole garlic head without separating the individual cloves completely.
-
Slice about half an inch off the top tip of the garlic head so all internal individual cloves are slightly exposed.
-
Place the trimmed garlic head onto a small piece of aluminum foil and drizzle 1 tablespoon of extra virgin olive oil over the top.
-
Wrap the aluminum foil tightly around the garlic head to create a tiny completely sealed roasting pouch.
-
Bake in the hot oven for about 35 to 40 minutes until all garlic cloves become completely soft, tender, and lightly golden brown.
-
Remove the foil pouch safely from the oven and allow the garlic to cool completely down to comfortable room temperature.
-
Once cooled down, gently squeeze the soft sweet roasted garlic paste out of the papery skins into a clean small bowl and set it aside for later.
Step 2: Preparing the Fresh Green Rosemary
-
Take fresh green rosemary sprigs and strip all small pointed leaves off the tough woody central stems.
-
Place the leaves onto a clean wooden cutting board and chop them very finely using a sharp kitchen knife.
-
Measure out exactly 2 full tablespoons of the finely chopped fresh rosemary herbs and set them aside alongside your cooled roasted garlic.
Step 3: Mixing the Main Dough Base
-
In a large clean glass or ceramic mixing bowl, add 100 grams of active bubbly sourdough starter and 350 grams of lukewarm water.
-
Whisk the starter and lukewarm water together using a fork or Danish dough whisk until the liquid becomes milky and cloudy.
-
Add 400 grams of unbleached bread flour and 100 grams of whole wheat flour into the liquid mixture.
-
Stir everything together thoroughly until all dry flour patches completely disappear and a shaggy wet dough mass forms.
-
Cover the bowl securely with a damp kitchen towel or plastic cover and let it sit undisturbed for 30 minutes to rest. This quiet resting phase is called autolyse and helps the flour absorb water deeply.
Step 4: Adding Salt and Inclusions
-
Sprinkle 10 grams of fine sea salt evenly over the top surface of your rested dough mass.
-
Add a tiny splash of lukewarm water (about 10 grams) over the salt to help it dissolve smoothly.
-
Gently pinch and stretch the dough using clean wet hands to fully incorporate the salt evenly throughout the mixture.
-
Scatter your prepared chopped fresh rosemary leaves and soft cooled roasted garlic cloves evenly across the top of the dough.
-
Gently fold the dough over itself multiple times from all four sides until the herbs and soft garlic are distributed within the dough.
Step 5: Performing Bulk Fermentation Stretch and Folds
-
Keep the covered dough bowl in a warm draft free spot in your kitchen to undergo bulk fermentation.
-
Over the next 2 hours, perform a total of 4 sets of gentle stretches and folds spaced about 30 minutes apart.
-
To perform a stretch and fold, wet your clean hands with cold water to prevent sticking.
-
Reach down along the side of the bowl, grab the bottom edge of the dough, gently lift it upward without tearing it, and fold it over the top center.
-
Rotate the bowl 90 degrees and repeat this lifting and folding process on all 4 quarter sides of the dough.
-
Cover the bowl and let the dough rest quietly between each set. You will notice the dough becoming smoother, stronger, and more elastic after every single set.
-
After finishing all 4 sets, cover the bowl tightly and allow the dough to rest undisturbed for another 2 to 4 hours until it grows roughly 50 percent larger in volume, shows visible surface air bubbles, and feels light and airy.
Step 6: Preshaping the Loaf
-
Lightly dust a clean flat kitchen countertop surface with a sprinkle of unbleached bread flour.
-
Gently tip your fermented bubbly dough out of the bowl onto the floured surface without flattening out all the precious internal air bubbles.
-
Using clean hands or a bench scraper tool, fold the edges of the dough inward toward the center to form a loose round ball shape.
-
Flip the dough ball over so the smooth top side is facing upward.
-
Cup your hands gently around the back of the dough ball and pull it toward your body across the un-floured counter surface to create gentle outer skin tension.
-
Let the shaped round dough rest uncovered on your counter for 20 minutes to relax the internal gluten structure.
Step 7: Final Shaping and Banneton Proofing
-
Lightly dust a round bread proofing basket or a medium mixing bowl lined with a clean cotton kitchen towel using rice flour or regular flour.
-
Dust the top of your relaxed dough ball with a tiny bit of extra flour.
-
Flip the dough over so the smooth tensioned side is resting flat against the counter and the bottom sticky side faces up.
-
Gently pull the bottom edge down toward you, then fold it up into the middle.
-
Pull the left and right sides outward gently, then fold them over the center like folding an envelope letter.
-
Roll the entire dough top down into a tight smooth log or round boule, maintaining good surface tension across the outer skin.
-
Lift the shaped dough carefully and place it upside down into your prepared proofing basket, so the smooth top side rests at the bottom of the basket.
-
Stitch the bottom seam closed gently using wet fingers if it loosens up.
-
Cover the basket with a clean plastic bag or shower cap and place it into your home refrigerator for a long cold retard rest lasting 12 to 16 hours overnight. This long cold rest creates incredible deep sourdough flavor and makes the dough firm for easy scoring.
Step 8: Preheating Your Dutch Oven
-
The following morning, place a heavy iron Dutch oven pot complete with its thick lid inside your cold baking oven.
-
Preheat the oven with the pot inside to 230 degrees Celsius or 450 degrees Fahrenheit for at least 45 to 60 minutes so the iron becomes extremely hot throughout.
Step 9: Scoring and Baking
-
Take your cold firm bread dough directly out of the refrigerator.
-
Lay a piece of parchment paper over the top of the proofing basket, place a flat cutting board on top, and invert the basket quickly so the dough turns out smoothly onto the parchment paper.
-
Dust any excess rice flour gently off the surface of the dough with your hand if needed.
-
Using a very sharp bread razor or sharp kitchen knife held at a slight angle, make one deep clean slash across the top of the dough. This allows trapped steam to escape neatly and helps the bread expand upward in the oven.
-
Carefully pull the hot Dutch oven out of the main baking oven using heavy insulated oven mitts and remove the hot lid.
-
Using the parchment paper corners as handles, gently lift your scored dough ball and lower it safely into the center of the piping hot iron pot.
-
Cover the pot immediately with its hot lid to trap internal moisture and moisture released from the baking dough.
-
Place the pot back into the hot oven and bake covered at 230 degrees Celsius or 450 degrees Fahrenheit for exactly 20 minutes. The trapped steam creates a crisp shiny crust and allows maximum oven spring expansion.
-
After 20 minutes, carefully remove the lid from the hot pot. You will see a pale, hugely expanded loaf inside.
-
Lower your oven temperature slightly to 210 degrees Celsius or 410 degrees Fahrenheit and continue baking uncovered for another 20 to 25 minutes.
-
The loaf is done when the outer crust turns a deep golden dark reddish brown color and knocking on the bottom crust produces a clear hollow sound.
Step 10: Cooling the Loaf Properly
-
Carefully lift the baked bread out of the hot iron pot using the parchment paper edges and place it onto a wire cooling rack.
-
Resist all temptation to cut into the hot bread immediately, no matter how amazing your kitchen smells right now.
-
Allow the loaf to cool down completely for at least 2 full hours before slicing. Slicing warm sourdough traps internal moisture, turning the soft interior gummy and dense. Waiting gives you a perfect light fluffy crumb.
Why This Recipe Is Special
This particular artisan bread recipe holds a very special place in home baking because it offers an extraordinary balance of rich savory taste, high digestive benefits, and pure wholesome ingredients. Standard commercial bread sold in modern grocery stores relies heavily on fast commercial yeasts, added sugars, artificial preservatives, and synthetic dough improvers designed to speed up factory mass production at the expense of real nutrition and complex flavor. In sharp contrast, this long fermented sourdough recipe relies completely on natural biological fermentation driven by active wild yeast and beneficial lactic acid bacteria present in a simple flour starter. Over many hours of cool quiet rest, these helpful natural bacteria pre digest tough wheat starches and break down gluten proteins that frequently cause feelings of heavy stomach bloating or digestive discomfort in many people. This gentle slow biological process also releases locked up minerals within whole grains, such as iron, magnesium, zinc, and calcium, making them far easier for your body to absorb naturally during digestion.
From a culinary perspective, the addition of sweet roasted garlic and aromatic fresh rosemary lifts simple sourdough into a luxury gourmet category without adding complex cooking steps. Roasting whole garlic cloves changes harsh sharp raw garlic flavor into a silky, sweet, rich paste that melts directly into the warm crumb during baking. Fresh green rosemary brings natural woody pine-like oils that cut through the richness of the dough, leaving a clean, highly refreshing herbal aftertaste with every bite. The natural acidity of sourdough acts like a flavor highlighter, making all savory notes taste brighter and far more pronounced. Furthermore, the thick caramelized crust achieved by baking inside a sealed steam filled Dutch oven protects internal crumb moisture, keeping your homemade loaf fresh, soft, and delicious for many days on your kitchen counter without relying on chemical additives. It is a completely natural, deeply nourishing, and timeless way to feed yourself and your family.
Extra Tips for Better Taste
-
Use Fresh Herbs Over Dried Options: Fresh green rosemary sprigs contain vibrant volatile natural oils that fill the dough with incredible aroma. Dried rosemary leaves often remain sharp, tough, and needle-like inside soft bread crumbs, which can feel unappealing when chewing.
-
Roast Garlic Low and Slow: Make sure your garlic is roasted completely until it turns deep tan and butter soft. Raw or under-cooked garlic added to dough can ruin flavor balance and even hinder proper yeast activity due to harsh natural antibacterial properties found in raw garlic juice.
-
Try Garlic Infused Water: For an even deeper savory flavor profile, squeeze your roasted garlic paste directly into your lukewarm water measurement and whisk thoroughly before adding your flours. This spreads sweet garlic essence evenly into every single flour grain rather than having it only in scattered pockets.
-
Master the Steam Technique: If you do not own a heavy iron Dutch oven pot, you can create steam inside your regular baking oven by placing a deep metal roasting pan filled with boiling hot water on the bottom rack right under your baking stone or heavy sheet pan.
-
Keep Rice Flour Nearby: Dusting your shaping linen or proofing basket with pure rice flour completely prevents wet dough from sticking to the fabric edges, ensuring your beautifully shaped loaf slides out cleanly onto parchment paper every single time without tearing its delicate outer skin.
-
Store Your Loaf Correctly: Never store freshly baked crusty sourdough inside a closed plastic bag at room temperature, as trapped moisture will soften the crispy crust into a soft rubbery texture. Keep your sliced loaf wrapped in a clean cotton tea towel or placed inside a wooden bread box to maintain a crisp crust and soft interior.
Final Thoughts
Baking a homemade loaf of savory rosemary garlic sourdough bread is far more than just a simple cooking task; it is a creative, peaceful, and deeply satisfying journey that reconnects you with simple natural living. Taking basic humble ingredients like water, flour, salt, herbs, and garlic, and guiding them gently through natural fermentation into a grand golden loaf brings immense joy that fast modern food simply can never match. The beautiful sounds of a crackling fresh crust cooling on your counter and the rich mouth watering aromas drifting through your home will make all the patience and care completely worth your time. Share your fresh warm slices generously with good friends, serve them alongside hearty comforting meals, and enjoy every single bite knowing you created real nourishing magic right in your own kitchen. Keep practicing your folding and shaping techniques, listen to how your dough responds to seasonal room temperatures, and enjoy every single step of your artisan sourdough journey.
Nutrition Details
Here is an estimated full nutrition breakdown for the complete loaf recipe as well as per individual serving slice (assuming the finished loaf is cut into 10 equal generous slices):
Recipe Nutrition Table
Please note that these dietary numbers are good estimates based on standard high protein bread flours, whole wheat grains, pure olive oil, and medium garlic heads. Actual numbers can vary slightly based on specific flour brands and exact portion sizing used in your home kitchen.
Disclaimer
The nutritional information and health benefits described in this article are provided for general educational, culinary, and informational purposes only and should not be taken as professional medical advice. Every individual body functions differently, and biological reactions to natural food ingredients, including fermented wheat flour or wild yeast strains, can vary from person to person. If you have specific dietary restrictions, severe wheat allergies, celiac disease, or ongoing medical concerns regarding gluten consumption, please consult a qualified healthcare provider or certified dietitian before introducing new fermented foods into your regular daily eating routine.