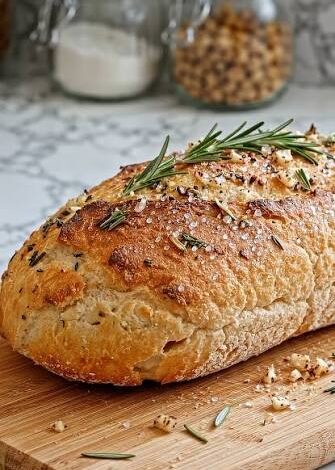
There is something truly magical about bringing a fresh loaf of homemade bread out of your hot oven. Many people feel scared of baking bread because they think it takes hours of tiring work and complex skill. This classic rustic recipe completely changes that idea and brings back the simple joy of baking in your own home kitchen. You do not need any special machinery or years of kitchen practice to achieve a bakery quality result today. With just a handful of basic ingredients and a good amount of patience while the dough rests, you will create a golden loaf that looks like it came from a fine French bakery. The smell of fresh garlic and fragrant rosemary floating through your warm home creates a deeply inviting feeling that instantly makes everyone feel comfortable and loved. Baking this loaf is an easy path to pure comfort and absolute deliciousness for anyone who wants to try it.
People all around the world fall in love with this specific recipe because it requires zero hard labor and never fails to impress. Traditional bread making often requires long minutes of pushing and pulling the dough on a floury counter, which can tire out your arms and make a huge mess. This simple method relies on the power of time to build structure and deep flavor inside the soft dough. As the mixture sits quietly on your kitchen counter overnight, tiny bubbles form naturally to build a gentle texture and rich aroma. When you lift the heavy lid of your hot pot, you are greeted with a stunning crust that crackles softly as it cools down. The beautiful contrast between the crisp golden crust and the soft airy center is something you usually find only in expensive specialty shops. It gives everyday home cooks absolute confidence in their baking abilities without causing any stress or frustration along the way.
You should make this warm loaf whenever you want to bring extra comfort and pure joy into your daily routine. It is the ultimate addition to a quiet Sunday dinner with your loved ones, a casual family gathering, or even a cozy evening alone with a big bowl of warm soup. The combination of rich roasted garlic and aromatic rosemary creates a deep sensory experience that warms your heart and satisfies your true cravings. Eating food made with real whole ingredients offers wonderful fuel for your daily energy and keeps your body feeling satisfied and strong. Sharing a fresh slice with melted butter creates unforgettable moments of pure happiness around the kitchen table. Food brings people together in wonderful ways, and this simple loaf acts as a hearty center piece for deep conversations and happy memories. It turns a regular afternoon into a special celebration of good taste and warm hospitality.
Taking the time to slow down and craft your own food offers a peaceful break from our fast paced modern lives. The gentle process of mixing water, flour, yeast, and salt allows you to clear your head and enjoy a rewarding creative task. You do not have to worry about complicated timelines or high stakes kitchen pressure when you follow this easy path. The dough quietly does all the heavy work while you go about your regular day or get a full night of good sleep. By the time you are ready to bake, you will feel a genuine sense of pride in what you have created with your own hands. The irresistible aroma that fills your entire living space acts as a wonderful reward before you even take your very first bite. This bread is a celebration of simple pleasures, good health, and the amazing comfort that only homemade food can bring to your family.
Ingredients You Will Need
To make this beautiful rustic loaf at home, you will need to collect a few simple ingredients from your local grocery store or pantry:
-
Bread flour or all purpose flour: 3.5 cups (420 grams)
-
Warm water (around 105 degrees Fahrenheit): 1.5 cups (360 milliliters)
-
Active dry yeast or instant yeast: 0.5 teaspoon (2 grams)
-
Fine sea salt or table salt: 1.5 teaspoons (9 grams)
-
Fresh rosemary (finely chopped): 2 tablespoons (6 grams)
-
Garlic powder or fresh minced garlic: 1.5 teaspoons (5 grams)
-
Extra virgin olive oil: 1 tablespoon (15 milliliters)
-
Extra flour for shaping and dusting: 3 tablespoons (25 grams)
Step by Step Method
Step 1: Prepare Your Mixing Bowl
Find a large glass or ceramic mixing bowl that gives your dough plenty of room to expand as it rests. Add your flour, salt, yeast, chopped fresh rosemary, and garlic powder into the bowl. Use a large spoon or a hand whisk to stir all these dry ingredients together thoroughly. Making sure the salt, yeast, and herbs are evenly mixed throughout the dry flour helps guarantee that every single slice of your baked bread carries delicious flavor.
Step 2: Combine the Wet and Dry Ingredients
Pour the warm water and extra virgin olive oil directly into your bowl of dry ingredients. Take a sturdy wooden spoon or a spatula and gently mix everything together until all the dry flour disappears. The mixture will look quite shaggy, wet, and messy at this point, which is completely normal for this type of recipe. Do not be tempted to add more flour or attempt to knead the dough with your hands. Once no dry spots of flour remain visible in the bowl, stop mixing.
Step 3: Allow the Long Slow Rise
Cover your mixing bowl tightly with plastic wrap or a clean damp kitchen towel to keep the air out. Set the bowl down in a warm, draft free spot on your kitchen counter where it can rest undisturbed. Let the dough rise for at least 12 hours, or up to 18 hours for the absolute best depth of flavor. During this long resting period, natural fermentation occurs, creating tiny air pockets and developing that classic sourdough like aroma that makes artisan bread so special.
Step 4: Preheat Your Oven and Heavy Dutch Oven
When your dough is big, puffy, and covered in tiny bubbles, it is time to get your oven ready. Place a heavy Dutch oven pot with its lid securely on inside your cold oven. Turn your oven to 450 degrees Fahrenheit (230 degrees Celsius) and let it heat up for at least 30 minutes with the pot inside. Heating the heavy pot while the oven warms up ensures that the intense heat will give your loaf an incredible initial rise and a super crispy crust.
Step 5: Shape the Sticky Dough
Lightly dust a large piece of parchment paper or a clean cutting board with flour. Gently scrape your sticky dough out of the bowl onto the floured surface using a spatula. Dust your hands with a little extra flour so the dough does not stick to your fingers. Gently fold the edges of the dough in toward the center a few times to create a smooth round shape. Turn the dough over so the smooth top side is facing up, resting on your parchment paper. Cover it loosely with a towel while the oven finishes heating.
Step 6: Bake Covered for the Ultimate Steam Effect
Carefully pull your very hot Dutch oven out of the main oven using thick oven mitts, and remove the lid safely. Grab the corners of your parchment paper and carefully lift the round dough into the hot pot. Place the heavy lid back on top of the pot immediately to trap the steam inside. Put the pot back into your hot oven and bake covered for 30 minutes. The trapped steam keeps the outer surface soft long enough for the bread to rise high before setting into a crisp golden shell.
Step 7: Bake Uncovered for Deep Color
After 30 minutes of covered baking, carefully remove the lid from your Dutch oven. You will see a pale, beautifully puffed loaf inside. Return the uncovered pot to the oven and bake for an additional 12 to 15 minutes. This step allows the outer crust to develop a rich golden brown color and a wonderful crackly texture. Watch the loaf closely toward the end to make sure it reaches your preferred level of deep golden goodness without getting too dark.
Step 8: Cool Completely Before Slicing
Use your mitts to carefully lift the baked bread out of the pot using the parchment paper edges. Transfer the loaf onto a wire cooling rack so air can circulate around the bottom. Allow the bread to cool down for at least 40 minutes before cutting into it with a serrated knife. Cutting into hot bread too early traps moisture inside and can make the center gummy or dense. Patience pays off with a soft, perfectly light texture inside every warm slice.
Why This Recipe Is Special
This unique baking method stands out because it removes every barrier that keeps everyday people from baking fresh bread. You do not need an expensive electric stand mixer, special bread pans, or physical strength to knead heavy dough for twenty minutes. The simple power of slow fermentation breaks down stars naturally, making the final loaf much easier on your digestive system compared to quick commercial bakery loaves.
Using real herbs like fresh rosemary provides natural plant compounds that support your overall health while offering incredible taste. Garlic contains wonderful natural properties that support your immune system, adding great functional nutrition to a simple basic carbohydrate source. Cooking with simple whole ingredients lets you completely avoid hidden sugars, artificial preservatives, or strange chemical additives that are often found in store bought options.
The incredible taste profile combines earthy herbs, savory garlic, and rich olive oil into a balanced savory experience. The exterior features a deep crackly crunch while the interior stays moist, chewy, and light. It brings the true luxury of an upscale European bakery straight into your home kitchen for a tiny fraction of the cost.
Extra Tips for Better Taste
-
Roast fresh garlic ahead of time: Squeeze soft roasted garlic cloves straight into your dough for a sweeter, milder flavor instead of using raw garlic or powder.
-
Add a splash of olive oil to the top: Brush the top of your loaf with extra virgin olive oil just before baking to yield a richer and shinier crust.
-
Include grated parmesan cheese: Fold a half cup of fresh grated parmesan or sharp cheddar cheese into the dry flour for a delicious cheesy twist.
-
Use sea salt on top: Sprinkle a few flakes of coarse sea salt over the top of the loaf right before it goes into the oven for extra pop and crunch.
-
Incorporate different fresh herbs: Mix in fresh thyme, oregano, or cracked black pepper alongside your rosemary to build your own custom flavor profile.
-
Store your loaf correctly: Keep leftover bread cut side down on a wooden board or in a paper bag to preserve the crispy outer crust for up to three days.
Final Thoughts
Baking a fresh loaf of rustic rosemary garlic bread is one of the most satisfying kitchen achievements you can enjoy at home. This foolproof process proves that delicious artisan food does not have to be complex, stressful, or high maintenance. With just a few minutes of active preparation and a little patience, you can serve a gorgeous golden loaf that brings genuine warmth, comfort, and big smiles to your dinner table. Give this simple recipe a try this week, and enjoy the wonderful magic of turning humble ingredients into pure culinary delight.
Nutrition Details
Here is the nutritional breakdown for this rustic loaf. The values are calculated for the whole recipe as well as for a single individual serving slice based on ten equal slices per loaf.
| Nutrients | Whole Loaf (Total Recipe) | Per Serving Slice (1 of 10) |
| Calories | 1850 kcal | 185 kcal |
| Total Carbohydrates | 360 g | 36 g |
| Dietary Fiber | 16 g | 1.6 g |
| Sugars | 6 g | 0.6 g |
| Total Protein | 48 g | 4.8 g |
| Total Fat | 18 g | 1.8 g |
| Saturated Fat | 2.5 g | 0.25 g |
| Sodium | 3500 mg | 350 mg |
| Potassium | 520 mg | 52 mg |
Disclaimer
Everyone’s body and dietary needs are completely different, so individual nutritional results may vary based on exact ingredient choices and brand variations. The nutritional information provided in this table is an estimate intended for general educational and informational purposes only. If you have specific dietary restrictions, health conditions, or allergies, please consult with a qualified health professional or registered dietitian before making significant changes to your regular meal plan.