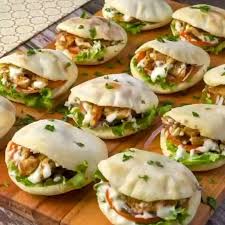
Making delicious homemade pita bread and warm shawarma pockets in your own kitchen is a wonderful experience that brings joy to both the cook and the people eating. This comprehensive guide is all about creating soft pita bread from scratch and filling it with juicy seasoned meat, crisp vegetables, and smooth sauce. You do not need to be an expert chef or have fancy bakery equipment to master this meal. Soft pita bread is a special kind of flatbread that inflates naturally when exposed to high heat inside an oven or on a hot stove skillet. That natural puffing creates a hollow center, which becomes a perfect pocket ready to hold rich fillings without breaking apart. When you pair this fresh warm bread with spiced chicken or beef, colorful fresh vegetables, and garlic sauce, you create an unforgettable dish. It brings the vibrant flavors of Mediterranean and Middle Eastern street food directly onto your family dining table in a clean, simple, and satisfying way.
People all over the world love this dish because it combines incredible texture with bold flavors in every single bite. Store bought pita bread often feels dry, stale, and tough, but warm pita bread made directly on your stove is amazingly soft, fluffy, and fragrant. The contrast between warm soft bread, tender spiced meat, cool crunchy cucumbers, juicy tomatoes, and creamy dressing creates a food sensation that feels truly special. Beyond the wonderful taste, people love the interactive nature of eating stuffed pockets. It is a fun meal where everyone at the table can customize their own pockets according to their personal preference. Children love watching flat rounds of dough swell up like small balloons over the heat, while adults appreciate eating authentic quality food made with clean ingredients that they can trust.
There are many great reasons to prepare this wonderful meal, ranging from cozy weekend family gatherings to healthy daily meal preparation. Food carries strong emotions, and serving warm homemade bread to people you care about communicates love and hospitality in a way few other things can. If you are focused on fitness or maintaining a balanced diet, this recipe is a major win because you control every single ingredient. Commercial fast food wraps are often loaded with extra sodium, low quality oils, and artificial preservatives. By making your own pita pockets at home, you can choose lean protein, fresh organic produce, healthy olive oil, and whole grain flour options. It is an ideal meal after a hard workout because it offers lean protein for muscle recovery along with healthy carbohydrates to replenish your body energy.
Whether you are planning a special dinner date at home, hosting a fun game night with good friends, or simply trying to break away from boring weeknight dinners, this recipe fits the occasion. The heavenly aroma of baking bread mixed with toasted spices will fill your whole house, making your living space feel warm and welcoming. Cooking this meal allows you to slow down, enjoy a creative process, and take pride in feeding your loved ones food that is both delicious and nourishing. Once you experience how easy and rewarding it is to craft soft bread and flavorful shawarma from basic ingredients, you will want to make this recipe a permanent part of your weekly cooking routine.
Ingredients You Will Need
To make the best pita bread and chicken shawarma pockets, you need simple items that are easy to find at any local grocery store.
For the Soft Pita Bread:
- All purpose flour: 4 cups (you can substitute 1 cup with whole wheat flour if preferred)
- Warm water: 1 and 1/2 cups (water should feel warm to the touch but not hot)
- Instant active yeast: 2 and 1/4 teaspoons (one standard packet)
- Pure white sugar: 1 tablespoon
- Fine salt: 1 and 1/2 teaspoons
- Extra virgin olive oil: 2 tablespoons
For the Spiced Shawarma Filling:
- Boneless skinless chicken thighs or chicken breasts: 1 and 1/2 pounds cut into small thin strips
- Olive oil: 3 tablespoons
- Fresh garlic cloves: 4 cloves finely minced
- Fresh lemon juice: 3 tablespoons
- Ground cumin: 1 teaspoon
- Ground coriander: 1 teaspoon
- Sweet paprika: 1 teaspoon
- Ground turmeric: 1/2 teaspoon
- Ground cinnamon: 1/4 teaspoon
- Ground black pepper: 1/2 teaspoon
- Salt: 1 teaspoon
For the Fresh Salad and Garnishes:
- Medium cucumber: 1 finely diced
- Ripe tomatoes: 2 finely diced
- Red onion: 1 small onion thinly sliced
- Fresh parsley: 1/2 cup finely chopped
- Shredded lettuce: 2 cups
For the Garlic Cream Sauce:
- Plain Greek yogurt: 1 cup
- Mayonnaise: 2 tablespoons
- Fresh garlic: 2 cloves finely pressed or grated
- Fresh lemon juice: 1 tablespoon
- Salt: 1/2 teaspoon
Step by Step Method
Step 1: Activate the Yeast Take a large bowl and pour in the warm water. Add the sugar and the yeast to the water and stir gently with a spoon. Let this bowl sit undisturbed for about 5 to 10 minutes. You will see small bubbles form on top of the liquid, and it will start to look frothy. This means your yeast is active and ready to make your dough rise properly.
Step 2: Prepare the Dough Add the olive oil, salt, and half of the flour into the yeast liquid. Stir the mixture with a wooden spoon until it turns into a smooth paste. Gradually add the remaining flour while stirring continuously. Once the dough comes together into a single sticky ball, turn it out onto a clean flat surface lightly dusted with extra flour.
Step 3: Knead the Dough Knead the dough with your hands for about 8 to 10 minutes. Push the dough down and away from you with the palms of your hands, then fold it back over itself. Continue this rhythmic movement until the dough becomes soft, smooth, and stretchy. If the dough feels too sticky to handle, sprinkle a tiny bit of flour over it, but be careful not to add too much flour or the bread will turn out dense.
Step 4: Let the Dough Rise Coat the inside of a large bowl with a little olive oil. Place your smooth dough ball into the bowl and turn it around once so the surface is lightly coated with oil. Cover the bowl tightly with a clean kitchen towel or plastic wrap. Place the bowl in a warm place in your kitchen for about 1 to 1 and 1/2 hours, or until the dough has doubled in total size.
Step 5: Marinate the Meat While you wait for your dough to rise, prepare your chicken filling. In a medium bowl, mix together three tablespoons of olive oil, minced garlic, lemon juice, cumin, coriander, paprika, turmeric, cinnamon, black pepper, and salt. Add the thin chicken strips to this spice mixture and mix well so every piece is coated. Cover the bowl and let it sit in the refrigerator for at least 30 minutes so the spices infuse into the meat.
Step 6: Form the Dough Balls Once the dough has doubled in size, press down gently on the dough to release the trapped air bubbles. Transfer the dough to a cutting board and divide it evenly into 8 equal pieces using a sharp knife. Roll each piece between your hands to create 8 smooth round balls. Place these dough balls on a tray, cover them loosely with a towel, and let them rest for 15 minutes. Resting allows the gluten to relax so rolling becomes easy.
Step 7: Roll out the Bread Take one dough ball and flatten it slightly with your hand on a floured surface. Use a rolling pin to roll the dough out into a circle that is about 6 to 7 inches wide and about one quarter of an inch thick. Keep the thickness even across the whole round so that it puffs up correctly when cooked.
Step 8: Cook the Pita Bread Heat a heavy cast iron skillet or flat pan over medium high heat until it is very hot. Place one rolled dough circle onto the dry hot pan without adding oil. Cook for about 30 seconds until you see small bubbles forming on top. Flip the bread over and cook the second side for about 1 minute until light brown spots appear. Flip it back to the first side again. Within a few seconds, the bread will miraculously inflate like a ball. Remove the hot puffed bread from the skillet and wrap it immediately in a clean cloth towel to keep it soft and pliable. Repeat this process for all dough pieces.
Step 9: Cook the Shawarma Heat a large skillet over high heat with one tablespoon of oil. Add the marinated chicken pieces to the hot skillet in a single layer. Cook the chicken without moving it for 3 to 4 minutes so it develops a nice brown crust. Flip the meat and cook for another 4 to 5 minutes until it is cooked completely through and slightly crisp on the edges.
Step 10: Make the Sauce and Assemble In a small bowl, whisk together the Greek yogurt, mayonnaise, pressed garlic, lemon juice, and salt until smooth. Cut each warm pita bread in half across the middle to reveal the interior pocket. Gently open the pocket with your fingers. Spread a generous spoon of garlic sauce inside the pocket. Stuff the pocket with warm shawarma meat, diced cucumbers, tomatoes, red onions, fresh parsley, and shredded lettuce. Serve immediately while warm.
Why This Recipe Is Special
This recipe stands out because it brings real gourmet flavor using basic everyday ingredients. Making bread at home gives you full control over what enters your body. Commercial packaged breads often contain chemical softeners, artificial preservatives, and extra sugars designed to extend shelf life. This homemade version contains only clean, wholesome elements that you select yourself.
From a health perspective, this dish offers a balanced nutritional profile. You receive high quality protein from lean chicken meat, which helps repair tissues and build strong muscles. The fresh vegetables contribute essential dietary fiber, vitamins, and minerals that aid digestion and boost immune strength. Garlic, lemon juice, and traditional spices like turmeric and cumin contain powerful natural compounds that help reduce body inflammation.
The taste profile is extraordinary. The contrast between warm, soft, freshly baked bread and hot, savory spiced meat creates deep satisfaction. The cool garlic yogurt sauce adds a rich tanginess that cuts through the bold spices of the meat, while the fresh raw vegetables add a crisp crunch that keeps the meal light and refreshing.
Extra Tips for Better Taste
To elevate your pita pockets to an even higher level of flavor, consider trying these helpful creative tips during preparation:
- Toast your dry ground spices in a warm pan for 30 seconds before mixing them into the meat marinade to unlock deeper aromas and richer flavor notes.
- Allow your chicken to marinate overnight in the refrigerator if you have enough time, which makes the meat exceptionally tender and full of flavor.
- Maintain high heat when cooking the pita bread because intense heat is the secret key that causes the steam inside the dough to expand quickly and create the hollow pocket.
- Brush the warm pita bread with a light coat of melted butter mixed with finely chopped fresh garlic as soon as it comes off the hot pan for extra indulgence.
- Add pickled turnip strips or pickled cucumbers inside the stuffed pockets to provide an authentic Middle Eastern street food tang.
- If you prefer spicy food, add a spoonful of red chili paste or hot sauce directly into your garlic yogurt mix.
Final Thoughts
Creating your own homemade pita bread and chicken shawarma pockets is a fun cooking adventure that yields delicious results. Nothing compares to the aroma of fresh dough rising in your kitchen and cooking on a warm skillet. This recipe is simple enough for absolute beginners to attempt with complete confidence, yet impressive enough to serve at special gatherings. Once you taste warm bread made by your own hands, you will rarely want to purchase prepackaged store varieties again. Gather your simple ingredients, follow these clear steps, and enjoy a wonderful culinary experience right in your home.
Nutrition Details
Here is the estimated nutritional breakdown per individual serving (recipe makes 8 complete stuffed pita pockets):
Nutrient ComponentValue Per Serving
| Total Calories | 420 kcal |
| Protein | 28 grams |
| Carbohydrates | 48 grams |
| Dietary Fiber | 4 grams |
| Sugars | 3 grams |
| Total Fat | 12 grams |
| Saturated Fat | 3 grams |
| Cholesterol | 65 milligrams |
| Sodium | 580 milligrams |
| Potassium | 450 milligrams |
Disclaimer
This recipe and its nutritional values are provided for general informational and educational purposes only. Individual dietary needs, metabolic responses, and health conditions vary from person to person. Nutritional content may change depending on the specific brands, ingredient substitutions, or portion sizes you choose to use. If you have specific food allergies, dietary restrictions, or medical concerns, please consult with a qualified healthcare professional or certified nutritionist before making changes to your regular meal planning.