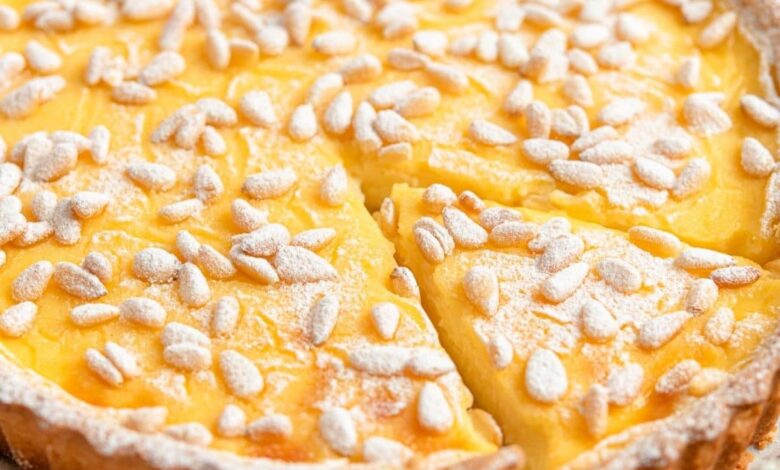
Welcome to one of the most delightful baking journeys you will ever take in your kitchen. Today we are exploring a truly timeless Italian dessert known as Torta della Nonna, which translates directly to Grandmother Cake in English. This traditional recipe comes from the famous region of Tuscany in Italy, where home cooks have passed it down from generation to generation for decades. At its heart, this dessert is a marvelous pie made with a rich and flaky sweet pastry dough that encloses a smooth custard filling. The smooth egg custard is gently infused with fresh lemon zest and pure vanilla, bringing a gentle citrus freshness that balances the rich dairy flavor perfectly. Before baking, the top crust is sprinkled with whole pine nuts, which become wonderfully warm and nutty in the oven. Finally, a light dusting of sweet powdered sugar covers the top like delicate winter snow, creating a dish that looks as beautiful as it tastes on any dessert table.
People all around the world fall deeply in love with this cake from the very first bite because of its incredible combination of textures and flavors. The contrast between the crunchy roasted pine nuts on top, the soft and buttery crust on the sides, and the warm creamy custard inside creates a pure sensation of comfort. Unlike many modern desserts that rely on artificial colorings, heavy frostings, or overwhelming sweetness, this cake relies on simple whole ingredients to deliver maximum satisfaction. Every slice offers a gentle balanced taste that is sweet without being heavy, making it appealing to adults and children alike. Cooking enthusiasts love it because it fills the entire home with the irresistible aroma of baked butter, fresh lemon, and warm vanilla while it sits in the oven. It represents the ultimate soul food in the baking world, reminding everyone of rustic Italian kitchens filled with warmth, laughter, and loving care.
There are so many wonderful reasons and special occasions to bake this cake in your own home. Emotionally, preparing this recipe offers a wonderful way to slow down, relax, and create lasting memories with family and loved ones on a quiet weekend. It is the perfect center piece for Sunday family lunches, holiday celebrations, birthday parties, or cozy afternoon tea time with good friends. From a taste perspective, nothing you can buy at a commercial grocery store can ever match the extraordinary flavor of freshly baked custard inside a golden homemade crust. From a health and fitness standpoint, making your own baked goods at home allows you to take complete control over what enters your body. You can select fresh high quality eggs, pure farm milk, real lemon zest, and unrefined ingredients while completely avoiding artificial preservatives, synthetic dyes, and processed oils found in packaged store snacks. Eating a slice of homemade cake made from real food ingredients provides quick clean energy for your day and serves as a rewarding mental treat after a tough week of workouts or work projects.
If you are a beginner who feels nervous about working with dough or making homemade custard from scratch, you can relax and feel confident today. This step by step guide is specifically crafted for beginners, breaking down every single technique into very easy and manageable actions. You do not need any fancy bakery equipment or advanced culinary training to achieve an authentic Italian bakery result in your own kitchen. All you need are standard cooking tools like a mixing bowl, a rolling pin, a saucepan, a whisk, and a regular pie pan or tart pan. By following these clear instructions, you will learn fundamental baking skills such as preparing sweet pastry dough and making smooth pastry cream. Baking this historic cake will build your confidence in the kitchen and reward you with a magnificent dessert that will impress your family and friends. Let us gather our simple ingredients and start creating this wonderful Italian pie together.
Ingredients You Will Need
To make this classic cake completely from scratch, we break down the ingredients into three simple sections: the pastry dough, the cream filling, and the lovely topping.
For The Sweet Pastry Dough
-
400 grams all purpose flour
-
200 grams cold unsalted butter cut into small cubes
-
150 grams granulated white sugar
-
2 large whole eggs at room temperature
-
1 extra egg yolk at room temperature
-
Zest of 1 fresh organic lemon finely grated
-
1 teaspoon baking powder
-
1 small pinch of fine table salt
For The Cream Custard Filling
-
750 milliliters whole milk
-
6 large egg yolks at room temperature
-
180 grams granulated white sugar
-
60 grams cornstarch
-
Large peeled strips of zest from 1 fresh organic lemon
-
1 teaspoon pure vanilla extract
For The Topping And Decoration
-
50 grams raw pine nuts
-
1 tablespoon milk or beaten egg white for brushing the top crust
-
2 tablespoons powdered sugar for final dusting
Step by Step Method
Step 1 Preparing The Sweet Pastry Dough
-
Take a large clean mixing bowl and sift the all purpose flour together with the baking powder and the pinch of salt to ensure there are no lumps.
-
Add the granulated white sugar and the finely grated lemon zest into the flour mix, then stir everything together with a spoon.
-
Drop the cold cubed unsalted butter into the flour mixture.
-
Use your clean fingertips to quickly rub the butter cubes into the flour until the mixture looks like coarse breadcrumbs with small pea sized butter bits remaining.
-
Make a small well in the center of the flour mixture and add the two whole eggs plus the extra egg yolk.
-
Use a fork to gently beat the eggs in the center, gradually drawing in the flour from the surrounding edges until a rough dough starts to form.
-
Bring the dough together with your hands and press it gently into a smooth ball. Do not knead the dough too long or the butter will melt and make the crust tough.
-
Cut the dough into two pieces where one piece is slightly larger than the other, using about two thirds for the bottom base and one third for the top lid.
-
Flatten each piece of dough into a smooth flat disc, wrap both discs tightly in plastic food wrap, and place them into the refrigerator to chill for at least 45 minutes.
Step 2 Making The Silky Cream Filling
-
Pour the whole milk into a medium saucepan and add the large strips of lemon peel.
-
Place the saucepan over medium heat and warm the milk until small bubbles begin to form around the inner edges of the pan, just before it reaches a boil.
-
Remove the saucepan from the heat, cover it with a lid, and let the milk steep for 15 minutes so the lemon flavor infuses deeply into the warm liquid.
-
In a separate heatproof bowl, add the 6 egg yolks and the granulated white sugar.
-
Whisk the egg yolks and sugar together vigorously for about two minutes until the mixture becomes pale yellow, creamy, and slightly thick.
-
Add the cornstarch to the egg yolk mixture and whisk continuously until you form a smooth paste with no dry powdery spots.
-
Remove the lemon peels from the warm milk and discard them.
-
Slowly pour a thin stream of warm milk into the egg mixture while whisking constantly so the warm milk gradually warms up the eggs without scrambling them.
-
Once all the milk is fully whisked into the egg mixture, pour the entire liquid back into the saucepan.
-
Place the saucepan back on the stove over low to medium heat and cook the cream, whisking constantly without stopping for several minutes.
-
As the liquid heats up, it will suddenly thicken into a rich, silky pastry cream. Once it starts bubbling softly and thickens, remove it immediately from the heat.
-
Stir in the pure vanilla extract until fully blended.
-
Pour the hot pastry cream into a wide shallow bowl, cover the surface directly with plastic wrap touching the cream to prevent a skin from forming, and allow it to cool down to room temperature.
Step 3 Assembling The Cake
-
Preheat your oven to 180 degrees Celsius or 350 degrees Fahrenheit.
-
Lightly grease an eight inch or nine inch round baking pan or tart pan with removable bottom using a little soft butter, then dust it lightly with flour.
-
Take the larger disc of dough out of the refrigerator and place it on a sheet of parchment paper lightly dusted with flour.
-
Use a rolling pin to roll out the dough into a round circle that is roughly three millimeters thick and larger than your baking pan.
-
Gently lift the rolled dough using the parchment paper and flip it carefully into your prepared baking pan, pressing it gently against the bottom and sides.
-
Trim away any excess dough hanging over the top outer edge using a small sharp knife or your thumbs.
-
Take a fork and gently prick the bottom surface of the dough several times so steam can escape during baking.
-
Pour the completely cooled cream filling into the dough shell, spreading it out evenly using a spatula.
-
Take the smaller disc of dough out of the refrigerator and roll it out into a smaller circle that will cover the top of the cake.
-
Place the top dough circle gently over the cream filling, pressing the edges together with the bottom dough shell to seal the custard inside completely.
-
Brush the top dough lightly with a small amount of milk or egg white.
-
Scatter the raw pine nuts evenly across the top crust, pressing them very gently into the dough so they stick securely.
Step 4 Baking And Cooling
-
Place the assembled cake into the middle rack of your preheated oven.
-
Bake for roughly 40 to 45 minutes until the pastry crust turns a beautiful golden color and the pine nuts on top look nicely toasted.
-
If you notice the pine nuts turning dark too fast during baking, loosely lay a sheet of aluminum foil over the top of the pan for the remaining minutes.
-
Once fully baked, carefully remove the pan from the oven and place it on a wire cooling rack.
-
Allow the cake to cool completely inside the pan at room temperature for at least two hours so the internal cream sets firmly.
-
Once completely cooled, gently remove the cake from the pan and transfer it onto a serving plate.
-
Dust the top generously with sweet powdered sugar right before slicing and serving to your eager guests.
Why This Recipe Is Special
This grand dessert holds a truly exceptional place in the world of home baking because it balances simplicity, taste, and wonderful texture in a way few other cakes can match. One major reason this recipe stands out is its complete lack of complex processing or artificial ingredients. Everything you put into this cake consists of simple staples like farm fresh eggs, wholesome whole milk, real butter, fresh citrus, and natural nuts. When you bake this at home from scratch, you completely eliminate the hidden additives, high fructose syrups, palm oils, and chemical stabilizers that are common in store bought factory pastries.
From a sensory standpoint, the cake provides a delightful surprise for anyone eating it for the first time. The contrast between the crunchy roasted pine nuts on the outer surface and the velvety soft custard inside makes every bite dynamic and interesting. The lemon zest brings a bright sunshine flavor that balances the rich dairy notes of the milk and eggs, ensuring that the cake never feels too sweet or heavy on the palate. It is a wonderful dessert to serve after any meal because it feels light, refreshing, and deeply satisfying.
From a wellness perspective, this dessert provides a wonderful source of quick carbohydrates from the flour and sugar combined with healthy fats and proteins from the egg yolks and pine nuts. Pine nuts are known to contain beneficial healthy fats, essential minerals, and antioxidants that support heart health and energy levels. While it remains a sweet treat, enjoying a slice made with real fresh ingredients gives your body pure energy without the inflammatory synthetic compounds found in processed snacks. It allows you to practice balanced eating while fully enjoying life to the absolute fullest.
Extra Tips For Better Taste
To make your homemade Italian grandmother cake taste like it came straight from a professional bakery in Florence, keep these easy tips in mind while cooking. First, always make sure your butter is very cold when you start mixing the dough. Cold butter creates small pockets of fat within the flour, which melt during baking to give you a delightfully light and flaky pastry crust. If your hands get too warm while handling the dough, wash them in cold water or place the dough back in the fridge for ten minutes to chill.
Second, pay close attention to how you treat your fresh lemon zest. Use an organic lemon that has not been treated with wax, and grate only the bright yellow outer skin without touching the bitter white layer underneath. For the pastry cream, steeping whole strips of lemon peel in warm milk allows the essential oils to release gently without adding any sharp acid that could curdle the milk. This creates a smooth lemon scent that elevates the entire custard to a higher level.
Third, ensure that your cream filling is completely cool before pouring it onto your bottom dough crust. If you pour boiling hot custard onto raw pastry dough, the heat will instantly melt the butter in the crust, making the bottom soggy and doughy instead of crisp and flaky. Letting the cream cool down to room temperature guarantees a crisp bottom layer every single time.
Finally, do not skip soaking or pressing the pine nuts gently onto the top crust before baking. Pine nuts contain natural oils that roast beautifully under heat, but they can burn if the oven is too hot. If you notice them browning too quickly after thirty minutes of baking, floating a loose piece of foil over the top keeps them golden and delicious without burning.
Final Thoughts
Baking a authentic Torta della Nonna is an absolute joy that brings warm Mediterranean sunshine right into your personal kitchen space. The gentle combination of flaky butter crust, lemon scented pastry cream, and toasted pine nuts offers a comforting food experience that brings smiles to people of all ages. By following this simple guide, you can easily master this traditional Italian classic on your very first try. Gather your whole ingredients, take your time enjoying the process, and share a warm slice with the people you love the most. Happy baking to you and your family.
Nutrition Details
Here is an estimated nutrition breakdown for one slice of this homemade cake based on a standard recipe divided into twelve equal serving portions.
| Nutritional Element | Amount Per Serving |
| Total Calories | 380 kcal |
| Carbohydrates | 48 grams |
| Dietary Fiber | 1.5 grams |
| Sugars | 24 grams |
| Total Fat | 18 grams |
| Saturated Fat | 9 grams |
| Protein | 7 grams |
| Cholesterol | 135 milligrams |
| Sodium | 85 milligrams |
| Calcium | 95 milligrams |
Disclaimer
Please keep in mind that nutritional needs and dietary responses vary from person to person based on age, activity level, metabolism, and overall health status. The nutritional information provided in this table is an estimate calculated using standard ingredients and traditional portion sizes. If you have specific medical conditions, food allergies, diabetes, or strict dietary guidelines set by a doctor, please adjust the ingredients or portion sizes to match your personal health needs accordingly.