Welcome to the wonderful world of baking your very own loaf of sourdough sandwich bread right in your own kitchen. This special recipe is designed to help you create a soft, fluffy, and delicious loaf of bread without using any commercial yeast at all. Instead of store bought packets, we use a bubbly and active sourdough starter to make the dough rise naturally over time. Sourdough baking might seem a little intimidating if you are completely new to it, but this foolproof method breaks everything down into very simple and manageable steps. You will learn how to mix active starter with flour, water, a little bit of salt, and a touch of honey or butter to create a rich dough that bakes into the ultimate sandwich loaf. The crumb inside is tender and perfect for holding your favorite fillings, while the crust remains soft and easy to bite into rather than being too chewy or tough. Whether you plan to make school lunches, weekend grilled cheese sandwiches, or simple morning toast with butter and jam, this loaf will quickly become a favorite staple in your home.
People absolutely fall in love with this particular bread because it combines the incredible health perks of traditional fermentation with the comforting texture of everyday sandwich bread. Unlike standard white bread from the grocery store that can feel dry and tasteless, a homemade sourdough loaf brings a gentle tang and a deep, comforting flavor that dances on your taste buds. The natural fermentation process breaks down the proteins in the flour, making the bread much easier on your stomach and a wonderful choice for people who want something wholesome. Furthermore, there is something deeply magical about watching a live starter transform a few basic pantry staples into a gorgeous, golden loaf of bread that fills your whole house with a heavenly aroma. Families adore the pillowy softness of each slice, and kids will never guess that something so delicious is actually good for them. Once you experience the joy of slicing into your very own warm, freshly baked loaf of sandwich bread, you will never want to go back to the plastic wrapped store versions again.
You should definitely choose to make this comforting recipe whenever you want to slow down, practice a rewarding hobby, and nourish the people you love with wholesome food. Baking bread from scratch is a wonderful weekend project that brings a sense of calm and accomplishment into your busy weekly routine. From a taste perspective, nothing compares to the rich and satisfying flavor of freshly baked bread that has been given plenty of time to develop its unique character. From a fitness and health point of view, making your own bread means you control every single ingredient that goes inside your body, completely avoiding artificial preservatives, hidden sugars, and strange chemical additives. It is a fantastic way to fuel your active lifestyle with clean carbohydrates and easily digestible nutrients that provide steady energy throughout your day. Whenever the weather turns chilly, or you simply crave the ultimate comfort food experience, mixing up a batch of this sourdough dough will lift your spirits and warm up your entire home.
Getting started on your baking journey requires a little bit of patience, but the actual hands on work is surprisingly quick and very relaxing to do. You will spend just a few minutes mixing things together, a few hours letting the dough rest on your counter, and then you let the oven do the rest of the magic. As you practice this recipe more often, you will get to know the unique personality of your sourdough starter and learn how the dough changes feel across different seasons in your kitchen. This journey connects you to ancient culinary traditions where bread was handmade with love, time, and very simple ingredients that nature provided. So grab your mixing bowl, clear off your kitchen counter, and get ready to create a masterpiece that will impress your family and bring pure joy to every single meal you share together. Let us dive right into the wonderful details and discover how easy it is to bake the best loaf of your life.
Ingredients You Will Need
To bake this wonderful loaf of sourdough sandwich bread, you will need a few simple and wholesome ingredients that you probably already have in your kitchen cupboards. Here is the exact list of everything required to make sure your baking adventure turns out successful.
-
Active Sourdough Starter: 1 cup bubbly and fed starter
-
All Purpose Flour: 4 cups plus extra for dusting your counter
-
Warm Water: 1 and 1/4 cups filtered water
-
Honey or Maple Syrup: 2 tablespoons for a touch of gentle sweetness
-
Melted Butter or Olive Oil: 3 tablespoons to make the crumb soft and tender
-
Salt: 2 teaspoons fine sea salt or regular table salt
Step by Step Method
Making sourdough sandwich bread is a fun and rewarding process that unfolds over the course of a day or two. Follow these detailed steps carefully, and you will pull a gorgeous loaf out of your oven with absolute confidence.
The very first step is to make sure your sourdough starter is ready for action before you begin mixing your main dough. You should feed your starter about four to twelve hours before you plan to bake, keeping it in a warm spot in your kitchen until it becomes very bubbly, active, and doubles in size. A good way to test your starter is to drop a small spoonful of it into a glass of room temperature water; if it floats right to the top, it is happy and ready to make your bread rise.
Next, grab a large mixing bowl and combine your warm water, active sourdough starter, honey, and melted butter or olive oil using a sturdy spoon or a whisk. Stir everything together gently until the bubbly starter is fully dissolved into the liquid and the mixture looks slightly milky and smooth.
Now it is time to add your dry components into the wet mixture by pouring in the all purpose flour and the fine sea salt all at once. Use your hands or a wooden spoon to mix everything together until no dry flour patches remain and a rough, sticky ball of dough begins to form inside your bowl. Do not worry if the dough feels a bit messy at this exact stage because the flour needs a little time to absorb all the moisture from the liquids.
Cover your mixing bowl with a damp kitchen towel or a reusable plastic cover and let the dough rest on your kitchen counter for about thirty minutes. This important step is called autolyse, and it allows the flour to fully hydrate, which makes the subsequent steps much easier and helps build a strong gluten structure naturally.
After the resting period is over, you need to develop the strength of your dough by performing a series of gentle stretches and folds. Grab the edge of the dough with your hand, pull it up gently, and fold it over the top towards the center of the bowl. Rotate your bowl slightly and repeat this pulling and folding motion about six to eight times all the way around the circle. Cover the bowl again and let the dough rest for thirty minutes, then repeat this stretching and folding process two more times over the next hour and a half.
Once you have finished your stretches and folds, cover the bowl securely and let the dough sit in a warm spot in your kitchen for its main bulk fermentation. This fermentation stage can take anywhere from four to eight hours depending on how warm your room is, and you will know it is ready when the dough looks puffy, has increased significantly in volume, and shows a few tiny bubbles on the surface.
When the bulk fermentation is complete, gently turn your puffy dough out onto a lightly floured kitchen counter or work surface. Use your hands to press the dough out into a rough rectangular shape, smoothing it gently to release any large trapped air pockets.
To shape your loaf for a standard loaf pan, start at the top edge of your rectangle and roll the dough tightly downward into a neat cylinder, just like rolling up a sleeping bag. Pinch the bottom seam closed with your fingers and tuck the two ends neatly underneath the loaf so it fits nicely inside your baking vessel.
Grease your loaf pan thoroughly with butter or cooking spray, then gently place your shaped dough seam side down into the pan. Press the dough lightly into the corners so it fills the bottom evenly and takes on the proper shape of your pan.
Cover the loaf pan with a clean towel or an upside down large bowl to prevent the dough from drying out on top. Let the dough rise a second time at room temperature for another four to six hours, or until it has crowned nicely over the top edges of the pan and looks light and airy. If you prefer, you can also place the covered pan in your refrigerator overnight for a slow, cold rise that develops even deeper flavor.
While your final rise is finishing up, preheat your kitchen oven to 375 degrees Fahrenheit so it is piping hot and ready for baking. If your oven tends to run hot, you can adjust it slightly, but this temperature is ideal for getting a golden crust without burning the outside before the inside cooks through.
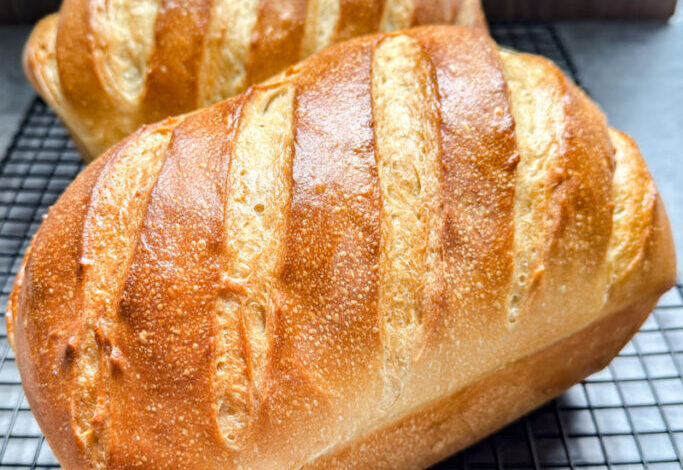
Place your loaf pan onto the center rack of the preheated oven and bake the bread for about thirty five to forty minutes. You will know the bread is fully baked when the top crust turns a rich, deep golden brown and the loaf sounds hollow when you tap gently on the bottom.
Carefully remove the hot pan from the oven using thick oven mitts to protect your hands from burns. Turn the loaf out of the pan immediately and place it onto a wire cooling rack so air can circulate underneath.
Allow your freshly baked bread to cool completely for at least two hours before you attempt to slice into it with a serrated bread knife. Cutting into hot bread can make the inside gummy and squish your beautiful loaf, so patience at this final stage is the ultimate secret to success.
Why This Recipe Is Special
This particular sourdough sandwich bread stands out from ordinary recipes because it balances traditional fermentation methods with modern convenience and incredible flavor. One of the greatest benefits of this loaf is how easy it is to digest compared to standard commercial white breads found in stores. The wild yeasts and beneficial bacteria present in your active sourdough starter work together to predigest the starches and break down phytic acid found in wheat flour. This natural breakdown makes the vitamins and minerals much easier for your body to absorb, reducing the heavy feeling some people experience after eating regular bread.
From a taste perspective, this recipe delivers the absolute best of both worlds by offering a rich, comforting softness that melts in your mouth alongside a very subtle, pleasant tang. Many traditional sourdough breads feature a thick, rock hard crust and a very sour flavor profile that can overwhelm delicate sandwich ingredients like turkey, cheese, or fresh vegetables. This recipe specifically modifies those elements by incorporating a touch of honey and butter, which mellows out the sour notes and creates a pillowy, tender crumb that kids and adults adore equally.
Nutritionally speaking, baking your own bread at home eliminates the need for chemical preservatives, stabilizers, calcium propionate, and refined white sugars that manufacturers pack into commercial loaves. You get clean, wholesome ingredients that provide lasting energy, making it a wonderful addition to a balanced diet focused on real, whole foods. Furthermore, the mindful process of nurturing your starter, mixing the dough, and waiting for nature to do its work brings a wonderful sense of mental peace and creative fulfillment. It turns a daily household staple into an artistic expression of care that nourishes both your physical body and your creative soul.
Extra Tips for Better Taste
To take your homemade sourdough sandwich bread from simply delicious to absolute perfection, you can try a few creative improvement tips in your kitchen. First of all, always make sure your water is lukewarm rather than hot, because overly hot water can accidentally kill the delicate wild yeast organisms in your starter and prevent your dough from rising.
If you want to experiment with different flavor profiles, you can swap out the regular honey for maple syrup or brown sugar to add a slightly deeper, caramel like sweetness to the crumb. For an even softer texture that stays fresh for days on your counter, you can replace part of the water with whole milk or plant based milk, which enriches the dough and keeps the crumb incredibly tender.
When shaping your loaf, make sure you roll the dough tightly and eliminate any large air pockets inside, which prevents ugly holes from forming in the middle of your bread slices later on. If your kitchen is naturally cool during the winter months, you can place your dough inside your oven with the interior light turned on to create a cozy, warm proofing box that speeds up the fermentation process.
Storing your bread properly is another key to maintaining that wonderful fresh baked quality throughout the week. Once your loaf has cooled completely, store it in a paper bag or a linen bread bag for the first couple of days to keep the crust nice and crisp. If you want it to last longer, you can transfer it to an airtight container or a plastic bag after day three, or slice the entire loaf and store the pieces in your freezer for quick toasting whenever hunger strikes.
Final Thoughts
Embarking on the journey of baking your own sourdough sandwich bread is a delightful adventure that fills your kitchen with warmth, comfort, and amazing aromas. While it requires a little bit of time and practice to master the rhythm of feeding your starter and waiting for the dough to rise, the incredible results are more than worth every single minute. Imagine waking up on a quiet morning, slicing into a warm loaf of bread that you crafted entirely with your own hands, and spreading your favorite toppings over a golden slice. It connects you to a simpler way of living and allows you to feed your family wholesome food made with pure love and intention. We hope this comprehensive guide inspires you to dust off your mixing bowls, feed your starter, and bake a wonderful loaf of bread that brings smiles to everyone around your kitchen table today.
Nutrition Details
Understanding the nutritional content of your homemade bread helps you fit it easily into your daily meal planning and healthy lifestyle goals. Below is a detailed breakdown of the nutrition facts per single serving slice, assuming the loaf yields about twelve generous slices.
| Nutrient Category | Amount Per Serving | Daily Value Percentage |
| Calories | 160 kcal | 8 percent |
| Total Fat | 3.5 grams | 5 percent |
| Saturated Fat | 2.0 grams | 10 percent |
| Sodium | 180 milligrams | 8 percent |
| Total Carbohydrates | 28 grams | 10 percent |
| Dietary Fiber | 1.5 grams | 6 percent |
| Sugars | 2.0 grams | Not Applicable |
| Protein | 5.0 grams | 10 percent |
Disclaimer
Please keep in mind that the nutritional information provided in this article is an estimate calculated based on standard ingredients and typical measurements used in home baking. Every individual body is completely unique, and dietary needs, health conditions, and personal fitness goals can vary significantly from person to person. The results you achieve with your baking or how your body responds to specific foods may change based on exact ingredient brands, portion sizes, and your own personal metabolism. If you have specific medical dietary restrictions, severe food allergies, or specific health concerns, it is always wise to consult with a qualified healthcare professional or a registered dietitian before making major changes to your regular daily diet.