Imagine taking the deep flavor of your favorite home fermented starter and turning it into a sweet, portable treat that everyone in your house will love. Sourdough cake jars came to life out of a desire to reduce kitchen waste while creating something totally unique and delicious for sweet lovers everywhere. This amazing recipe brings together the subtle tang of sourdough discard with soft, fluffy cake layers, rich cream frostings, and delicious fruit jams or chocolate fillings packed neatly inside clear glass jars. Cooking with leftover starter allows you to explore soft textures and rich flavors that normal white flour just cannot achieve on its own. When you assemble these charming little jars, you create individual desserts that look like they came straight out of a luxury bakery showcase. Best of all, these sweet jars are completely customizable, meaning you can swap flavors, change toppings, and create endless variations based on what you already have sitting in your kitchen pantry right now.
People all over the world are absolutely falling in love with this creative dessert idea because it solves several common problems at once while delivering amazing taste. First, every baker who keeps a active starter knows the feeling of guilt that comes with throwing away extra discard during weekly feedings. Turning that extra starter into cake jars means zero waste and maximum deliciousness without extra stress. Second, serving individual jars makes portion control simple while offering a neat, portable option for parties, picnics, and family gatherings. Kids and adults love digging their long spoons through multiple layers of moist sponge, smooth butter icing, and fruit fillings. The unique fermentation process also breaks down gluten and phytic acid in the flour, making this sweet treat much easier on sensitive stomachs compared to standard store bought boxed cakes. People love how impressive these jars look when given as thoughtful homemade gifts decorated with simple cloth ribbons and personalized hand written note tags.
There are so many wonderful moments when making a fresh batch of sourdough cake jars makes total sense for your life and well being. If you want a fun weekend project that brings warmth and sweet baked aromas into your home, this simple baking journey provides pure comfort for your soul. It is perfect for meal prepping your weeknight desserts because these sealed jars stay fresh and moist in your refrigerator much longer than a open sliced cake sitting on a counter dish. From a fitness perspective, using fermented starter adds beneficial nutrients and natural enzymes to your dessert, making it a smarter alternative when you want a sweet treat that will not leave you feeling super heavy or overly bloated later. Emotionally, sharing these beautiful jars with your close friends, busy coworkers, or wonderful neighbors creates instant moments of human connection and pure joyful smiles. Whether you are celebrating a cozy birthday, hosting a simple holiday gathering, or just treating yourself after a long stressful work week, these delicious sweet jars bring pure happiness.
Learning to master this simple recipe will build your kitchen confidence while opening up a whole new world of creative sourdough discard dessert ideas. You do not need any advanced baking skills, expensive special equipment, or complicated tools to get amazing result on your very first try. The process is completely forgiving because even if your cake layers break or look uneven when cooling on the wire rack, they still look gorgeous once crumbled or stacked inside clear glass vessels. You can make your cake bases ahead of time, store them safely, and assemble your favorite flavor combinations whenever you have a free moment during your busy day. Once you see how proud you feel holding a finished jar filled with colorful homemade layers, you will want to share this magical baking secret with everyone you meet. Get ready to transform basic everyday pantry items into extraordinary personal cakes that satisfy your deep sweet cravings while keeping your digestive system completely happy.
Ingredients You Will Need
For the Sourdough Cake Base
- 1 cup unbleached all purpose flour
- 1 cup active sourdough discard or starter
- 1 cup organic granulated white sugar
- 0.5 cup unsalted butter at room temperature
- 2 large eggs at room temperature
- 0.5 cup whole milk or plain oat milk
- 1 teaspoon pure vanilla extract
- 1 teaspoon baking powder
- 0.5 teaspoon baking soda
- 0.25 teaspoon fine sea salt
For the Vanilla Cream Filling
- 1 cup heavy whipping cream or full fat coconut cream
- 8 ounces soft cream cheese at room temperature
- 0.75 cup powdered confectioners sugar
- 1 teaspoon vanilla bean paste or pure extract
For Layering and Assembly
- 0.5 cup strawberry jam or raspberry preserves
- 0.5 cup dark chocolate chips or sweet cacao nibs
- 0.25 cup chopped toasted pecans or walnuts
- 4 wide mouth glass mason jars with tight lids
Step by Step Method
- Preheating the Oven and Preparing Pans Start by turning on your oven to 350 degrees Fahrenheit so it reaches the perfect temperature while you mix your ingredients. Take a standard nine by thirteen inch metal or ceramic baking pan and grease the interior thoroughly with a small piece of softened butter or natural cooking spray. Sprinkle a thin layer of flour over the butter, tapping the sides of the pan to distribute it evenly and dumping out any extra loose flour. Setting up your pan properly prevents your delicious sourdough cake base from sticking to the bottom during the baking process.
- Creaming Butter and Sugar In a large mixing bowl, place your softened unsalted butter and granulated white sugar together. Use an electric hand mixer on medium speed for about three to four minutes until the mixture turns pale yellow and fluffy. Creaming these two simple ingredients together incorporates small air bubbles into the fat structure, which helps your cake rise evenly and maintain a light, airy crumb texture. Take time to scrape down the sides of your bowl with a soft rubber spatula so every grain of sugar blends completely into the soft butter base.
- Adding Wet Ingredients and Sourdough Starter Add your two eggs into the creamed butter mixture one at a time, beating well after each single addition until fully blended. Measure out your rich sourdough discard, whole milk, and pure vanilla extract, then pour them directly into the large bowl. Mix on low speed for roughly sixty seconds until all the liquid ingredients combine into a smooth batter. Do not panic if the batter looks slightly separated or textured at this stage because the acidic fermented starter reacts naturally with the fats and proteins in your liquid mixture.
- Whisking Dry Ingredients Take a separate dry bowl and place your all purpose flour, baking powder, baking soda, and fine sea salt inside. Use a wire hand whisk to stir all the dry ingredients together for thirty seconds to ensure the leavening agents are completely distributed throughout the flour mixture. Mixing dry ingredients separately prevents small pockets of baking soda or salt from ending up in your final baked cake, guaranteeing a balanced flavor and an even rise across the whole pan.
- Combining Dry and Wet Mixtures Slowly pour the dry flour mixture into your bowl containing the wet sourdough ingredients. Stir gently using a large wooden spoon or rubber spatula using a basic folding motion just until the white flour disappear. Avoid overmixing the batter at this point because overworking the wheat proteins will make your final cake tough rather than light and soft. Your finished cake batter should look silky, moderately thick, and smell pleasantly sweet with a subtle sourdough aroma.
- Baking the Sourdough Sponge Pour the prepared batter evenly into your greased baking pan, using your spatula to smooth out the top surface toward all four corners. Place the pan onto the middle rack of your preheated oven and bake for twenty two to twenty six minutes. You will know the cake is fully cooked when the top turns a light golden color and a clean wooden toothpick inserted into the center comes out clean without wet batter. Remove the pan carefully from the oven and set it on a wire cooling rack until the cake reaches complete room temperature.
- Making the Fluffy Frosting While your baked sponge cools down completely, prepare your sweet cream filling in a clean mixing bowl. Combine the softened cream cheese, cold heavy whipping cream, powdered sugar, and vanilla bean paste. Beat the mixture on medium high speed for about three minutes until thick, stiff peaks form that hold their shape on the beaters. Place the bowl of prepared cream into your refrigerator for fifteen minutes to chill so it stays firm during jar assembly.
- Cutting Cake Layers for Jars Once your baked sourdough cake is totally cool to the touch, place it on a clean wooden cutting board. Use the open rim of one of your glass mason jars as a natural cookie cutter to stamp out round circles of cake from the sheet. Alternatively, you can simply use a sharp knife to cut the entire cake into small, neat one inch cubes. Both methods work wonderfully for creating the interior structural layers inside your dessert jars.
- Assembling the Sourdough Cake Jars Place one round piece of cake or a small handful of cake cubes directly at the bottom of each clean glass jar. Press down lightly with your fingers or a small spoon so the cake forms a solid base layer. Pipe or spoon two generous tablespoons of your sweet vanilla cream filling over the bottom cake layer, smoothing it out toward the glass walls. Add a rich layer of strawberry jam and a simple sprinkle of chopped toasted nuts over the cream. Repeat this layering order a second time until your jar is nicely filled near the top.
- Sealing and Storing the Finished Jars Finish the top layer of your cake jar with a final swirl of cream, a small drizzle of fruit jam, and a sprinkle of dark chocolate chips. Wipe the outer threads and glass rim of each jar with a clean damp cloth to remove any stray drips or smudges. Screw the metal lids on tightly and place your completed sourdough cake jars into the refrigerator for at least two hours before serving. Chilling allows the delicious flavors to meld together while making the cake layers absorb extra moisture from the cream.
Why This Recipe Is Special
This unique dessert recipe stands out because it combines traditional old world fermentation techniques with modern, convenient dessert styling. By using simple sourdough discard that would otherwise end up in the trash, you actively practice sustainable kitchen habits while creating pure culinary magic. The subtle lactic acid produced by natural sourdough microbes works wonders on wheat grains, breaking down complex starches into simple sugars that enhance overall flavor. This natural fermentation process creates a deep flavor complexity that neutralizes harsh sweetness, resulting in a cake that tastes balanced, rich, and sophisticated.
From a wellness perspective, sourdough fermentation reduces phytic acid, an anti nutrient that can block mineral absorption in the human digestive system. This means your body can absorb minerals like magnesium, zinc, and iron much easier from sourdough baked goods than from standard unfermented treats. Additionally, the pre digested nature of fermented flour makes this cake far gentler on your stomach, reducing the uncomfortable heavy feeling often associated with traditional desserts. It bridges the gap between delicious comfort foods and mindful eating practices perfectly.
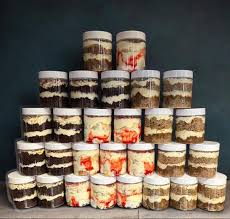
The visual charm of serving cake inside individual clear glass jars adds a whole layer of joy to your dining table. Seeing the distinct colorful layers of golden cake sponge, white cream frosting, red fruit jam, and rich dark chocolate creates instant appetite appeal. Portions are already measured out, making them stress free for hostesses serving guests at busy dinner parties or outdoor family events. These durable glass jars also make transport extremely easy, so you can bring homemade gourmet treats along on picnics without worrying about squishing a delicate layer cake.
Extra Tips for Better Taste
To take your sourdough cake jars to an even higher culinary level, consider soaking your cake layers with a light homemade simple syrup. You can boil equal parts water and sugar together with a drop of lemon juice or almond extract, then lightly brush this liquid over the cake rounds before adding cream. This simple trick guarantees that your cake layers remain incredibly moist, even if you keep the assembled jars stored inside your refrigerator for four or five days.
Experimenting with seasonal flavor variations is another amazing way to keep this recipe exciting all year long. During warm summer months, try layering your sourdough sponge with fresh ripe peaches, lemon curd, and light whipped cream for a bright sunshine treat. In cold winter months, swap the vanilla cream for spiced cinnamon butter frosting, cooked apple slices, and crushed gingerbread cookies. The neutral, rich background of the sourdough cake pairs effortlessly with almost any fruit, nut, or spice profile you love.
Texture contrast is the real secret behind world class dessert making, so do not forget to add crunchy elements between your soft layers. Layering toasted slivered almonds, crispy waffle cone pieces, toasted coconut flakes, or mini chocolate morsels provides an exciting mouthfeel in every bite. You can also brown your butter in a pan before mixing it into the initial cake batter to introduce a nutty, caramelized undertone that complements the sour tang of your starter naturally.
Final Thoughts
Creating sourdough cake jars at home is a rewarding experience that combines smart kitchen sustainability with pure sweet indulgence. This beginner friendly project turns humble pantry staples into stunning individual treats that delight all five senses from start to finish. Once you experience the magic of layering your own fermented cakes inside charming glass jars, you will never look at leftover starter the same way again. Gather your glass jars, preheat your oven, and enjoy every single minute of this fun, delicious baking journey with the people you love most.
Nutrition Details
Below you will find estimated nutrition details for this sourdough cake jar recipe. Please remember that nutritional values can fluctuate based on specific brand choices, fat content of dairy products, and personal portion sizes used during assembly.
Recipe Nutrition Overview
- Total Yield: 4 Large Cake Jars
- Serving Size: 1 Jar (approx. 250 grams)
- Prep Time: 25 Minutes
- Bake Time: 25 Minutes
- Chill Time: 2 Hours
Estimated Values Per Serving
| Nutrient | Amount Per Serving | Daily Percentage Value |
| Calories | 520 kcal | 26% |
| Total Fat | 26 g | 33% |
| Saturated Fat | 15 g | 75% |
| Trans Fat | 0.5 g | 0% |
| Cholesterol | 85 mg | 28% |
| Sodium | 310 mg | 13% |
| Total Carbohydrates | 64 g | 23% |
| Dietary Fiber | 3 g | 11% |
| Total Sugars | 38 g | 76% |
| Added Sugars | 32 g | 64% |
| Protein | 7 g | 14% |
| Vitamin D | 0.6 mcg | 3% |
| Calcium | 90 mg | 7% |
| Iron | 2.1 mg | 12% |
| Potassium | 180 mg | 4% |
Disclaimer
The health and nutrition information provided in this guide is meant for general educational purposes only and should not replace professional medical advice. Everyone has a unique biological makeup, and individual bodies digest foods differently depending on health status, underlying allergies, and physical activity levels. While long fermented sourdough can be easier on digestion for many people, it is not guaranteed to treat or cure any digestive disorders or gluten sensitivities. Always consult with a qualified health professional or licensed dietitian before making major changes to your dietary routine or lifestyle.