Welcome to the wonderful world of baking your very own sourdough brown artisanal loaf right in your own kitchen. This special recipe combines the rich and nutty flavors of whole grain flour with the classic bubbly magic of live wild yeast starters. When you bake this bread, you are creating something truly traditional that requires no store-bought yeast packets at all. Instead, it relies on time and patience to grow natural goodness inside a rustic crust that feels both crunchy and soft at the same time. You will mix simple pantry staples into a shaggy dough and watch it transform through gentle rises and careful folds. Making artisan bread at home might sound fancy, but this guide breaks every single part down so anyone can succeed. Get ready to fill your entire home with the most incredible baking aromas you have ever experienced.
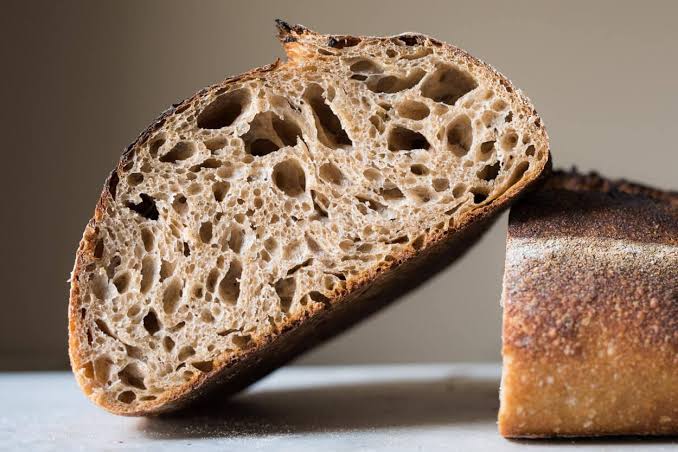
People fall completely in love with this bread because of its unmatched texture and deep flavor profile that mass-produced supermarket loaves simply cannot match. The inside crumb stays wonderfully soft and slightly chewy while the outside features a dark and crackly crust that begs for a generous spread of butter. Because this recipe uses a wild fermentation process, it creates complex sour notes that balance out the earthy sweetness of brown flour. Every single slice has character with unique air pockets and a rustic appearance that makes you feel like a professional baker. Beyond the taste, there is a deep sense of pride that comes from feeding your family or friends something you crafted entirely with your own hands. Once you taste that first warm slice fresh from the oven, you will understand why millions of people trade regular baking for sourdough.
You should make this lovely loaf whenever you want to slow down and enjoy a mindful weekend project that rewards your patience. It is the ultimate comfort food when you want something nourishing to pair with a hot bowl of soup or a comforting stew. Choosing to bake with whole brown grains also brings wonderful fitness and wellness reasons because it provides long lasting energy and important dietary fiber. Unlike white bread that causes sudden energy spikes, this slow fermented sourdough treats your digestive system with much more kindness. Baking this loaf is also a wonderful emotional retreat from busy daily screens, giving you a relaxing physical task to focus on. Whenever you feel like treating yourself or welcoming guests into your home, this warm artisanal bread creates an instant feeling of cozy hospitality.
Embarking on this baking journey invites you to connect with centuries of culinary history where patience and simple elements create pure magic. You do not need expensive commercial mixers or complicated kitchen gadgets to achieve bakery quality results right on your kitchen counter. All it takes is a warm spot in your home, a bit of attention during folding times, and a hot Dutch oven to trap steam. As you practice shaping your dough into smooth rounds, you will notice your skills improving with every single baking weekend. This recipe becomes more than just a list of instructions because it turns into a rewarding hobby that feeds both your soul and your stomach. Dive into this adventure today and discover just how rewarding homemade bread making can truly be.
Ingredients You Will Need
-
Active sourdough starter: 100 grams
-
Lukewarm water: 350 milliliters
-
Whole wheat flour: 200 grams
-
Bread flour: 300 grams
-
Fine sea salt: 10 grams
-
Extra flour for dusting: 50 grams
Step by Step Method
Before you begin baking, make sure your sourdough starter is bubbly and active so your bread rises properly. Feed your starter a few hours before mixing your main dough until it doubles in size and floats in water.
Take a large mixing bowl and pour in your lukewarm water along with the bubbly active sourdough starter. Stir them gently together with a wooden spoon or your clean fingers until the starter dissolves completely into the water.
Add your whole wheat flour and bread flour right into the liquid mixture. Mix everything together with your hands until no dry flour spots remain and you have a messy shaggy mass.
Cover the mixing bowl with a damp cloth or a plastic shower cap to keep the moisture inside. Let this dough rest on your counter for about forty-five minutes so the flour absorbs all the water naturally.
Sprinkle your fine sea salt evenly over the top of the rested dough. Pour just a tiny splash of water over the salt to help it melt into the mixture easily.
Use your fingers to pinch and fold the salt into the dough, squeezing gently to work it thoroughly through every part. Cover the bowl again and let it rest for another thirty minutes in a warm spot.
Now you will start the stretch and fold process to build strong gluten structures inside your bread. Grab the edge of the dough, stretch it gently upward, and fold it right over the center of the mass. Rotate your bowl slightly and repeat this stretching and folding motion four to six times to complete one full round.
Perform this gentle stretch and fold routine every thirty minutes for a total of four times over the next two hours. You will notice the dough getting smoother, tighter, and much more elastic with each round you complete.
Cover the bowl securely and leave the dough alone on your counter for its bulk fermentation phase. This process can take anywhere from four to six hours depending on how warm your kitchen is right now. Watch for bubbles forming on the surface and sides, and wait until the dough increases in size by about fifty percent.
Turn your fermented dough out onto a lightly floured wooden cutting board or clean countertop. Shape the dough into a tight round ball by dragging it toward you using your hands to create surface tension. Let the shaped dough rest uncovered on the counter for twenty minutes so the gluten relaxes slightly.
Flip your resting dough upside down and fold the edges inward like an envelope to shape your final tight loaf. Place your shaped loaf upside down into a cloth lined proofing basket dusted heavily with rice flour or regular flour.
Cover the basket with a plastic bag or towel and place it inside your refrigerator overnight for a slow cold ferment. This overnight stay in the cold environment develops those incredible sour flavors and makes scoring much easier tomorrow.
The next morning, place a heavy cast iron Dutch oven with its lid firmly on inside your oven. Preheat your entire oven and the heavy pot together at 230 degrees Celsius for at least one full hour.
Take your cold dough out of the refrigerator and carefully turn it upside down onto a sheet of parchment paper. Use a sharp razor blade or kitchen knife to cut a slash across the top of the dough so steam can escape.
Carefully remove the blazing hot Dutch oven from your main oven using thick heat resistant mitts. Lift the parchment paper holding your scored dough by the corners and lower it gently into the hot pot.
Put the heavy lid back on the Dutch oven and place it back inside the hot oven to bake for twenty minutes. This trapped steam helps your bread expand fully and creates that wonderful crispy outer crust.
Carefully remove the lid from your Dutch oven after twenty minutes are up. Continue baking the loaf uncovered for another twenty to twenty-five minutes until the outer crust turns a deep golden brown.
Take the hot Dutch oven out of your machine and transfer your finished bread onto a wire cooling rack. Let your artisanal loaf cool down completely for at least two hours before slicing into it with a serrated knife.
Why This Recipe Is Special
This special recipe stands out because it brings authentic artisan bakery quality directly into your home kitchen without requiring commercial ingredients. By using wild yeast fermentation, your body gets to enjoy bread that is much easier to digest compared to standard white loaves. The combination of whole wheat and bread flour gives you a wonderful balance of rustic nutrition and structural strength that holds together beautifully. Furthermore, the slow fermentation process helps break down phytic acid found in grains, making vitamins and minerals much more accessible for your body to absorb. The incredible taste profile offers a nutty depth that elevates simple everyday meals into gourmet dining experiences. Every single bite delivers a wonderful contrast between a crunchy dark crust and a tender, flavorful interior.
Extra Tips for Better Taste
To make your bread taste even more amazing, try adding a handful of toasted sunflower seeds or flaxseeds into the dough during the mixing stage. If you prefer a slightly sweeter note, a small spoonful of dark molasses or raw honey can complement the earthy brown flour wonderfully. Always make sure your baking stone or Dutch oven is thoroughly preheated so your loaf gets a great oven spring right at the start. If your kitchen runs cold during winter months, place your mixing bowl inside your oven with just the internal light turned on to create a cozy proofing box. Experiment with different flour ratios over time, slowly increasing the whole grain percentage as you grow more confident with your shaping techniques.
Final Thoughts
Baking bread at home is a truly wonderful journey that teaches you patience, rewards your efforts, and brings incredible joy to your daily life. There is nothing quite like the feeling of pulling a gorgeous golden loaf out of your oven and sharing warm slices with the people you love. Remember that every single loaf you bake teaches you something new, so never worry if your first attempt looks a little rustic. Keep practicing your folds, enjoy the calming rhythms of the kitchen, and most importantly, have fun creating delicious food from scratch. May your kitchen always smell like warm baking bread and may every slice bring comfort to your table.
Nutrition Details
Note: Nutrition values are approximate estimates and can vary based on exact ingredient brands and slice thickness.
Disclaimer
Everyone’s body is unique and nutritional needs vary greatly from person to person based on lifestyle, health status, and personal wellness goals. The information provided in this article is meant for educational and creative purposes only and should not replace professional medical or dietary advice. Always listen to your body and consult with a qualified healthcare provider if you have specific dietary concerns or food allergies. Results and baking outcomes can also change depending on your local environment, ingredient types, and kitchen equipment.