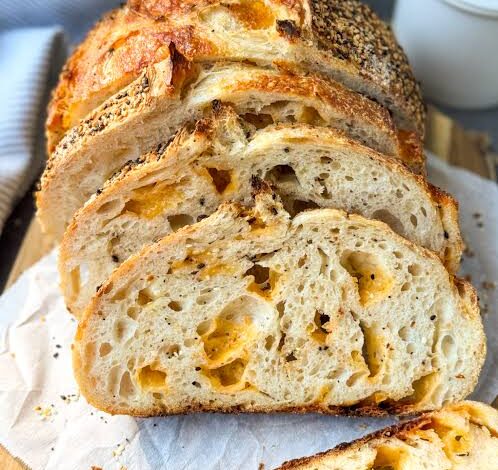
Welcome to your ultimate guide on baking the most wonderful loaf of sourdough bread right inside your own kitchen. This recipe takes you through a simple and joyful journey of transforming basic pantry items into a golden masterpiece with a crispy crust and a soft airy inside. Sourdough baking is an ancient art that relies on wild yeast captured from the air and flour rather than store bought packets of instant yeast. When you mix flour water and wild yeast culture together magic begins to happen on your kitchen counter over the course of a day or two. You will learn how to feed your starter mix your dough gently let it rise naturally shape it into a neat round loaf and bake it until it turns a gorgeous deep brown color. Every single step is broken down into friendly everyday language so that even if you have never baked a single loaf in your life before you will feel completely confident from start to finish.
People all around the world have completely fallen in love with homemade sourdough bread for so many wonderful reasons that go far beyond its gorgeous appearance on social media feeds. First of all the taste is something truly extraordinary because it offers a delightful tangy flavor combined with a rich nutty undertone that you simply cannot find in regular grocery store sandwich bread. Furthermore the texture provides an amazing sensory experience every single time you take a bite thanks to the contrast between the crunchy outer crust and the chewy soft interior crumb. Beyond the incredible taste and texture the process of making sourdough acts as a deeply therapeutic and calming hobby that helps you slow down from your busy daily routine. Working with your hands to feel the texture of the dough shift and change brings a unique sense of peace and mindfulness that modern life rarely allows us to experience.
There are countless wonderful moments throughout the year when baking a fresh loaf of sourdough bread becomes the absolute best activity you could possibly choose to do. Imagine waking up on a crisp autumn morning when the rain is tapping softly against your window and filling your entire home with the warm comforting aroma of baking bread. It is also the ultimate weekend project when you have a bit of extra time to relax around the house and watch your dough slowly rise on the kitchen counter. Many people turn to sourdough because they want a wholesome bread option that is much easier on their digestion compared to heavily processed commercial breads found on supermarket shelves. Because the natural fermentation process breaks down gluten proteins and phytic acid many individuals who experience mild bloating find that artisan sourdough is much gentler on their stomachs.
Choosing to bake your own sourdough bread is also a fantastic decision for anyone who cares deeply about feeding their family pure wholesome ingredients without any mysterious preservatives or artificial additives. You control every single item that goes into your mixing bowl using only flour water salt and your living bubbly starter culture. It brings a profound sense of pride and accomplishment when you pull a steaming hot loaf out of your oven and tap the bottom to hear that hollow sound of perfection. Whether you want to impress your weekend brunch guests create the ultimate avocado toast base or simply enjoy a thick slice slathered in rich melting butter this recipe delivers every single time. So tie your apron wash your hands and get ready to discover a rewarding culinary skill that will bring joy and delicious aromas to your kitchen for many years to come.
Ingredients You Will Need
To bake a wonderful traditional loaf of sourdough bread you do not need a long shopping list filled with complicated items. Here are the exact quantities and units you will need to gather before you begin your baking adventure today.
-
Active Sourdough Starter: 100 grams of bubbly and fed starter that has doubled in size
-
Warm Water: 350 milliliters of filtered water heated to a comfortable lukewarm temperature
-
Bread Flour: 500 grams of unbleached bread flour plus a little extra for dusting your work surface
-
Fine Sea Salt: 10 grams of fine salt to enhance all the natural flavors
Step by Step Method
Creating a delicious loaf of sourdough bread takes a little bit of patience and time but the actual active work is surprisingly simple and fun. Follow these detailed steps carefully and you will be amazed at what you can achieve in your very own kitchen.
Step One: Mixing the Dough
Start by taking a large mixing bowl and pouring in your lukewarm water along with the active bubbly sourdough starter. Stir them gently together with a wooden spoon or your clean fingers until the starter is mostly dissolved into the liquid. Next add your bread flour and fine sea salt directly into the bowl with the liquid mixture. Use your hands to mix everything together until there are no dry patches of flour remaining and you have formed a rough sticky ball of dough. Cover your mixing bowl with a damp cloth or a reusable plastic wrap and let the dough rest on your kitchen counter for about forty five minutes.
Step Two: Doing Stretch and Folds
Because sourdough does not use commercial yeast it needs a little bit of help to build structure and strength through a simple process called stretch and folds. Grab one edge of the dough with your wet hand pull it gently upward until you feel some resistance and fold it over toward the center of the bowl. Rotate your bowl a quarter turn and repeat this exact pulling and folding motion four to six times until you have gone all the way around the bowl. Cover the bowl back up and let your dough rest for another thirty minutes before repeating this exact stretching sequence three more times.
Step Three: The Bulk Fermentation
After you finish all your stretch and folds sessions it is time for the bulk fermentation stage where the wild yeast works its magic to make the dough grow. Leave your covered mixing bowl in a warm spot in your kitchen and let the dough sit undisturbed until it increases significantly in volume and looks puffy and bubbly. This usually takes anywhere from four to six hours depending on how warm your kitchen is on the day you decide to bake. You will know the dough is ready when you see little gas bubbles trapped underneath the surface and the top looks slightly domed and airy.
Step Four: Shaping Your Loaf
Dust your clean kitchen counter lightly with a little bit of bread flour and gently turn your fermented dough out of the bowl onto the floured surface. Use a bench scraper to shape the dough into a tight round ball by dragging it toward you across the counter in a circular motion. Let the dough rest uncovered on the counter for about twenty minutes so the gluten can relax slightly before the final shaping step. Flip the dough over fold the edges toward the center like an envelope and roll it up tightly to create surface tension on your round or oval loaf.
Step Five: The Overnight Cold Proof
Place a clean kitchen towel inside a round proofing basket or a medium bowl and dust the cloth generously with rice flour or regular flour to prevent sticking. Carefully lift your shaped loaf of dough and place it upside down into the prepared basket so the seam side is facing up toward you. Cover the top of the basket securely with a plastic bag or a shower cap to lock in moisture and place the whole thing inside your refrigerator overnight. This cold rest helps develop that wonderful deep sourdough tang flavor and makes the dough much easier to score with a razor blade the next morning.
Step Six: Baking Your Bread
The next morning preheat your oven and a heavy cast iron Dutch oven with its lid on to four hundred fifty degrees Fahrenheit for at least forty five minutes. Carefully take your cold dough out of the refrigerator remove the plastic covering and invert the basket to release the loaf onto a piece of parchment paper. Use a sharp razor blade or a bread lame to make a deliberate slash across the top of the dough so the steam can escape during baking. Carefully lift the parchment paper holding your scored dough and lower it into the extremely hot Dutch oven before putting the heavy lid back on top. Bake with the lid on for twenty minutes to create gorgeous oven spring and steam and then remove the lid and bake for another twenty minutes until the crust turns dark golden brown.
Why This Recipe Is Special
This particular sourdough recipe stands out from the rest because it is specifically designed to be approachable for complete beginners while still delivering professional bakery quality results. One of the main health benefits of this loaf comes from the natural fermentation process which predigests much of the starches and proteins making the bread much easier on your stomach. Unlike store bought white bread that leaves you feeling sluggish this artisan sourdough provides steady lasting energy without causing sudden spikes in your blood sugar levels. In terms of taste you will experience a magnificent balance between a mild lactic sourness and a rich toasted wheat flavor that lingers pleasantly on your palate. The texture is truly legendary offering a shattering crisp crust on the outside and a bouncy moist interior crumb that holds up beautifully to butter jam or olive oil. Furthermore baking this bread gives you a deep psychological boost as you master a traditional craft that has sustained human communities for thousands of years.
Extra Tips for Better Taste
If you want to take your homemade sourdough bread to the next level here are some fantastic creative tips and tricks to try out during your next baking session.
-
Temperature Control: Keep a close eye on your kitchen temperature because warmer rooms make your dough rise much faster while cooler rooms slow the fermentation process down significantly.
-
Starter Vigor: Always make sure your sourdough starter is fed and bubbly at its peak activity level before you mix your main dough to ensure a great rise.
-
Steam Creation: If you do not own a cast iron Dutch oven you can place a small metal pan of boiling water on the bottom rack of your oven to create steam.
-
Flour Varieties: Experiment by replacing fifty grams of the bread flour with whole wheat or rye flour to add an even deeper nutty flavor profile to your finished loaf.
-
Cooling Patience: Always let your freshly baked loaf cool completely on a wire rack for at least two hours before slicing to allow the interior crumb to set properly.
Final Thoughts
Baking your very own sourdough bread at home is a truly magical journey that transforms four basic ingredients into a masterpiece of flavor and texture. Even if your very first loaf does not turn out looking like a magazine cover remember that every single attempt teaches you something new about the wonderful world of fermentation. Do not be afraid to get your hands messy experiment with different rising times and enjoy the incredible process of creating food completely from scratch. Sharing a warm slice of freshly baked bread with the people you love brings a special warmth and connection that no store bought item could ever replace. We hope this guide inspires you to start your sourdough adventure today and fill your home with the happiest and most comforting aromas imaginable.
Nutrition Details
To help you keep track of your daily dietary goals here is a clear breakdown of the nutritional content for this delicious sourdough bread recipe based on standard serving sizes.
| Nutritional Component | Amount Per Serving |
| Calories | 160 kcal |
| Total Fat | 0.8 grams |
| Saturated Fat | 0.2 grams |
| Sodium | 290 milligrams |
| Total Carbohydrates | 32.0 grams |
| Dietary Fiber | 1.5 grams |
| Sugars | 0.4 grams |
| Protein | 5.5 grams |
Disclaimer
Please remember that every single person has a unique body nutritional requirement and individual health profile that responds differently to various foods and recipes. The nutritional information provided in this article is only an estimate calculated based on standard ingredient databases and may vary depending on the specific brands of flour you use. If you have specific medical conditions food allergies or dietary restrictions related to gluten or fermentation please consult with a qualified healthcare professional before making major changes to your diet.