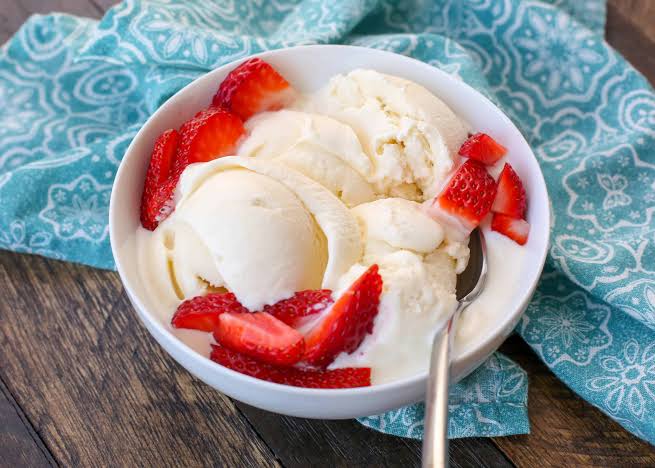
Making your own sweet treats at home is one of the most rewarding things you can do in your kitchen. This special guide is all about a super easy ice cream recipe that anyone can make without needing any fancy machines or expensive tools. Many people think that making ice cream at home is a very hard job that takes hours of work and a lot of complex steps, but that is simply not true. With just a few simple ingredients that you probably already have in your kitchen, you can create a rich, creamy, and incredibly delicious dessert that tastes even better than the ones you buy from the local store. This recipe is designed for complete beginners, which means you do not need any cooking skills or prior experience to get it perfectly right on your very first try. We will walk through every single step together so you can feel confident and happy while making this amazing treat for yourself, your family, or your friends.
People absolutely love this recipe because it is incredibly simple, honest, and highly customizable to match whatever flavors you like best. When you buy ice cream from a supermarket, it is often packed with artificial flavors, heavy preservatives, and chemical stabilizers that you cannot even pronounce. This home recipe gives you complete control over what goes into your body, allowing you to use fresh, wholesome ingredients that make a massive difference in taste and quality. There is also a unique sense of joy and pride that comes from serving a bowl of frozen dessert that you created from scratch with your own two hands. Kids love to help with the mixing, teenagers enjoy choosing their favorite toppings, and adults appreciate the rich texture and clean taste of a dessert made without any processed junk. It is a wonderful way to bring people together in the kitchen, sharing laughs and creating sweet memories while waiting for the mixture to freeze into perfect, scoopable goodness.
There are so many perfect times to make this delightful dessert, whether you are celebrating a special occasion or just looking for a sweet escape after a long, stressful day. During the hot summer months, when the sun is shining bright and the heat is almost too much to bear, a cold bowl of creamy ice cream feels like heaven on earth. It is also the ultimate comfort food for cozy movie nights at home, lazy weekend afternoons with your family, or fun backyard barbecue parties with your favorite neighbors. For those who are highly focused on fitness and health, this recipe is a total lifesaver because you can easily swap out standard ingredients for lighter options, control the total amount of sugar, or even add fresh fruits to boost the vitamins. It is a wonderful treat that feeds both your body and your soul, offering a moment of pure happiness and relaxation whenever you decide to take a big, cold scoop.
The magic of this recipe lies in its incredible versatility and the deep emotional connection we all have with frozen sweet treats from our childhood days. Every spoonful of this creamy mixture brings back happy memories of summer vacations, ice cream trucks playing familiar tunes down the street, and family gatherings filled with laughter. By learning how to make this yourself, you are not just making a quick snack, but you are also mastering a timeless skill that will serve you well for the rest of your life. You can make it as a surprise gift for someone you love, use it to cheer up a friend who is having a tough week, or simply treat yourself because you deserve a beautiful reward. It is a simple, budget friendly way to bring a massive smile to anyone’s face, proving that the very best things in life are often the ones we make with love right in our own homes.
Ingredients You Will Need
To make this incredibly smooth and delicious dessert, you will only need a few basic ingredients. You can find all of these items at your local grocery store without any trouble at all.
-
2 cups of heavy whipping cream (Make sure it is very cold before you start using it)
-
1 can of sweetened condensed milk (This should be about 14 ounces or 396 grams)
-
2 teaspoons of pure vanilla extract (This gives your dessert a beautiful, warm aroma)
-
1 pinch of fine sea salt (A tiny bit of salt helps to balance all the sweetness perfectly)
Step by Step Method
Step 1: Chill Your Kitchen Tools
Before you begin mixing your ingredients, it is a very smart idea to place your large glass mixing bowl and your metal beaters into the freezer for about 15 minutes. Cold tools help the heavy whipping cream whip up much faster and create a far more stable structure, which results in a lighter and fluffier final texture.
Step 2: Whip the Heavy Cream
Take your chilled mixing bowl out of the freezer and pour in your 2 cups of very cold heavy whipping cream. Using an electric hand mixer on a medium speed, start beating the cream gently. As the cream begins to thicken up, increase the mixer speed to high and continue whipping until you see stiff peaks form. This means when you lift your beaters out of the bowl, the cream should stand straight up and not fall back down. Be very careful not to overmix, or your cream will start to turn into homemade butter.
Step 3: Mix the Sweet Base
In a separate medium bowl, pour in your entire can of sweetened condensed milk. Add your 2 teaspoons of pure vanilla extract and your single pinch of fine sea salt. Use a spoon or a small spatula to stir these three ingredients together until they are fully combined and look like a smooth, shiny golden liquid.
Step 4: Fold the Mixtures Together
Now, gently add about one third of your whipped cream into the bowl with the sweetened condensed milk mixture. Use a rubber spatula to gently fold the cream into the milk using a light, circular motion. This is called folding, and it helps keep all the air inside the whipped cream so your dessert stays light. Once that first part is mixed in, gently fold in the rest of the whipped cream until everything is smooth and there are no white streaks left.
Step 5: Pour and Cover
Carefully pour your smooth and fluffy mixture into a clean metal loaf pan or any freezer safe container that you have in your kitchen. Use the back of your spatula to smooth out the top so it looks nice and flat. Cover the container very tightly with plastic wrap, making sure the plastic wrap actually touches the surface of the mixture to prevent any icy crystals from forming on top.
Step 6: Freeze to Perfection
Place your covered container into the coldest part of your freezer and leave it there to chill for at least 6 hours. For the absolute best results, it is highly recommended to leave it in the freezer overnight. Once it is completely firm, take it out, let it sit on your kitchen counter for about 5 minutes to soften slightly, and then scoop and enjoy.
Why This Recipe Is Special
This home recipe is truly special because it requires absolutely no ice cream maker, which saves you a lot of money and kitchen storage space. Most traditional recipes require you to cook a custard base on the stove with egg yolks, cool it down for hours, and then churn it in a noisy machine that you might only use once a year. This recipe completely bypasses all of those difficult steps while still delivering a texture that is incredibly silky, rich, and professional.
Another amazing benefit of this recipe is that it is completely free from chemical additives, artificial colors, and weird preservatives that are found in almost all commercial brands. You get to decide exactly what goes into your food, which is fantastic for families with young children or anyone who is trying to live a cleaner lifestyle. The simplicity of the ingredients allows the true, natural flavors to shine through beautifully, creating a much cleaner taste on your palate.
Additionally, this recipe is extremely forgiving and serve as the perfect blank canvas for your culinary creativity. Whether you want a deep chocolate flavor, a fresh fruity twist, or a crunchy nut sensation, this base can handle it all without losing its luxurious creaminess. It is a highly reliable recipe that works perfectly every single time, giving you a massive boost of confidence in your home cooking skills.
Extra Tips for Better Taste
To take your homemade dessert to the absolute next level, you can experiment with some incredibly fun and tasty additions. If you love chocolate, you can gently fold in a half cup of chocolate chips, cocoa powder, or chunks of your favorite chocolate bar right before you pour the mixture into the freezer container. For a fruity and refreshing twist, you can swirl in some fresh strawberry puree, raspberry jam, or wild blueberries.
If you are a fan of crunchy textures, try adding crushed sandwich cookies, chopped roasted pecans, toasted walnuts, or even colorful sprinkles to make it look like a birthday party treat. You can also add a swirl of warm caramel sauce, peanut butter, or hazelnut spread through the mixture using a butter knife to create beautiful, flavorful ribbons throughout your scoop.
Another great tip is to always use high quality vanilla extract, or even real vanilla bean paste if you can find it. The tiny black flecks of vanilla bean not only look beautiful and professional, but they also give a much deeper, richer flavor that matches the sweet cream perfectly. Always remember to store your finished product in the very back of the freezer where the temperature is coldest and most stable.
Final Thoughts
Making your own delicious frozen treats at home is a beautiful journey that brings pure comfort, joy, and sweetness into your daily life. This simple recipe proves that you do not need fancy equipment, expensive culinary school training, or complicated ingredients to create something truly magical and satisfying. We hope you have a wonderful time making this recipe, sharing it with the people you care about most, and enjoying every single creamy bite. Thank you so much for reading, and we wish you a very happy and sweet dessert making adventure.
Nutrition Details
Here is an estimated look at the nutritional values for this delicious treat. Please keep in mind that these numbers are approximations based on standard ingredients, and your actual numbers may vary depending on the specific brands you choose to buy at the store.
| Nutrient | Amount Per Serving | Daily Value Percentage |
| Calories | 290 calories | 15 percent |
| Total Fat | 18 grams | 23 percent |
| Saturated Fat | 11 grams | 55 percent |
| Cholesterol | 60 milligrams | 20 percent |
| Sodium | 75 milligrams | 3 percent |
| Total Carbohydrates | 28 grams | 10 percent |
| Sugars | 26 grams | 52 percent |
| Protein | 4 grams | 8 percent |
| Calcium | 120 milligrams | 10 percent |
Disclaimer
The nutritional information provided in this article is for educational and informational purposes only and should not be taken as professional medical advice. Everyone has a different body, unique health needs, and distinct dietary requirements, which means your individual nutritional needs and results may vary. If you have specific health concerns, food allergies, or medical conditions, it is always best to consult with a qualified doctor or a registered dietitian before making significant changes to your diet.