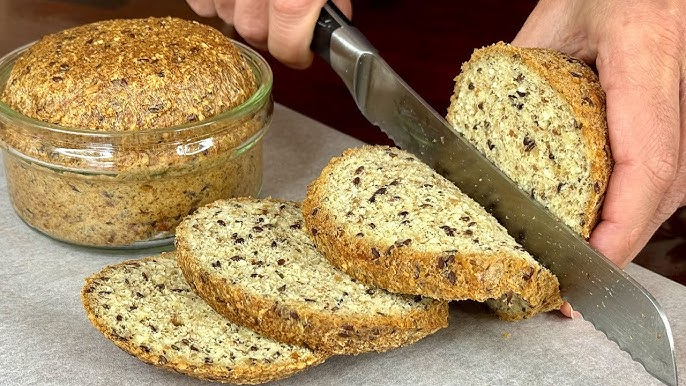
Welcome to a revolutionary approach to home baking where the timeless, comforting art of making fresh bread meets ultimate modern convenience. This recipe is all about creating the perfect Seeded No-Knead Jar Bread—a spectacular, crusty loaf baked directly inside large glass mason jars. Most people skip baking bread at home because they assume it requires hours of exhausting physical kneading, rare countertop mixers, or messy flour-covered kitchens. However, by leveraging a high-hydration dough and a long, slow overnight fermentation, you completely bypass the need for kneading altogether.
We are going to mix a simple dough with a nutrient-rich blend of crunchy seeds, let it rise peacefully on the counter, and bake it inside glass jars to create adorable, perfectly portioned cylinder loaves. By the time you finish reading this comprehensive guide, you will know the exact secrets to achieving a shatteringly crisp crust, a beautifully airy crumb, and a deeply nutty flavor profile that rivals any artisan bakery.
Why People Adore This Recipe
People are absolutely obsessed with jar baking because it brings unparalleled convenience, built-in portion control, and an incredibly fun rustic look to the table. It is a massive favorite among busy professionals who want fresh morning toast without waking up early to handle dough, and families who love having individual loaves for picnics or lunchboxes.
The magic happens right inside the glass jar, which acts like a mini Dutch oven—trapping steam during the first half of the bake to help the dough rise beautifully, then letting the heat caramelize the outer edges into a gorgeous golden-brown crust. Many people find that this recipe makes the absolute perfect culinary gift; you can tie a colorful piece of twine around a cooled jar loaf and hand it to a friend as a stunning, heartfelt present.
Ingredients You Will Need
-
3 cups of unbleached artisan bread flour (or all-purpose flour)
-
$1 \frac{1}{2}$ cups of lukewarm water (around 40°C or 105°F)
-
1 teaspoon of active dry yeast or instant yeast
-
$1 \frac{1}{2}$ teaspoons of fine sea salt
-
2 tablespoons of raw pumpkin seeds (pepitas)
-
2 tablespoons of raw sunflower seeds
-
1 tablespoon of whole flaxseeds
-
1 tablespoon of black or white sesame seeds
-
1 tablespoon of chia seeds
-
2 tablespoons of high-quality olive oil (for coating the jars)
-
Extra cornmeal or rolled oats (for dusting the jars)
Step-by-Step Method
[Mix Flour, Salt, Yeast & Seeds] -> [Pour Warm Water & Stir] -> [Ferment Overnight (12-18 hours)]
                                                                           |
[Bake in Preheated Oven at 425°F] <- [Proof 30 mins] <- [Divide Dough into Oiled Jars]
1. Mixing the Dry Base
In a large mixing bowl, combine your artisan bread flour, fine sea salt, and active dry yeast. Use a dry wire whisk to stir the powders together for thirty seconds to ensure the yeast and salt are completely distributed. Dump in your pumpkin seeds, sunflower seeds, flaxseeds, sesame seeds, and chia seeds. Toss the seeds through the flour mixture until they are completely coated.
2. Formulating the No-Knead Dough
Pour the lukewarm water directly into the center of the flour and seed mixture. Use the handle of a sturdy wooden spoon or a silicone spatula to stir the ingredients together using large, circular motions. The dough will look incredibly shaggy, wet, and sticky, which is exactly correct. Keep stirring for about one minute until all the dry flour pockets vanish completely.
3. The Overnight Fermentation
Cover the top of your mixing bowl tightly with a sheet of plastic wrap or a damp kitchen towel. Place the bowl in a warm, draft-free spot on your kitchen counter and leave it completely undisturbed for 12 to 18 hours (overnight is perfect). During this long, peaceful rest, the water activates the gluten bonds naturally, completely eliminating the need for manual kneading while developing an incredibly rich, complex sourdough-like flavor.
4. Prepping the Baking Jars
After the long rise, you will notice the dough has more than doubled in size, looking highly puffy and dotted with beautiful air bubbles. Before touching the dough, select two wide-mouth 1-quart (32 oz) mason jars.
Important Note: Ensure your glass jars are completely clean, dry, and labeled as heat-safe. Never use jars with narrow necks, or your bread will get trapped inside after baking!
Pour one tablespoon of olive oil into each jar and use a pastry brush or your fingers to coat the entire inside wall thoroughly. Sprinkle a tablespoon of cornmeal or rolled oats into each jar, rotating them so the grains stick to the oil—this creates an extra layer of non-stick protection and a wonderful rustic texture.
5. Shaping and Dividing
Dust your hands lightly with flour. Gently deflate the puffy dough by folding it over itself a few times inside the bowl. Use a sharp knife or a bench scraper to divide the wet dough into two equal portions. Gently drop one portion of dough down into the bottom of each prepared glass jar. The dough should only fill the jars about halfway to leave plenty of room for expansion. Let the jars sit uncovered on your counter for 30 minutes for a quick final proof while you heat up your oven.
6. The Perfect Golden Bake
Turn on your oven and set the temperature to 425°F (218°C). Place your open, uncovered glass jars standing upright onto a sturdy metal baking sheet. Slide the sheet onto the middle rack of your preheated oven. Bake undisturbed for 35 to 40 minutes. You will watch the dough rise magnificently out of the jars, turning a deep, spectacular golden-brown color.
7. Cooling and Releasing
Carefully remove the hot baking sheet from the oven using thick, heavy oven mitts. Let the jars stand quietly on a wire cooling rack for 10 minutes to let the steam settle. Run a thin plastic knife or an offset spatula gently around the inside edge of each jar to loosen the sides. Turn the jars upside down over your hand or a clean cutting board, and the beautiful cylinder seed loaves will slide right out effortlessly. Allow the bread to cool completely before slicing.
Extra Tips for Bakery-Level Success
-
Use Wide-Mouth Jars: Always double-check that your mason jars have a completely straight wall from top to bottom. If the jar curves inward at the neck, the bread will expand past the opening and become entirely impossible to remove without breaking the glass.
-
Get Creative with Toppings: Spray the top of the wet dough with a tiny mist of water right before it goes into the oven, then press extra sesame and sunflower seeds onto the top surface for a highly decorative, professional-looking crown.
-
Test the Texture: If you prefer an ultra-soft sandwich style crust rather than a crunchy artisan shell, tent a sheet of aluminum foil loosely over the tops of the jars during the first twenty minutes of baking to trap extra moisture.
-
Check the Hydration: If you live in an incredibly humid environment, you may need to reduce the water by a single tablespoon to ensure the dough holds its structure perfectly inside the glass walls.
Nutrition Details
| Nutrient | Amount Per Serving (1 Thick Slice) |
| Calories | 160 kcal |
| Total Fat | 4 grams |
| Saturated Fat | 0.5 grams |
| Sodium | 290 milligrams |
| Total Carbohydrates | 26 grams |
| Dietary Fiber | 3 grams |
| Sugars | 0 grams |
| Protein | 5 grams |
| Iron | 10% of daily value |
Disclaimer
Please keep in mind that baking with glass requires strict care and attention to thermal shock. Always ensure your glass jars are completely free of microscopic cracks, stars, or deep scratches before heating them in an oven. Never place a cold glass jar directly into a smoking hot oven, and never place hot baked jars onto an ice-cold granite countertop or into a sink filled with water, as sudden temperature drops can cause glass to fracture. This article is written for educational and culinary enjoyment purposes and should be executed with proper kitchen safety measures.