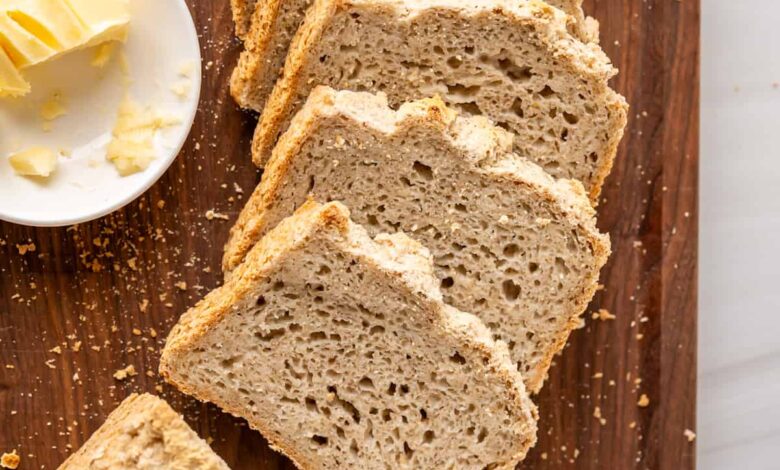
Making fresh homemade bread is one of the most rewarding things you can do in your kitchen. This specific recipe is all about creating a wonderful loaf of gluten free bread without any of the hard work that usually comes with baking. Many people think that baking bread requires hours of heavy kneading and perfect timing but this method changes everything completely. You do not need any special skills or expensive kitchen tools to make this happen. It is designed for beginners who want a warm comforting loaf of bread but do not want to spend all day dealing with sticky dough. The magic of this recipe lies in how the ingredients work together over time to build structure naturally without you having to push or pull the dough at all. It is a true game changer for anyone who misses the smell of fresh bread baking in the oven but needs to avoid gluten for their health.
People absolutely love this recipe because it takes away all the stress and fear of making gluten free bread from scratch. Traditional gluten free baking can often feel like a complicated science project with too many strange ingredients and dry crumbly results. This recipe is a massive favorite because it yields a loaf that is incredibly soft on the inside with a beautiful crispy golden crust on the outside. It is amazing how simple the process is since you basically just mix the ingredients in a large bowl and let time do the rest of the work. Families love it because it tastes just like regular bakery bread and nobody can even tell that it is entirely gluten free. It saves you money compared to buying those tiny frozen gluten free loaves from the grocery store that often taste like cardboard. Plus the joy of cutting into a warm loaf that you made with your own hands is a feeling that cannot be matched.
You should make this bread whenever you want to fill your home with the most comforting and heavenly aroma imaginable. It is perfect for a lazy Sunday morning when you want to treat your family to a special breakfast with fresh toast and melted butter. It is also an excellent fitness choice for people who want to manage their digestion or follow a gluten free lifestyle without feeling like they are missing out on their favorite comfort foods. You can make it for holiday dinners to share with friends or simply prepare it during the week so you have healthy sandwich bread ready for school lunches. Food has a powerful way of bringing people together and serving a warm slice of homemade bread is like giving someone a giant hug. Whether you are dealing with a food allergy or you just want a cleaner way of eating this recipe fits perfectly into your life.
Baking this bread is a beautiful way to practice self care and slow down in a world that always seems to move too fast. When you mix these simple ingredients together you are creating something wholesome and nutritious from scratch for the people you care about most. It gives you a great sense of pride to look at a beautiful loaf of bread on your counter and know exactly what went into it. There are no strange chemicals or artificial preservatives hidden inside this recipe like the ones you find in store bought options. It is pure simple goodness that nourishes your body and satisfies your cravings for real authentic bread. Once you see how easy it is to get a perfect result on your very first try you will want to make it every single week. It is a wonderful addition to your cooking routine that brings health happiness and great flavor to your dinner table.
Ingredients You Will Need
To make this beautiful loaf of bread you will need to gather a few simple ingredients. Make sure your measurements are accurate so your bread turns out perfectly soft and delicious.
-
Four cups of high quality gluten free baking flour blend
-
Two teaspoons of rapid rise instant yeast
-
One and a half teaspoons of fine sea salt
-
Two tablespoons of pure organic honey
-
Two cups of warm water at about one hundred degrees Fahrenheit
-
Two tablespoons of extra virgin olive oil
-
One teaspoon of apple cider vinegar
-
Two tablespoons of whole psyllium husk powder
Step by Step Method
Preparing the Flour Mixture
Take a very large glass mixing bowl and make sure it is completely clean and dry before you begin. Pour your four cups of gluten free baking flour blend directly into the center of the bowl. Add your two teaspoons of rapid rise instant yeast and your one and a half teaspoons of fine sea salt. Use a large wire whisk to stir these dry ingredients together for at least one full minute. Stirring thoroughly ensures that the yeast and salt are evenly distributed throughout the flour mixture which helps the bread rise perfectly later on.
Activating the Psyllium Husk
In a separate smaller bowl or a large glass measuring cup pour your two cups of warm water. The water should feel warm to the touch like bath water but it must not be hot or it will kill the yeast. Add your two tablespoons of whole psyllium husk powder to the warm water and whisk it quickly. Let this mixture sit on your counter for about five minutes. You will notice that it transforms into a thick gel which is exactly what we want because this gel acts like gluten to give our bread structure.
Mixing the Liquid Ingredients
Once your psyllium husk water has turned into a thick gel you can add the remaining wet ingredients directly to it. Pour in your two tablespoons of pure organic honey which provides food for the yeast and adds a nice flavor. Add your two tablespoons of extra virgin olive oil to keep the bread moist and soft. Finally pour in your one teaspoon of apple cider vinegar because the acid helps activate the yeast and creates a lighter texture in the final loaf. Stir everything together with a spoon until it is well combined.
Combining Wet and Dry Ingredients
Pour your wet mixture directly into the large bowl with your dry flour ingredients. Use a sturdy wooden spoon or a silicone spatula to stir everything together. Start from the outside of the bowl and push the ingredients toward the center. Keep stirring until all the dry flour disappears and you form a sticky uniform dough. You do not need to use your hands to knead this dough at all. Just make sure there are no dry pockets of flour left at the bottom of your bowl.
The First Rise Period
Once your dough is fully mixed use your spatula to shape it into a loose ball in the center of the bowl. Cover the top of the bowl tightly with a piece of plastic wrap or a clean damp kitchen towel. Place the bowl in a warm draft free spot in your kitchen such as inside an oven that is turned off. Let the dough rest undisturbed for about two hours. During this time the yeast will work its magic and the dough will expand significantly in size while developing a lovely aroma.
Shaping the Dough
After the two hours have passed look at your dough to see how much it has grown. Line a standard loaf pan with a piece of parchment paper making sure the paper sticks up over the sides like handles. Use your spatula to gently transfer the sticky dough from the mixing bowl into your prepared loaf pan. Smooth out the top of the dough using the back of a spoon that has been dipped in a little bit of water so it does not stick.
The Second Rise Period
Cover your loaf pan loosely with a clean dry cloth to protect the dough. Let it sit on your counter for another forty five minutes for its second rise. This step allows the dough to settle into the shape of the pan and creates a lighter fluffier texture inside the bread. While your bread is rising for the second time you should preheat your oven to four hundred degrees Fahrenheit so it is perfectly hot when the bread is ready to go inside.
Baking the Bread
Once your oven is fully heated and your dough has puffed up beautifully remove the cloth from the loaf pan. Place the pan on the center rack of your hot oven. Bake the bread at four hundred degrees Fahrenheit for about fifty to fifty five minutes. You will know it is done when the top turns a beautiful dark golden brown color and feels firm to the touch. If you tap the top of the loaf lightly it should sound hollow inside.
Cooling and Slicing
Carefully remove the hot loaf pan from your oven using thick oven mitts. Let the bread sit inside the pan for about ten minutes to cool down slightly. Use the edges of the parchment paper to lift the hot loaf out of the pan and place it onto a wire cooling rack. It is absolutely essential that you let the bread cool completely for at least two hours before slicing it. Slicing it too early will make the inside gummy because the bread continues to set as it cools.
Why This Recipe Is Special
This recipe is incredibly special because it solves the biggest problem people face with gluten free baking which is dryness. Many gluten free breads you buy at the store feel like blocks of wood and crumble into pieces the moment you try to make a sandwich. This homemade version stays remarkably soft and flexible for days because of the natural gel created by the psyllium husk powder. It holds its shape perfectly whether you are spreading cold butter on it or packing it in a lunchbox for work.
Another reason this bread stands out is that it is completely free from common allergens and bad additives. When you read the label on a package of commercial gluten free bread you often see a long list of chemical stabilizers preservatives and extra sugars. This recipe uses clean simple ingredients that you can actually pronounce and feel good about feeding to your family. It is much easier on sensitive stomachs and provides a great option for people who want to reduce inflammation in their bodies.
The flavor of this bread is far superior to anything you will find in a plastic bag at the store. Because the dough rests for a long time the yeast has an opportunity to develop deep complex flavors that taste like traditional sourdough. The small amount of honey creates a beautiful balance with the sea salt while the olive oil adds a rich satisfying quality. It gives you the authentic bakery experience right in your own home without any of the stress or hard physical labor.
Extra Tips for Better Taste
To make your bread taste even more amazing you can experiment with adding different seeds to the dough. Stirring in a quarter cup of sunflower seeds pumpkin seeds or chia seeds during the mixing step adds a wonderful crunch and extra nutrition. You can also sprinkle a generous handful of sesame seeds or poppy seeds on top of the loaf right before it goes into the oven. This makes the bread look like it came from a fancy artisan bakery and adds a lovely toasted flavor to the crust.
If you love savory bread you can easily mix in some dried herbs and spices to customize your loaf. Adding one tablespoon of dried rosemary or Italian seasoning along with a teaspoon of garlic powder creates a deeply aromatic bread that pairs perfectly with pasta dishes. You can also mix in a half cup of shredded sharp cheddar cheese for a rich savory treat. The cheese melts into the dough as it bakes creating delicious little pockets of flavor throughout the loaf.
For those who prefer a slightly sweeter bread you can swap the olive oil for melted coconut oil and add a teaspoon of ground cinnamon to the flour. Throwing in a half cup of raisins or dried cranberries makes a spectacular breakfast bread that tastes incredible when toasted. You can serve it with a drizzle of honey or a smear of cream cheese for a comforting morning meal. The options are truly endless once you master the basic base recipe.
Always make sure your yeast is fresh before you start baking this bread. If your yeast has been sitting in your cupboard for months it might be dead and your bread will not rise properly. You can test your yeast by mixing a tiny bit of it with warm water and sugar to see if it bubbles up after a few minutes. If it does not bubble it is time to buy a fresh package so your bread turns out beautifully high and fluffy.
Final Thoughts
Baking your own gluten free bread does not have to be a difficult or frustrating chore. This no knead recipe proves that you can achieve incredible bakery quality results with just a bowl a spoon and a little bit of patience. It is a joyful peaceful process that rewards you with a delicious healthy loaf of bread that everyone can enjoy regardless of their dietary needs. Once you experience the smell of this bread baking in your oven you will never want to go back to store bought options again. Grab your ingredients give it a try and enjoy the wonderful journey of homemade baking.
Nutrition Details
Here is a helpful breakdown of the nutritional information for this homemade bread. These values are calculated based on cutting the loaf into twelve equal slices.
| Nutrient Type | Amount Per Serving | Percentage of Daily Value |
| Calories | One hundred and sixty calories | Eight percent |
| Total Fat | Three grams | Four percent |
| Saturated Fat | Zero grams | Zero percent |
| Sodium | Three hundred milligrams | Thirteen percent |
| Total Carbohydrates | Thirty one grams | Eleven percent |
| Dietary Fiber | Four grams | Fourteen percent |
| Sugars | Two grams | Two percent |
| Protein | Three grams | Six percent |
Disclaimer
Please remember that everyone has a unique body with different nutritional requirements and health needs. The information provided in this article is meant for educational and sharing purposes only and should not replace professional medical advice. Individual baking results may vary depending on your oven temperature the specific brand of gluten free flour you choose and your local climate. If you have severe celiac disease or specific medical concerns always consult with a doctor or a certified dietitian before making major changes to your diet.