Welcome to a world where making a decadent dessert becomes the easiest part of your week without ever needing to turn on your kitchen oven or deal with complicated baking timers. This recipe is all about creating the most perfect no bake chocolate peanut butter crunch bars that deliver a massive amount of sweet satisfaction with every single bite you take. We are going to explore how simple pantry staples like creamy peanut butter and rich chocolate can be combined into a beautiful dessert masterpiece that sets perfectly right inside your refrigerator. You will learn the secrets of achieving a crisp texture that balances the dense richness of the nut butter so that your bars are never too heavy or sticky on your tongue. This comprehensive guide is written specifically for beginners who want to treat their sweet tooth to a high quality homemade snack without spending hours washing multiple dirty baking pans or mixers. It is truly amazing how just a few basic ingredients from your local market can come together to create a gorgeous tray of bars that your whole family will beg you to make every single weekend. You do not need any previous cooking skills to achieve a professional result on your very first try because every step is explained in very simple words that anyone can master in less than fifteen minutes today.
People absolutely love this recipe because it combines two of the most popular flavors in the world into a single dessert that requires absolutely zero baking effort. The contrast between the velvety smooth chocolate layer and the crisp peanut butter base creates a satisfying mouthfeel that rivals any expensive candy bar bought from a premium confectionery shop. Parents love it because it is a fantastic heat free recipe that they can safely make together with their young children on a hot summer afternoon when the house is already too warm for the oven. There is something incredibly comforting about a no bake dessert because it offers a quick route to sweet indulgence while keeping your kitchen perfectly cool and organized throughout the entire process. This version of the recipe focuses heavily on using simple measuring steps so that your bars hold their shape beautifully when you slice them into neat squares for your guests. You will find that the rich aroma of melted chocolate filling your home brings a massive smile to your face before you even take your very first bite from the tray. It is the ultimate convenience dessert that brings pure happiness to your household and makes you feel like a master pastry chef without any of the traditional hard work.
You should make this recipe whenever you have a sudden intense craving for chocolate or when you need a quick crowd pleasing dessert for an upcoming neighborhood block party or school bake sale. It is the absolute perfect choice for busy people who want to meal prep a sweet treat for the week because these bars store beautifully in the freezer and stay fresh for a very long time. Many people choose this recipe during the busy holiday season when their ovens are already packed with heavy roasting pans and they need a spectacular dessert that can be made entirely on the counter top. The emotional satisfaction of spreading a shiny layer of melted chocolate over a crisp peanut butter foundation is a wonderful way to relax your mind and enjoy a peaceful moment of creativity in your kitchen. It also serves as a fantastic base recipe for using up extra cereal or baking chips you might have sitting inside your cabinets before they lose their freshness and go to waste. Whether you are hosting a large backyard celebration or just want a delicious treat to enjoy with a cold glass of milk while watching your favorite television show this recipe fits into your life flawlessly.
The taste of these no bake chocolate peanut butter crunch bars is a spectacular journey for your palate because you get the initial hit of rich cocoa followed by the salty sweetness of the peanut butter and finally the loud clean snap of the crispy rice hidden inside. This timeless flavor combination has remained a favorite among dessert lovers worldwide for many decades and will likely continue to be a standard comfort food classic forever. Making these bars yourself allows you to control the quality of the ingredients so you can avoid the hydrogenated oils and high fructose corn syrup typically found in factory processed store bought snacks. You get to select your favorite chocolate and choose a high quality nut butter which makes a tremendous difference in the rich homemade quality of the final treat you serve. Learning how to properly melt chocolate without burning it will build your kitchen confidence tremendously and you will realize that spectacular desserts can be made using very simple tools. By the time you finish reading this detailed article you will possess all the knowledge required to become the dessert champion of your home and your friends will definitely want the secret recipe.
Ingredients You Will Need
To assemble these rich and crispy bars you will need to gather the following simple ingredients from your kitchen pantry or local grocery store:
-
One cup of creamy peanut butter or crunchy peanut butter based on your personal preference
-
One half cup of raw honey or pure maple syrup to sweeten the base naturally
-
One quarter cup of unsalted butter or pure coconut oil melted completely
-
Three cups of crispy rice cereal or corn flakes crushed gently
-
One cup of semi sweet chocolate chips or dark chocolate chunks
-
One tablespoon of extra creamy peanut butter to swirl into the chocolate layer
-
One pinch of flaky sea salt to sprinkle over the top for a gourmet finish
Step by Step Method
First you need to prepare your baking pan by taking an eight inch square metal or glass pan and lining it completely with a sheet of parchment paper. Make sure the paper extends up and over the sides of the pan slightly because these paper handles will allow you to lift the set bars out of the pan easily later when it is time to slice them. Lightly wipe the paper with a tiny drop of oil to ensure your dessert releases perfectly without any tearing or sticking.
Take a large mixing bowl and combine your one cup of creamy peanut butter with the half cup of raw honey and the quarter cup of melted unsalted butter. Use a sturdy wooden spoon to stir these liquid ingredients together vigorously until the mixture is completely smooth and looks like a rich golden caramel sauce. If your peanut butter is very cold or stiff you can warm the bowl in your microwave for twenty seconds to make the mixing process much easier for your arms.
Pour the three cups of crispy rice cereal directly into the bowl with your sweet peanut butter mixture and use a rubber spatula to fold them together carefully. Work from the bottom of the bowl upward making sure that every single grain of cereal receives a generous coating of the peanut butter sauce without crushing the flakes completely. This step is crucial because the coated cereal provides the structure and the ultimate crunch that defines the entire character of these bars.
Transfer the sticky cereal mixture into your prepared baking pan using your spatula to scrape every last drop from the sides of the bowl. Use the back of a large metal spoon or a piece of plastic wrap to press the mixture down firmly and evenly into the bottom of the pan into a tight flat layer. Take your time during this step to pack the corners tightly because a firmly pressed base ensures that your final bars will not crumble apart when you cut them.
Place a small saucepan over low heat on your stove top and drop in your one cup of semi sweet chocolate chips along with the single tablespoon of extra peanut butter. Stir the chocolate constantly with a spoon as it begins to melt so that it stays perfectly smooth and does not scorch against the hot metal. Once the chocolate is completely melted and looks shiny pour it immediately over the top of your pressed cereal layer in the square pan.
Use your spatula to spread the hot melted chocolate evenly across the entire surface of the bars reaching all the way to the edges to create a beautiful uniform top coat. While the chocolate is still warm and wet sprinkle the pinch of flaky sea salt evenly over the surface to create a wonderful contrast that balances the rich sweetness of the dessert. Place the entire pan flat onto a shelf inside your refrigerator and let it chill undisturbed for at least one full hour.
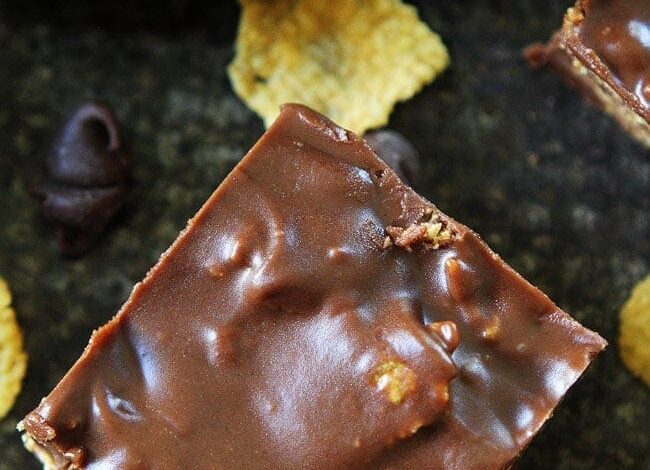
Once the chilling time is up and the chocolate layer feels completely hard to the touch remove the pan from the refrigerator carefully. Grab the edges of the parchment paper handles and lift the solid block of dessert out of the pan and place it onto a clean wooden cutting board. Take a large sharp chef knife and slice the block into sixteen neat square bars wiping the blade with a clean towel between each cut to ensure your squares look beautiful and sharp.
Arrange the completed chocolate peanut butter crunch bars onto a festive serving platter and serve them immediately while they are perfectly cool and fresh. If you have any leftovers store them in an airtight container with layers of parchment paper between the bars so they do not stick together. Keep the container inside your refrigerator for up to two weeks or inside your freezer for up to three months so you always have a premium sweet snack ready to enjoy.
Why This Recipe Is Special
This recipe is remarkably special because it successfully creates an incredibly indulgent dessert experience using simple physical assembly techniques rather than relying on the chemical reactions of traditional baking. By omitting white flour and refined eggs entirely you eliminate the risk of ending up with a dry or fallen cake and guarantee a perfect outcome every single time you mix the ingredients. It provides an exceptional balance of satisfying textures including a firm crunchy cereal foundation and a velvety smooth chocolate top coat that satisfies your cravings completely. This dessert is naturally vegetarian and can easily be modified to fit different dietary styles by choosing specific allergen friendly nut butters or dairy free chocolate chips based on your needs. It is a genuine triumph of modern kitchen convenience that proves you can create a high end crowd pleasing treat using affordable pantry staples and minimal preparation energy at home.
Extra Tips for Better Taste
If you want to take these no bake chocolate peanut butter crunch bars to an even higher level of culinary excellence you can try adding a half cup of chopped roasted peanuts into the cereal mixture to increase the nut flavor profile. For those who love a bit of visual flair taking a spoonful of melted white chocolate and drizzling it in a zigzag pattern across the dark chocolate layer right before chilling can create a spectacular zebra appearance. If you want to make the bars feel extra festive for a holiday party you can mix a handful of colorful M and M candies or mini marshmallows into the crispy cereal base before pressing it into the pan. Always remember to use regular commercial peanut butter for this specific recipe because natural varieties that separate in the jar can sometimes be too oily and might prevent your bars from holding their shape properly at room temperature. If you prefer a less sweet dessert experience try using dark chocolate chips with a high cocoa percentage which provides a wonderful bitter edge that contrasts beautifully with the sweet honey base.
Final Thoughts
Assembling a fresh tray of no bake chocolate peanut butter crunch bars is a deeply rewarding kitchen activity that will instantly bring a sense of fun and comfort to your weekly dessert routine. It is a beautiful celebration of simplicity and flavor that proves you do not need to spend hours working over a hot stove to create an extraordinary sweet treat that your loved ones will cherish. We hope that these rich and crispy bars bring a massive amount of happiness to your snack time and become a trusted staple in your household cooking rotation for many years to come. Remember that creating food should always be an enjoyable and stress free process that allows you to share love and sweetness with the people around you every day. Enjoy the wonderful feeling of slicing into a solid homemade candy bar that you created with your own hands and enjoy every single crunchy chocolate bite. Happy no bake dessert making and may your refrigerator always be filled with wonderful sweet creations.
Nutrition Details
Here is the estimated nutritional breakdown for one individual square of these no bake chocolate peanut butter crunch bars:
| Nutrient | Amount per Serving |
| Calories | 210 kcal |
| Total Fat | 12 grams |
| Saturated Fat | 4 grams |
| Cholesterol | 5 milligrams |
| Sodium | 95 milligrams |
| Total Carbohydrates | 24 grams |
| Dietary Fiber | 2 grams |
| Sugars | 14 grams |
| Protein | 4 grams |
| Calcium | 2 percent of daily value |
| Iron | 6 percent of daily value |
Disclaimer
Please keep in mind that every human body is completely different with unique nutritional requirements and distinct health backgrounds so the individual results of this recipe may vary for you. The nutrition facts provided throughout this guide are standard estimates calculated using average ingredient databases and your personal choice of product brands may alter the final numbers slightly. If you have any underlying medical conditions like diabetes or severe food allergies to peanuts or tree nuts you should always check with a licensed doctor or a professional nutritionist before changing your diet. We provide this recipe and the accompanying wellness details purely for educational and entertainment purposes to help you explore easy home cooking in a fun and safe manner. Your personal health journey is completely unique to you and you should always listen to your body and make the lifestyle choices that best support your long term health and happiness.