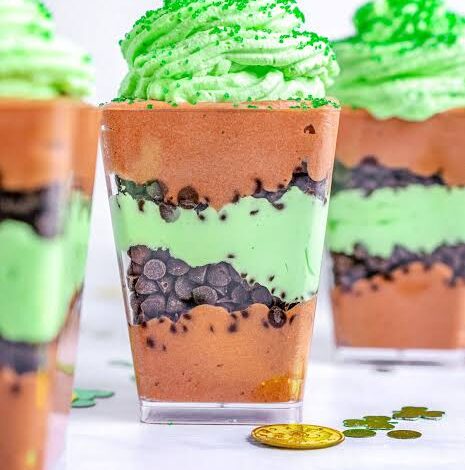
Mint chocolate marble whip dessert jars are a wonderful creation that brings together the cool and refreshing taste of mint with the rich and comforting flavor of sweet chocolate in every single spoon you take. This delightful treat is layered inside cute little glass jars to show off a stunning marble pattern that looks just like something you would order at a fancy cafe or a high end bakery downtown. When you look through the glass, you see swirls of vibrant green mint cream and dark velvety chocolate mousse dancing together in a beautiful pattern that instantly makes your mouth water with pure excitement. It is a completely no bake dessert which means you do not have to worry about turning on a hot oven or spending hours managing complicated baking steps and temperatures. Everything comes together smoothly using simple mixing bowls and an electric hand mixer making it a fun project for both experienced home cooks and absolute beginners who are stepping into the kitchen for the very first time. You get all the luxury of a gourmet layered parfait right at home without any of the stress or mess that usually comes with making traditional cakes and pastries.
People fall completely in love with this recipe from the very first bite because it offers a magical texture contrast that feels like a soft cloud melting on your tongue. The whipped cream base gives it a light and airy feel while the smooth chocolate adds a deep and satisfying richness that balances the sweetness so it never feels too heavy or overwhelming. Mint and chocolate is a classic flavor combination that has won the hearts of food lovers for generations because the cooling sensation of mint cuts right through the richness of chocolate in the most refreshing way imaginable. Furthermore serving individual portions inside glass jars means nobody has to fight over who gets the biggest slice of pie or the corner piece of cake because everyone gets their very own personal treat. It is clean and neat to serve and it adds an instant touch of elegance to any table setting whether you are hosting a casual game night or a cozy dinner with your closest friends.
You should make these delightful dessert jars whenever you want to bring a special spark of joy into an ordinary weekday evening or when you are celebrating a joyful milestone with the people you cherish most. They are wonderful for summer barbecues and outdoor picnics because the cool mint flavor provides a refreshing escape from the warm weather while still satisfying your deepest chocolate cravings. From an emotional standpoint making these jars is a wonderful form of self care and a lovely way to unwind after a long week by engaging your creative side in the kitchen. On the fitness and moderation side you can easily adapt this recipe to fit your lifestyle by choosing lighter dairy options or sugar alternative sweeteners so you can enjoy a sweet treat without derailing your personal wellness goals. The process of whipping the cream and layering the colors is surprisingly therapeutic and allows you to slow down and focus on creating something beautiful and delicious with your own hands.
Bringing these jars to a family gathering or a holiday party guarantees that you will walk away with glowing compliments and requests for the recipe from everyone who tastes them. The visual appeal is simply unmatched because the green and brown swirls look like art trapped inside glass making it one of the most photogenic desserts you can possibly share on social media or family group chats. It is a foolproof recipe that rewards you instantly for your minor efforts giving you a gourmet result that looks like it took hours of professional pastry training. Whether you are treating yourself after a long day of work or surprising your kids with an after school sweet, these dessert jars deliver pure happiness in every single spoonful. The combination of easy preparation and stunning visual presentation ensures that this recipe will quickly become a permanent favorite in your personal cooking collection for years to come.
Ingredients You Will Need
To make these lovely mint chocolate marble whip dessert jars, you will need a few simple items that you can easily find at your local grocery store. Here is the complete list of ingredients with clear quantities and units to help you get ready for your kitchen adventure.
-
Heavy whipping cream: Two cups, kept very cold in the refrigerator before using.
-
Powdered sugar: Half a cup, to give the whipped cream a delicate and smooth sweetness.
-
Pure peppermint extract: One teaspoon, to bring that fresh and cooling mint flavor.
-
Green food coloring: Two to three tiny drops, to give the mint layer a fun and vibrant look.
-
Dark chocolate chips: One cup, for making the rich chocolate component.
-
Unsalted butter: Two tablespoons, to help the chocolate melt into a silky and smooth sauce.
-
Vanilla extract: One teaspoon, to enhance the overall aroma and depth of the flavors.
-
Crushed chocolate cookies: One cup, for adding a wonderful crunch at the bottom and middle of the jars.
-
Fresh mint leaves: A small handful, for a pretty green garnish on top of each jar.
Step by Step Method
Creating these beautiful dessert jars is a fun and relaxing process when you take it one step at a time. Follow these detailed instructions carefully and you will achieve a professional result on your very first try.
First you need to prepare your chocolate base so it has enough time to cool down before mixing it with the whipped cream. Take a microwave safe bowl and add your one cup of dark chocolate chips along with two tablespoons of unsalted butter. Place the bowl in the microwave and heat it in thirty second bursts, stopping to stir thoroughly after each burst so the chocolate does not burn. Once the chocolate and butter are completely melted and smooth, stir in half a teaspoon of vanilla extract and set the bowl aside on your counter to cool down to room temperature.
Next you will prepare your wonderful whipped cream base which serves as the fluffy foundation for both your mint and chocolate layers. Take a large mixing bowl and pour in your two cups of very cold heavy whipping cream. Use an electric hand mixer on medium speed to whip the cream until it begins to thicken and soft peaks start to form. Gradually add your half a cup of powdered sugar and the remaining vanilla extract while continuing to mix gently. Keep mixing until the cream holds stiff and glossy peaks that stand up straight when you lift the beaters out of the bowl.
Now you will divide your freshly whipped cream into two separate bowls so you can create the two distinct flavors and colors. Leave about half of the whipped cream in the original bowl and label that your chocolate mixing bowl. Pour the other half of the whipped cream into a second bowl and gently fold in your one teaspoon of pure peppermint extract and two to three drops of green food coloring. Stir the green mixture very gently with a spatula until the color is completely uniform and you have a lovely mint cream ready to go.
To turn the plain whipped cream into your chocolate whip, take your cooled melted chocolate mixture and pour it slowly into the first bowl of whipped cream. Use your spatula to fold the chocolate into the cream using gentle upward strokes so you do not knock all the air out of the whipped cream. Continue folding until the mixture turns a gorgeous light brown color and the chocolate is completely blended into the fluffy cloud of cream. Now you have both your vibrant green mint whip and your rich chocolate whip sitting proudly on your kitchen counter.
The next step is the most fun part where you assemble everything inside your clean glass jars. Take your crushed chocolate cookies and spoon about two tablespoons of the crumbs directly into the bottom of each empty dessert jar. This creates a delicious crunchy crust that mimics the bottom of a traditional pie. Take a spoon or a piping bag and add a dollop of your green mint whip on one side of the jar and a dollop of your chocolate whip on the other side. Repeat this layering process, alternating the colors to create that stunning marble effect as the two creams press against the glass walls.
Continue filling your jars until you reach near the top, adding a tiny layer of crushed cookies in the middle for an extra surprise crunch if you like. Finish the very top of each jar with a neat swirl of both creams meeting right in the center. Garnish each jar with a fresh mint leaf and a tiny sprinkle of remaining cookie crumbs to make them look like they came straight from a gourmet bakery display. Place your finished dessert jars into the refrigerator for at least one hour before serving so they can chill and set into their final wonderful textures.
Why This Recipe Is Special
This recipe stands out from ordinary desserts because it combines incredible flavor with unmatched visual elegance and extreme ease of preparation. You do not need any fancy pastry chef tools or expensive equipment to make these jars look like a million bucks. The balance between the cool and refreshing peppermint and the deep comforting chocolate creates a sensory experience that wakes up your taste buds and leaves you feeling completely satisfied. Furthermore the portion control aspect of using individual jars makes it very easy to enjoy a sweet treat without worrying about cutting slices or overindulging. It is a versatile recipe that brings joy to both adults and children alike making it a universal crowd pleaser for any occasion you can possibly think of.
Extra Tips for Better Taste
If you want to take your dessert jars to the next level of deliciousness, try out these creative improvement tips from experienced home bakers. Always make sure your heavy whipping cream is ice cold straight from the fridge because warm cream will not whip properly and will stay runny. If you want an even deeper chocolate experience, you can drizzle a little bit of homemade chocolate syrup along the inside walls of the glass jars before adding your creams to enhance the marble pattern. For an extra crunch, try toasting your crushed cookies in a dry skillet for just one minute before layering them into the jars to bring out a richer toasted flavor. Do not skip the chilling time in the refrigerator because letting the jars rest allows the flavors to meld together and gives the cream a firmer and more luxurious texture.
Final Thoughts
Making these mint chocolate marble whip dessert jars is such a rewarding and joyful experience that brings a little extra sweetness into your everyday life. There is something truly special about taking a few simple ingredients and turning them into a gorgeous dessert that brings smiles to the faces of your family and friends. We hope you have an absolute wonderful time whipping up these treats in your kitchen and enjoying every single refreshing and chocolatey spoonful. Remember that cooking and baking are all about having fun and expressing your creativity so feel free to make this recipe your own and share the joy with the people you love. Happy cooking and may your kitchen always be filled with delicious aromas and happy moments.
Nutrition Details
Here is a helpful breakdown of the estimated nutritional information per serving for your mint chocolate marble whip dessert jars based on standard ingredients. Please remember that these numbers can change slightly depending on the specific brands you choose to use in your kitchen.
| Nutrient | Amount Per Serving |
| Calories | Three hundred fifty calories |
| Total Fat | Twenty two grams |
| Saturated Fat | Fourteen grams |
| Carbohydrates | Thirty four grams |
| Dietary Fiber | Two grams |
| Sugars | Twenty eight grams |
| Protein | Four grams |
| Sodium | One hundred milligrams |
Disclaimer
Please keep in mind that this recipe article is intended for general informational and entertainment purposes only and does not constitute professional nutritional or medical advice. Every single human body is completely unique with different metabolism rates, dietary needs, health conditions, and nutritional requirements. The stated nutritional values are only rough estimates and your actual results may vary based on your specific portion sizes and ingredient selections. If you have any specific food allergies, intolerances, or underlying health concerns, you should always consult with a qualified healthcare professional or a registered dietitian before making significant changes to your regular diet. Enjoy your treats mindfully and listen to what your own body tells you to maintain a happy and balanced lifestyle.