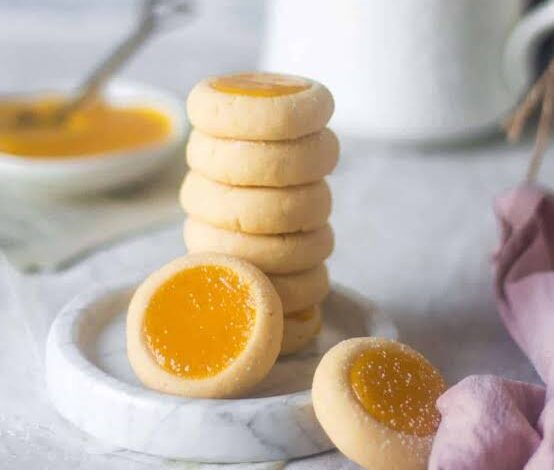
Welcome to your new favorite baking adventure where we explore the wonderful world of home baking. This recipe is all about creating the most wonderful lemon curd cookies you have ever tasted in your life. We are talking about a soft, melt in your mouth buttery sugar cookie base that holds a bright, golden pool of sweet and tangy lemon cream right in the center. It is a beautiful mix of textures because you get the rich and crumbly cookie together with the smooth and silky fruit filling. These treats are often called thumbprint cookies because you use your thumb or a small spoon to make a little well in the dough before baking. The bright yellow color of the fruit center looks like a tiny splash of sunshine on your plate, making them look just as amazing as they taste. Whether you are an expert baker or someone who has never turned on an oven before, this guide will show you how to create magic with simple kitchen ingredients.
People all over the world absolutely love these citrus treats for so many great reasons, but mostly because they bring pure joy to the taste buds. The biggest reason for this love is the perfect balance between the rich sweetness of the baked dough and the sharp, refreshing sourness of the fruit topping. Many desserts can feel too heavy or overly sweet after just one bite, but the citrus notes here keep your palate feeling clean and excited for another taste. People also love how beautiful they look on a serving tray, as they look like fancy pastries from an expensive French bakery even though they are made right at home. They are incredibly comforting to eat with a warm cup of coffee or hot tea, creating a lovely moment of peace during a busy day. There is also a great sense of nostalgia attached to making thumbprint treats, reminding many people of baking with their parents or grandparents during holidays. It is a crowd pleasing dessert that disappears within minutes whenever it is brought to a party or a casual family gathering.
There is never a bad time to bake a batch of these glorious desserts because they fit perfectly into almost any moment of your life. You might want to make them on a rainy afternoon when you need some emotional comfort and want your house to smell like warm vanilla and fresh citrus fruits. They are the ultimate addition to spring parties, summer picnics, bridal showers, baby showers, or holiday dessert tables where you want to impress your guests with something elegant. From a taste perspective, you should make them whenever you are tired of standard chocolate chip treats and crave something that is deeply refreshing and lively. Even if you are trying to stay mindful of your fitness and healthy lifestyle choices, these treats serve a wonderful purpose in your routine. Instead of eating heavily processed store bought snacks filled with strange chemicals, you can enjoy a whole food treat made with real fruit juice and real butter. Having one beautifully crafted sweet after a long workout or a week of clean eating satisfies your sugar cravings completely, helping you stay on track with your long term wellness goals without feeling deprived.
Baking these items at home is a beautiful sensory experience that connects you deeply to the joy of cooking and sharing food with people you care about. When you grate the fresh skin of the citrus fruit, the air fills with natural oils that instantly lift your mood and make your kitchen feel like a bright sanctuary. Watching simple elements like flour, sugar, and fat come together into a smooth dough teaches you the beautiful science of baking in a very practical way. It is a fantastic project to do with children or friends because rolling the dough into neat little balls and pressing the center is incredibly fun and tactile. You do not need any fancy tools or expensive machinery to make this happen, which means anyone can join in the fun regardless of their skill level. By the time you pull the golden trays out of your hot oven, you will feel a massive wave of pride seeing what your own hands have created. This recipe is more than just instructions for food, it is an invitation to slow down, enjoy the process, and treat yourself to a burst of pure homemade happiness.
Ingredients You Will Need
To make these delicious treats completely from scratch, you will need to gather a few simple components from your local grocery store. It is always best to measure everything carefully before you start mixing so that your baking process goes smoothly and successfully. Here is the complete list of everything you will need for both the cookie base and the luscious fruit center.
For the Cookie Base
-
Unsalted butter: 1 cup, which is equal to 2 sticks, and it must be softened at room temperature.
-
Granulated white sugar: Two thirds of a cup to give the dough its classic sweetness.
-
Pure vanilla extract: 1 teaspoon to add a warm, rich aroma to the dough.
-
Fresh lemon zest: 1 tablespoon, finely grated from the skin of washed organic fruits.
-
All purpose flour: 2 cups and 2 tablespoons, measured correctly by spooning it into the cup.
-
Salt: One quarter of a teaspoon of fine salt to balance all the sweet notes.
For the Lemon Curd Filling
-
Fresh lemon juice: One third of a cup, strained to remove any small seeds or pulp.
-
Granulated white sugar: Half a cup to tame the sharp sourness of the citrus juice.
-
Large egg yolks: 3 yolks from large eggs, brought to room temperature before cooking.
-
Unsalted butter: 4 tablespoons, cut into small cubes and kept cold until needed.
-
Fresh lemon zest: 1 teaspoon for an extra layer of bright citrus flavor.
Step by Step Method
Step 1: Prepare Your Kitchen and Tools
Before you touch any food ingredients, you want to set yourself up for ultimate success by organizing your baking space. Turn on your oven and preheat it to 350 degrees Fahrenheit, which is about 175 degrees Celsius, so it reaches the perfect temperature by the time your dough is ready. Take two large baking sheets and line them with parchment paper or silicone baking mats so your treats do not stick to the metal pans. Make sure your workspace is clean, dry, and free of clutter, and gather all your bowls, spoons, and measuring cups within arm’s reach.
Step 2: Make the Homemade Fruit Filling
While you can use store bought filling, making your own citrus cream takes this dessert to a whole new level of freshness. Find a small saucepan that is not made of aluminum, as aluminum can react with citrus juice and cause a strange metallic taste. Whisk the half cup of granulated white sugar and the three large egg yolks together in the saucepan until the mixture looks smooth and pale yellow. Pour in the one third cup of fresh citrus juice and the single teaspoon of zest, then stir everything together with a wooden spoon or silicone whisk.
Place the saucepan over low heat on your stove top and cook the liquid, stirring constantly without stopping for even a minute. It is very important to stir non stop so the eggs do not scramble or turn into an omelet on the bottom of the pan. After about five to eight minutes of gentle cooking, you will notice the liquid transforming into a thick, glossy custard that coats the back of your spoon. As soon as it thickens up beautifully, remove the pan from the hot stove burner and turn off the heat source.
Immediately drop the four tablespoons of cold, cubed unsalted butter into the hot custard one piece at a time, stirring gently until each piece melts completely. Adding cold butter at the end gives the filling a wonderfully glossy look and a rich, velvety texture that melts beautifully in your mouth. Pour the finished cream through a fine mesh strainer into a clean glass bowl to catch any tiny bits of cooked egg that might be hiding. Place a piece of plastic wrap directly onto the surface of the cream so a tough skin does not form, then set it in the refrigerator to cool completely.
Step 3: Cream the Butter and Sugar
In a large mixing bowl, place your two sticks of softened unsalted butter along with the two thirds of a cup of granulated white sugar. If you have an electric hand mixer or a stand mixer, use it on medium speed to beat the butter and sugar together for about three to four minutes. If you are mixing by hand, use a sturdy wooden spoon and a lot of energy to whip the mixture until it changes color. You are looking for a texture that is light, fluffy, and pale yellow, which means you have successfully trapped tiny pockets of air in the fat to make your cookies light.
Step 4: Add the Flavor Elements
Once your butter and sugar mixture looks beautifully fluffy, pour in the single teaspoon of pure vanilla extract and add the tablespoon of fresh citrus zest. Turn your mixer back on to low speed and blend for about thirty seconds until these aromatic elements are fully distributed through the cream. The oils from the citrus zest will start to release into the fat of the butter, which amplifies the natural fruit aroma throughout the entire dough.
Step 5: Incorporate the Dry Ingredients
In a separate medium bowl, whisk together your two cups and two tablespoons of all purpose flour with the one quarter teaspoon of fine salt. Pour about half of this flour mixture into your wet butter mixture, then stir gently using a large silicone spatula or a wooden spoon. Once that first half disappears into the dough, add the remaining flour and continue to mix just until a soft dough forms. Be very careful not to overmix the dough at this point, because mixing too much will develop gluten in the flour and make your cookies tough instead of melt in your mouth tender.
Step 6: Chill the Cookie Dough
Gather the soft dough with your hands and shape it into a flat disc, then wrap it tightly in plastic wrap or wax paper. Place the wrapped dough into your refrigerator and let it chill for at least thirty to forty five minutes before attempting to shape it. Chilling the dough is a crucial step because it firms up the butter fat, which prevents the cookies from spreading out into flat pancakes while they are baking in the hot oven.
Step 7: Shape the Treat Balls
Remove your chilled dough from the refrigerator and unwrap it on your clean kitchen workspace. Use a small cookie scoop or a standard tablespoon to portion out pieces of dough that are about the size of a whole walnut. Roll each piece of dough between the palms of your clean hands until it forms a perfectly smooth, round ball without any deep cracks. Place each dough ball onto your prepared baking sheets, leaving about two inches of open space between each one so they have room to breathe.
Step 8: Create the Centers
Now comes the fun part where you create the little nests to hold your delicious homemade golden fruit filling. Take your thumb, or the round back of a small teaspoon measure, and press it gently directly into the dead center of each dough ball. Press down until you are about halfway through the thickness of the ball, creating a nice, deep well with raised edges all around. If you notice the edges of the dough cracking open as you press down, simply use your fingers to gently smooth out the cracks and press them back together.
Step 9: Fill and Bake the Cookies
Take your chilled fruit cream out of the refrigerator and give it a gentle stir with a spoon to loosen it up. Use a small spoon to carefully drop about one teaspoon of the cold filling into the center well of each shaped dough ball. Make sure you do not overfill the wells, as the filling can bubble up and spill over the sides during the baking process, which makes a bit of a mess.
Slide your filled baking sheets into the middle rack of your preheated oven and let them bake for about twelve to fifteen minutes. You will know they are perfectly done when the bottoms and edges of the cookies turn a very pale, light golden brown color, while the tops remain beautifully light. The fruit center should look slightly set but still wonderfully shiny and bright yellow.
Step 10: Cool and Serve Your Masterpiece
Remove the hot baking sheets from your oven using thick oven mitts and set them down on a heat safe counter top or a wire cooling rack. Let the treats sit undisturbed on the hot baking sheets for about five to ten minutes because they are incredibly soft and fragile when they first come out of the oven. Once they have firmed up slightly, use a wide spatula to gently transfer each cookie onto a wire cooling rack to cool completely to room temperature. If you want to make them look extra beautiful, you can dust a tiny bit of powdered sugar over the edges just before serving them to your guests.
Why This Recipe Is Special
This specific recipe holds a very special place in the world of desserts because it offers a marvelous combination of benefits that you rarely find in standard bakery items. First and foremost is the incredible flavor profile, which provides an intense burst of real fruit flavor that store bought cookies simply cannot replicate. Because we use real citrus fruit zest and fresh juice instead of artificial flavor drops or preservatives, the taste is exceptionally clean, vibrant, and pure. The contrast between the rich, buttery pastry base and the bright, tangy filling creates a magical experience that satisfies every single part of your sweet tooth.
From a health and wellness perspective, making these treats at home gives you complete power over every single ingredient that enters your body. You do not have to worry about high fructose corn syrup, hydrogenated oils, artificial yellow food dyes, or chemical shelf stabilizers that are commonly found in commercial snacks. Every ingredient used here is a whole food element that you can recognize, which makes it a much cleaner option for your family. Furthermore, because these treats are so rich in flavor, they provide deep sensory satisfaction, meaning you will feel completely happy and content after eating just one or two portions instead of mindlessly consuming an entire box of processed snacks.
Another beautiful aspect of this recipe is its amazing versatility and accessibility for bakers of all experience levels. The dough does not require any complex rolling pins, special cookie cutters, or intricate decorating skills, making it highly approachable for young children or complete beginners. It is a wonderful foundational recipe that teaches you the basic core rules of pastry making, such as creaming fat and sugar, chilling dough, and cooking a basic fruit custard. The skills you learn while making this dish will give you immense confidence to tackle even bigger baking projects in your future culinary journeys.
Extra Tips for Better Taste
To take your baking to the highest possible level of excellence, there are a few creative adjustments and expert tricks you can implement.
Tip 1: Elevate Your Citrus Choices
Instead of using standard Lisbon lemons from the supermarket, try sourcing Meyer lemons for your homemade custard filling. Meyer lemons are a hybrid fruit that blends traditional citrus with sweet mandarin oranges, resulting in a much sweeter, deeper flavor with a beautiful floral aroma.
Tip 2: Add a Textured Sugar Coating
Before you press the center well into your round dough balls, roll each ball in a small bowl of coarse sparkling sugar or raw turbinado sugar. This extra step coats the outside of the pastry in large sugar crystals, which creates a wonderful crunchy texture that contrasts beautifully with the soft crumb and smooth filling.
Tip 3: Infuse with Fresh Herbs
If you want to create a highly sophisticated dessert for an elegant dinner party, consider infusing your cookie dough with finely chopped fresh herbs. Adding a half teaspoon of minced fresh rosemary or fresh thyme to the flour mixture introduces a lovely earthy note that pairs beautifully with citrus fruits.
Tip 4: Create a Chocolate Barrier
To keep your cookie bases extra crisp for multiple days, melt a small handful of white chocolate chips and brush a thin layer inside the well before adding the fruit cream. The white chocolate hardens into a sweet moisture barrier that prevents the juicy filling from making the underlying pastry soggy over time.
Tip 5: Watch the Temperature of Your Ingredients
Always make sure your butter for the dough is truly at room temperature, meaning it should yield gently to the press of your finger without being shiny, greasy, or melted. If your butter is too warm or too cold when you start mixing, it will fail to trap the necessary air, leading to dense or heavy cookies instead of light, melt in your mouth treats.
Final Thoughts
Baking these wonderful lemon curd cookies is a deeply rewarding way to bring a little bit of sunshine, warmth, and sweetness into your home kitchen. There is something truly magical about turning basic pantry staples into an elegant dessert that brings smiles to the faces of everyone who takes a bite. This recipe shows us that you do not need complicated techniques or strange ingredients to create an extraordinary culinary experience. As you share these beautiful golden treats with your friends, family, or neighbors, you are sharing a token of love, care, and homemade comfort. So tie on your favorite kitchen apron, turn on your oven, and enjoy every single moment of this joyful citrus baking journey.
Nutrition Details
To help you keep track of your daily food intake and stay aligned with your health targets, here is a detailed breakdown of the nutritional content. These values are calculated per single cookie, assuming your entire batch yields approximately twenty four medium sized treats.
| Nutrient Type | Amount Per Single Serving | Percentage of Daily Value |
| Calories | 145 calories | 7 percent |
| Total Fat | 9 grams | 12 percent |
| Saturated Fat | 5 grams | 25 percent |
| Cholesterol | 45 milligrams | 15 percent |
| Sodium | 35 milligrams | 2 percent |
| Total Carbohydrates | 15 grams | 5 percent |
| Dietary Fiber | 0.3 grams | 1 percent |
| Total Sugars | 9 grams | 18 percent |
| Protein | 2 grams | 4 percent |
| Vitamin C | 2 milligrams | 3 percent |
| Calcium | 8 milligrams | 1 percent |
Disclaimer
Please keep in mind that everyone’s body, health status, and nutritional needs are completely unique and different from one another. The nutritional values provided in the table above are general estimates calculated using standard ingredient databases, so your actual results may change based on the specific brands and exact measurements you use in your kitchen. This recipe content is intended purely for educational and entertainment purposes and should never be taken as professional medical advice or personalized dietary planning. If you have specific health concerns, food allergies, or medical conditions that require a strict diet, please consult with a qualified doctor or a registered dietitian before making significant changes to your eating habits.