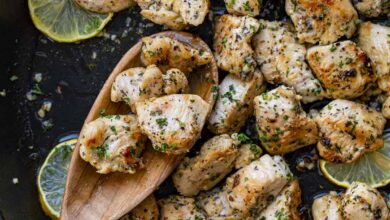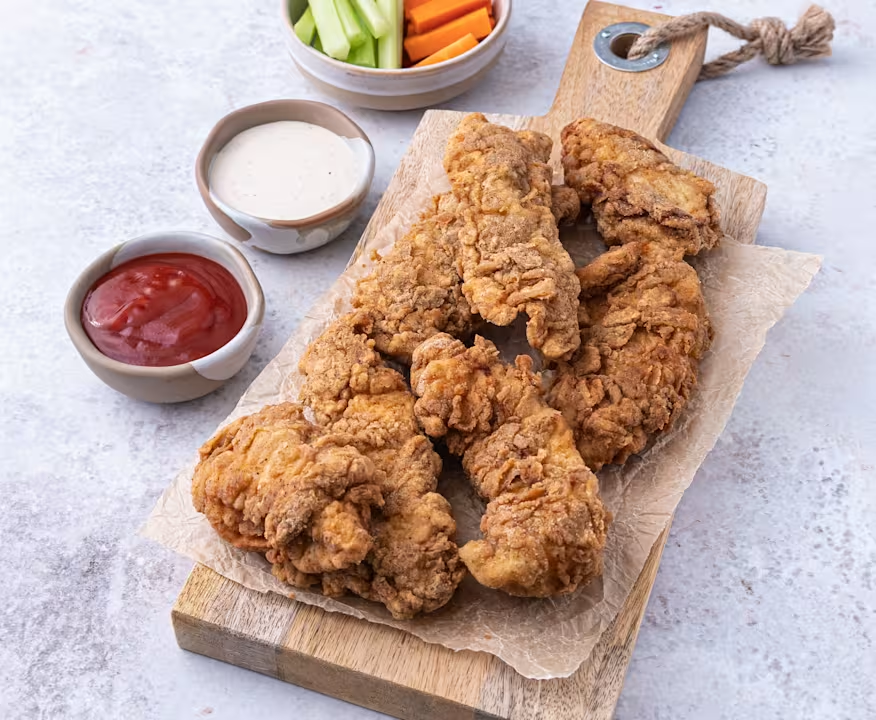
When it comes to comfort food that makes your mouth water just by thinking about it, nothing beats a big platter of Krispy Fried Chicken. This recipe is all about creating the ultimate homemade version of your favorite restaurant style chicken. We are talking about chicken that has a super loud crunch when you take your first bite, followed by incredibly juicy and tender meat on the inside. Making this at home might seem a bit scary if you are a beginner cook, but this guide will show you that it is actually very simple when you know the right steps. You do not need any fancy tools or secret factory powders to get that perfect golden crust that stays crispy for a long time. This recipe focuses on basic kitchen ingredients that work together to create an amazing texture and a deeply savory flavor profile. By marinating the meat properly and using a special double coating technique, you can make fried chicken that is much fresher and tastier than anything you can buy at a fast food drive through window.
People absolutely love Krispy Fried Chicken because it appeals to all of our human senses at the very same time. The visual beauty of a freshly fried piece of chicken with its rough, craggy, golden brown skin is immediately inviting to anyone who walks into the kitchen. Then there is the texture, which provides a wonderful contrast between the brittle, noisy outer shell and the soft, moist meat hidden underneath. Food scientists often talk about how humans are naturally drawn to foods that combine high crunch with rich flavors, and this dish is the perfect example of that rule. It brings back happy childhood memories for many people who grew up eating family dinners on lazy Sundays or attending backyard summer picnics. It is a universal comfort food that crosses cultures and borders, bringing a smile to both children and adults who simply want a satisfying meal. When you serve a plate of hot, crunchy chicken to your guests, you are not just giving them food, but you are giving them a feeling of warmth, safety, and pure culinary happiness.
There are so many wonderful occasions and emotional reasons to mix up a batch of this delicious Krispy Fried Chicken in your own home. You might want to celebrate a special milestone like a birthday, a promotion at work, or a weekend game night with your closest friends where good food is mandatory. It is also the ultimate weekend project when you want to slow down, enjoy the process of cooking from scratch, and treat your family to a restaurant quality feast. From a taste perspective, making it yourself allows you to control the exact level of salt and spices so that every single bite perfectly matches your personal preferences. Even from a fitness or health balance viewpoint, cooking fried chicken at home is highly beneficial because you can choose high quality fresh oil and premium chicken pieces. You will completely avoid the heavy preservatives, mystery additives, and overly processed fats that commercial fast food chains use to keep their food stable for hours. It fits nicely into a balanced lifestyle as a wonderful reward meal that satisfies your deep cravings while keeping you in charge of what goes into your body.
Ingredients You Will Need
To ensure your cooking process goes smoothly, please measure out all your ingredients ahead of time. Having everything ready on your kitchen counter will prevent mistakes and keep your workspace clean.
The Chicken and Wet Marinade
-
1500 grams of chicken pieces such as drumsticks, thighs, and wings
-
500 milliliters of fresh buttermilk
-
15 milliliters of hot pepper sauce
-
5 grams of fine garlic powder
-
5 grams of fine onion powder
-
5 grams of ground black pepper
-
10 grams of fine sea salt
The Dry Coating Mixture
-
360 grams of all purpose white flour
-
60 grams of pure cornstarch
-
10 grams of baking powder
-
15 grams of sweet paprika powder
-
10 grams of fine garlic powder
-
10 grams of fine onion powder
-
5 grams of ground white pepper
-
5 grams of cayenne pepper powder for a mild spicy kick
-
10 grams of fine sea salt
For the Frying Process
-
1500 milliliters of high smoke point vegetable oil such as canola oil or peanut oil
Step by Step Method
Please follow these detailed steps carefully to achieve the absolute best results. Each phase of the process is designed to maximize both the crunch of the crust and the juiciness of the chicken meat.
Step 1: Preparing the Chicken Meat
Start by taking your chicken pieces out of the refrigerator. Wash them gently under cool water if needed, and then use clean paper towels to pat every single piece completely dry. Removing the surface moisture is highly important because it helps the marinade stick directly to the chicken skin and meat. If you are using large chicken breasts, cut them into smaller pieces so they cook at the same speed as the drumsticks and thighs. Place all the dried chicken pieces into a large, clean mixing bowl.
Step 2: Mixing the Buttermilk Marinade
In a separate medium bowl, pour in your fresh buttermilk. Add the hot pepper sauce, five grams of garlic powder, five grams of onion powder, five grams of ground black pepper, and ten grams of fine sea salt. Use a whisk to stir this liquid mixture vigorously until all the spices are fully dissolved into the buttermilk. This liquid is highly acidic, which means it will naturally tenderize the chicken meat while infusing it with a lovely background flavor.
Step 3: Marinating the Chicken
Pour the seasoned buttermilk liquid directly over the chicken pieces in the large bowl. Use your clean hands or a pair of tongs to flip the chicken pieces multiple times, ensuring every single nook and cranny is coated in the liquid. Cover the bowl tightly with plastic wrap or a secure lid. Place the bowl into your refrigerator for at least four hours, though leaving it overnight for twelve hours is much better for developing deep tenderness.
Step 4: Creating the Dry Flour Mixture
When your marinating time is finished, take the chicken out of the refrigerator and let it sit on the counter for twenty minutes to lose its chill. In a very large, shallow baking dish or a big clean bowl, combine your all purpose white flour and pure cornstarch. Add the baking powder, sweet paprika powder, ten grams of garlic powder, ten grams of onion powder, ground white pepper, cayenne pepper powder, and ten grams of fine sea salt. Use a large fork or a whisk to mix these dry ingredients thoroughly so the spices are distributed evenly throughout the flour.
Step 5: Heating the Cooking Oil
Place a large, heavy pot or a deep Dutch oven onto your stove top. Pour in your high smoke point vegetable oil, making sure the oil fills the pot up to at least three inches deep. Turn your stove burner to medium heat. You want the oil to reach a steady temperature of 175 degrees Celsius. Use a kitchen thermometer to check this temperature accurately, as oil that is too cold will make the chicken greasy, and oil that is too hot will burn the crust before the inside is fully cooked.
Step 6: Coating the Chicken Pieces
Take a piece of chicken out of the buttermilk marinade and let the excess liquid drip back into the bowl for a few seconds. Drop the wet chicken directly into the seasoned flour mixture. Use your hands to scoop flour over the chicken, pressing down firmly so the flour sticks well. Flip the chicken and press it into the flour again. For a super krispy crust, dip the floured chicken back into the buttermilk marinade for just one second, and then bury it in the flour mixture for a second time, pressing hard to create beautiful, rough flakes on the surface.
Step 7: Frying to Golden Perfection
Carefully lower three or four coated chicken pieces into the hot oil one by one. Do not crowd the pot, as adding too many pieces at once will cause the oil temperature to drop rapidly. Fry the chicken pieces for about twelve to fifteen minutes, turning them gently with metal tongs every few minutes. The crust will turn a deep, gorgeous golden brown color, and the internal temperature of the thickest part of the meat should read 74 degrees Celsius on a digital meat thermometer.
Step 8: Draining and Resting
Once the chicken is fully cooked, lift each piece out of the hot oil using a slotted metal spoon or tongs. Hold the chicken over the pot for a couple of seconds to let the surface oil drain off. Place the hot fried chicken onto a wire cooling rack set inside a large baking sheet. Avoid draining the chicken on paper towels because trapping the hot steam underneath the chicken will quickly make your beautifully krispy crust turn soggy. Let the chicken rest for five minutes before serving so the juices can settle inside the meat.
Why This Recipe Is Special
This specific recipe stands out from standard fried chicken methods for several excellent reasons that involve both kitchen science and culinary art. First of all, the inclusion of pure cornstarch and baking powder inside the flour mixture alters the structure of the crust completely. Cornstarch prevents gluten from developing too strongly in the white flour, which guarantees that the outer shell turns out incredibly brittle and light instead of hard or chewy. The baking powder releases tiny air bubbles when it hits the hot cooking oil, creating a highly textured, craggy surface that traps extra crunch in every single bite. Furthermore, the double dipping technique ensures that you get a substantial layer of crust that seals in the natural moisture of the chicken, protecting the meat from direct contact with the harsh heat of the oil.
From a health and lifestyle viewpoint, making this dish at home offers wonderful benefits that you cannot find at commercial fast food restaurants. You have complete authority over the quality of the chicken, meaning you can choose organic, farm fresh meat that is free from growth hormones and antibiotics. You are also using fresh, clean vegetable oil that has not been heated and cooled hundreds of times, which minimizes the presence of unhealthy broken down fats. The spice blend relies purely on natural dried herbs and peppers to create depth of flavor, which means you do not need to add artificial flavor enhancers or massive amounts of chemical sodium. It gives you a magnificent, restaurant level experience while maintaining the transparency and safety of a home cooked meal that you can feel truly good about serving to the people you love.
Extra Tips for Better Taste
If you want to elevate your Krispy Fried Chicken to an even higher level of deliciousness, you can try a few creative adjustments in your kitchen. For an incredible burst of extra flavor, you can add two tablespoons of clean pickle juice directly into your buttermilk marinade. The pickle juice contains vinegar and garlic notes that penetrate deep into the chicken meat, adding a subtle tanginess that balances out the richness of the fried crust beautifully. Another fantastic trick is to drizzle a small amount of warm honey mixed with a pinch of cayenne pepper over the hot chicken pieces immediately after they come out of the frying pot. This creates a gorgeous sweet and spicy glaze that clings to the crunchy ridges without making the crust lose its structural integrity.
You can also experiment with the texture of the dry coating by crushing up a cup of plain cornflakes or unsweetened crackers into very fine crumbs and mixing them directly into your seasoned flour. This modification adds an extra layer of structural crunch that holds up exceptionally well if you plan to transport the chicken to an outdoor picnic or a potluck party. If you love a more pungent herb profile, feel free to mix in a tablespoon of dried thyme and dried oregano into the flour blend. Always remember to let your marinated chicken sit on the kitchen counter for a short while before frying, because dropping ice cold chicken into hot oil causes the oil temperature to crash, which leads to a greasy and disappointing crust.
Final Thoughts
Making the perfect batch of Krispy Fried Chicken is a deeply rewarding journey that transforms simple, everyday ingredients into an extraordinary culinary masterpiece. It is a dish that creates instant happiness and brings people closer together around the dining table to share stories, laughter, and great food. By mastering the simple rules of marinating, double coating, and oil temperature control, you can easily create a meal that rivals the best fried chicken joints in town. Do not feel discouraged if your very first attempt is not absolutely flawless, because cooking is a beautiful skill that grows better with practice and time. Put on your favorite kitchen apron, heat up your cooking oil with confidence, and enjoy every single crunchy, juicy bite of this spectacular homemade treat.
Nutrition Details
This table provides an estimate of the nutritional values present in one standard serving of home cooked fried chicken, which equals about two pieces of chicken. Please note that these numbers can change depending on the specific chicken cuts you select.
| Nutrient Type | Amount Per Serving | Percentage of Daily Value |
| Total Calories | 520 Calories | 26 Percent |
| Total Fat | 28 Grams | 36 Percent |
| Saturated Fat | 6 Grams | 30 Percent |
| Cholesterol | 115 Milligrams | 38 Percent |
| Sodium | 680 Milligrams | 30 Percent |
| Total Carbohydrates | 24 Grams | 9 Percent |
| Dietary Fiber | 1 Gram | 4 Percent |
| Total Sugars | 2 Grams | 0 Percent |
| Dietary Protein | 42 Grams | 84 Percent |
Disclaimer
Please keep in mind that every single human body is unique, and individual nutritional requirements or health results can change based on your personal metabolism, fitness levels, and daily activity. The nutritional information provided in this article is meant for general educational purposes only and should not replace professional medical advice. If you have specific dietary restrictions, food allergies, or medical conditions related to fat or sodium intake, please consult with a qualified doctor or a registered dietitian before making major changes to your regular meal plans. Always practice excellent food safety by cooking chicken to the proper internal temperature to prevent foodborne illness.