Garlic Herb Skillet Bread is one of those timeless kitchen creations that brings an incredible amount of comfort, warmth, and pure joy into your home whenever you decide to bake it. This recipe is all about taking basic, everyday ingredients from your pantry and turning them into something that tastes like it came straight out of a high end bakery. Imagine a soft, fluffy loaf of bread with a perfectly golden crust, infused with rich butter, fresh minced garlic, and aromatic herbs that fill every corner of your kitchen with a heavenly scent. Cooking bread in a heavy skillet is a traditional technique that ensures a beautiful crispy bottom while keeping the inside unbelievably soft and airy. It is a simple concept, yet the final result feels incredibly fancy and impressive to anyone who gets to try a slice. Whether you are completely new to baking or you have been making your own bread for years, this recipe offers a stress free, highly rewarding baking experience that will quickly become a favorite in your household.
The reason why so many people fall completely in love with this recipe goes far beyond just its delicious flavor and mouthwatering aroma. It touches on nostalgia and the deep, satisfying feeling of eating warm, homemade food that was made with care and patience. In a fast paced world where so many of us rely on prepackaged store bought items, taking the time to mix flour, yeast, butter, and herbs feels grounding and deeply satisfying. People love how versatile this bread is, as it pairs seamlessly with a massive variety of meals, from rich pasta dishes and cozy winter soups to fresh summer salads and grilled meats. Kids adore the rich garlic butter flavor, while adults appreciate the rustic charm and restaurant quality texture that the cast iron skillet provides. It is an extremely forgiving recipe, meaning you do not need to be a professional pastry chef or have expensive kitchen equipment to achieve absolute perfection on your very first try.
There are so many wonderful moments and occasions when baking this garlic herb skillet bread makes perfect sense for your mood, your appetite, or your social plans. If you are hosting a cozy dinner party with close friends or family, serving a steaming hot skillet of homemade bread right in the middle of the table creates an instant feeling of warmth and hospitality. On a rainy afternoon or a chilly winter evening, the process of baking provides physical warmth from the oven and emotional comfort from the rich, buttery smells wafting through your house. Even if you are watching your fitness or trying to eat a cleaner diet, making your own bread allows you to take total control over every single ingredient, completely eliminating artificial preservatives, refined sugars, and bad oils that are usually found in commercial bakery products. Food is not just about fuel, it is about emotion, connection, and enjoying the simple pleasures of life, and this warm skillet bread fits that purpose beautifully.
Understanding the deep connection between wholesome home cooking and overall happiness is what makes recipes like this so enduring over time. Taking a moment out of a busy week to slow down, roll out some simple dough, and coat it generously with fragrant herbs is a wonderful form of self care and practical mindfulness. When you pull this deep brown, bubbling skillet out of the oven, you get an immediate sense of pride and accomplishment that buying bread at a grocery store could never possibly match. Your family will naturally gather around the kitchen island, drawn in by the irresistible smells of roasted garlic and toasted herbs, eager to grab a warm slice while the butter is still melting on top. It transforms a standard weeknight meal into a special occasion without requiring hours of complicated labor or expensive ingredients. Once you experience how easy, affordable, and delicious this process is, you will likely find yourself reaching for your skillet week after week.
Ingredients You Will Need
To create this incredible bread, you will need a few simple items for the dough itself, along with a rich, fragrant herb topping. Here is the exact list of everything you need to gather before you start.
For the Bread Dough
-
Three cups of all purpose flour or bread flour
-
One packet or two and one quarter teaspoons of active dry yeast
-
One cup of warm water, ideally around one hundred and five degrees Fahrenheit
-
One tablespoon of granulated sugar or pure honey
-
One teaspoon of fine sea salt
-
Two tablespoons of extra virgin olive oil
-
One tablespoon of melted unsalted butter for brushing the skillet
For the Garlic Herb Butter Topping
-
One half cup of unsalted butter, softened to room temperature
-
Four large cloves of fresh garlic, finely minced or crushed
-
Two tablespoons of fresh parsley, finely chopped
-
One tablespoon of fresh rosemary, finely chopped
-
One tablespoon of fresh thyme leaves, finely chopped
-
One half teaspoon of garlic powder for extra deep flavor
-
One half teaspoon of coarse sea salt or flaky salt for topping
-
One quarter cup of grated parmesan cheese, optional but highly recommended
Step by Step Method
Making homemade bread can sound intimidating if you have never tried it before, but this step by step guide breaks down the process into super simple actions that anyone can handle easily.
Step One: Activate the Yeast
Start by taking a large mixing bowl and adding one cup of warm water. Make sure the water is warm to the touch but not hot, because water that is too hot can kill the yeast. Add one tablespoon of granulated sugar or honey into the warm water and stir until it dissolves completely. Sprinkle the active dry yeast over the top of the sugary water and give it a quick, light stir. Let the bowl sit undisturbed on your counter for about five to ten minutes. You will know the yeast is active and alive when the surface becomes thick, frothy, and full of tiny bubbles. If the liquid stays completely flat, your yeast might be expired, and you should start again with fresh yeast for the best fluffy bread.
Step Two: Mix the Dough
Once your yeast mixture is frothy and ready, pour in two tablespoons of extra virgin olive oil and one teaspoon of fine sea salt. Gradually begin adding three cups of flour into the bowl, pouring in about one cup at a time while stirring with a sturdy wooden spoon or a spatula. Keep stirring until a shaggy, wet dough begins to form and pull away from the sides of the bowl. If the dough feels far too sticky to work with, you can add a tiny bit more flour, one tablespoon at a time, until it comes together smoothly.
Step Three: Knead the Dough
Dust a clean countertop or large cutting board with a small amount of extra flour. Transfer your dough onto the floured surface and begin kneading it gently with your hands. To knead, push the dough forward using the palms of your hands, fold it back over itself, turn it slightly, and push forward again. Repeat this simple rhythm for about eight to ten minutes. As you knead, the dough will transform from a sticky, rough mass into a smooth, elastic, and soft ball. You can test if it is ready by gently poking the ball with your finger; if the dough springs back quickly, it is perfectly kneaded and ready for its first rest.
Step Four: First Dough Rise
Lightly coat the inside of a clean, large bowl with a little bit of olive oil. Place your rounded ball of dough inside the bowl and turn it over once so the top is lightly coated in oil as well. Cover the bowl securely with a damp kitchen towel or a sheet of plastic wrap to keep the moisture inside. Place the covered bowl in a warm, draft free spot in your kitchen, such as inside an oven that is turned off with the light on. Allow the dough to rise for about one hour, or until it has fully doubled in size. This rising time allows the yeast to work its magic, creating air pockets that make the bread super soft.
Step Five: Prepare the Garlic Herb Butter
While your dough is rising happily, you can prepare the delicious garlic herb topping. Take a medium bowl and place your softened unsalted butter inside. Add the minced fresh garlic, chopped fresh parsley, chopped fresh rosemary, chopped fresh thyme, garlic powder, and a pinch of salt. Use a fork or a spoon to mash and mix everything together until all the herbs and garlic are evenly mixed throughout the soft butter. Set this rich mixture aside at room temperature so it remains soft and easy to spread over your dough later.
Step Six: Shape the Skillet Bread
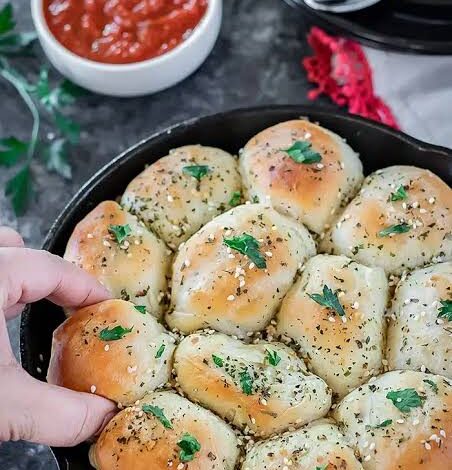
Take a heavy nine inch or ten inch cast iron skillet and brush the bottom and sides thoroughly with one tablespoon of melted butter. Once your dough has doubled in size, gently press your fist into the center to release the trapped air bubbles. Transfer the dough onto a lightly floured surface and divide it into nine or twelve equal pieces. Roll each piece between your hands to form a smooth, round little ball. Place the dough balls into your prepared skillet, arranging them side by side in a circular pattern so they are lightly touching each other.
Step Seven: Second Rise and Topping
Cover the skillet loosely with a clean kitchen towel and let the dough balls rest for another twenty to thirty minutes. They will swell up, puff together, and completely fill the bottom of your skillet. While they undergo this second rise, preheat your oven to three hundred and seventy five degrees Fahrenheit. Once the dough balls look puffy and light, take half of your prepared garlic herb butter and gently brush or dollop it all over the top of the dough using a pastry brush or spoon. If you are using parmesan cheese, sprinkle it evenly over the top right now.
Step Eight: Bake to Perfection
Place the skillet carefully into the middle rack of your preheated oven. Bake for approximately twenty five to thirty minutes. You will know the bread is fully baked when the crust turns a rich, golden brown color, and the top feels firm yet slightly springy to the touch. The garlic and herbs will sizzle gently in the skillet, filling your kitchen with an incredible smell.
Step Nine: Final Finish and Serve
Remove the skillet safely from the oven using thick oven mitts, as cast iron becomes extremely hot. Immediately brush the remaining half of the garlic herb butter all over the hot, fresh bread so it melts right into every crack and crevice. Finish with a light sprinkle of coarse sea salt and a little bit of extra fresh parsley for a gorgeous look. Let the bread cool down inside the skillet for about ten minutes before serving it warm straight from the pan.
Why This Recipe Is Special
This garlic herb skillet bread stands out from standard recipes for several wonderful reasons. First, using a heavy cast iron skillet creates an unbeatable cooking environment. The iron holds onto heat extremely well and distributes it evenly, giving the bottom of your bread a delightfully crispy, golden crust while keeping the inside light, pillow soft, and tender. That amazing contrast in texture between the top, middle, and bottom is something you simply cannot achieve when baking on a flat sheet pan or in a basic aluminum baking dish.
From a health standpoint, making this recipe at home gives you total control over what enters your body. Commercial breads bought from major supermarkets often contain hidden sugars, high fructose corn syrup, chemical dough conditioners, and artificial preservatives designed to keep them shelf stable for weeks. When you bake this at home, you use pure, basic ingredients that your body knows how to process easily. Fresh garlic is famous for its natural health benefits, including boosting your immune system and supporting heart health, while fresh herbs like rosemary and thyme are packed with natural antioxidants.
Finally, the flavor profile of this bread is extraordinary. The combination of slow roasted garlic, creamy butter, aromatic herbs, and a touch of salty parmesan cheese creates a rich, complex taste experience. Every bite gives you a burst of savory goodness that elevates any meal it accompanies. It looks like an artisan creation from an expensive Italian restaurant, giving you a huge boost of confidence in your cooking skills while treating your family to something genuinely wholesome and delicious.
Extra Tips for Better Taste
-
Use fresh herbs whenever possible, as fresh parsley, thyme, and rosemary offer a vibrant, bright flavor and gorgeous color that dried herbs cannot match.
-
Roasted garlic can be used instead of raw minced garlic if you prefer a sweeter, milder, and deeper garlic flavor without any sharp bite.
-
Brushing the bread twice with butter, once right before it goes into the oven and once immediately after it comes out, guarantees maximum moisture and flavor.
-
Add a pinch of red pepper flakes to your garlic butter if you enjoy a tiny bit of subtle heat that cuts through the rich butteriness.
-
Try swapping parmesan cheese for shredded mozzarella or sharp cheddar if you want an extra stretchy, gooey, cheese filled pull apart bread experience.
-
Always ensure your water is warm and not boiling hot when mixing with yeast, as proper temperature control is the absolute secret to soft bread.
Final Thoughts
Baking your own garlic herb skillet bread is one of the most satisfying kitchen projects you can undertake, bringing joy, warmth, and incredible flavors directly to your home. It proves that you do not need complex steps or mysterious ingredients to cook meals that feel luxurious and deeply special. Gathering around a warm skillet filled with golden, herb crust bread creates simple, beautiful memories with the people you love most. Give this recipe a try this week, enjoy the comforting process of making it, and savor every single soft, buttery bite.
Nutrition Details
Here is an estimated nutrition breakdown for this garlic herb skillet bread recipe, calculated based on twelve equal servings.
Nutrition Table Per Serving
| Nutrient | Amount Per Serving |
| Calories | 210 kcal |
| Total Fat | 10 grams |
| Saturated Fat | 5 grams |
| Trans Fat | 0 grams |
| Cholesterol | 20 milligrams |
| Sodium | 310 milligrams |
| Total Carbohydrates | 25 grams |
| Dietary Fiber | 1 gram |
| Sugars | 1 gram |
| Protein | 4 grams |
Overall Recipe Summary
-
Total Yield: Twelve individual pull apart bread rolls
-
Prep Time: Twenty minutes
-
Rising Time: One hour and thirty minutes total
-
Bake Time: Thirty minutes
-
Equipment Needed: Nine or ten inch heavy skillet, mixing bowl, pastry brush
Disclaimer
Everyone’s body is unique, and individual nutritional needs, dietary restrictions, and health responses can vary significantly from person to person. The health information and nutritional estimates provided in this article are for general educational purposes only and should not replace professional medical advice, diagnosis, or personalized dietary planning. If you have specific food allergies, sensitivities, or underlying medical conditions, please consult with a qualified physician or registered dietitian before making significant changes to your regular diet or lifestyle.