Making your own food at home is one of the most beautiful things you can do for your family because it brings a sense of pure joy and comfort to the dining table. Many people think that giving up wheat means saying goodbye to the wonderful world of fresh and warm baked goods that fill the kitchen with a sweet aroma. This special baking guide is designed to change your mind completely by introducing a wonderful way to bake a loaf that feels like a soft cloud in your hands. We are going to explore a method that creates a truly magnificent texture without using any of the traditional wheat proteins that cause trouble for so many stomachs. You do not need to be an expert baker with years of training to master this beautiful creation because every single part of this guide is written to help you succeed on your very first try today. By the time your oven timer rings you will have a beautiful golden masterpiece that looks exactly like the ones you see in professional bakery windows down the street.
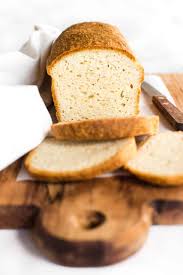
Finding a good alternative to traditional bakery items can be a very long and disappointing journey for many families who truly miss the simple pleasure of a good morning toast. Most of the options you buy from the local grocery store are incredibly dry and they often taste like cardboard or crumble into tiny pieces the moment you try to spread some fresh butter on them. People absolutely fall in love with this specific homemade recipe because it solves every single one of those annoying problems by remaining incredibly soft and bouncy for days. The crust gets beautifully golden and crispy while the inside stays moist and tender which is exactly what you want when making a giant sandwich for your afternoon lunch. Your friends and family will be completely amazed when they take their first bite because it tastes so rich and satisfying that nobody will ever guess it is missing the traditional ingredients. It brings back the pure happiness of eating a simple slice of warm food without any of the worry or discomfort that usually comes along with it.
There are so many wonderful reasons to start baking this amazing creation in your own kitchen today whether you are trying to improve your daily fitness or just want a fun weekend project. Many individuals choose this path because their bodies feel much lighter and more energetic when they avoid heavy proteins that are difficult for the human stomach to break down properly. Others make it because they want to surprise a loved one who has been feeling left out during family breakfast time or holiday dinners where traditional rolls are served. It is also the perfect option for a cozy Sunday morning when you want to slow down and enjoy the peaceful process of mixing simple ingredients into something truly magical and nourishing. Taking care of your health does not mean you have to give up the comforting foods that make life sweet and enjoyable for you and your children. This wonderful baking experience connects you to old traditions while keeping your modern wellness goals completely on track so you can feel good about every single bite you take.
As you get ready to start this fun kitchen adventure you will quickly realize that the process of baking can be incredibly therapeutic and relaxing for a busy mind. This recipe is all about bringing people together around the table to share a meal that is both safe and incredibly delicious for every single person sitting down. You do not have to worry about complicated tools or expensive machines because simple hand mixing and a standard baking tin are all it takes to achieve greatness here. Preparing your own meals from scratch gives you total control over what goes into your body which means no strange chemicals or artificial preservatives will ever touch your plate. Get ready to experience the deep satisfaction of pulling a steaming hot loaf out of your own oven and hearing that beautiful hollow sound when you tap on the top crust. Let us open up the kitchen cabinets and gather our simple materials so we can begin making a fresh loaf of happiness together right now.
Ingredients You Will Need
White rice flour — 2 cups
Tapioca starch — 1 cup
Potato starch — half cup
Xanthan gum — 1 tablespoon
Active dry yeast — 1 packet or two and a quarter teaspoons
Warm water — 1 and a half cups
Honey — 2 tablespoons
Apple cider vinegar — 1 teaspoon
Whole eggs at room temperature — 3 large eggs
Melted butter or olive oil — a quarter cup
Fine sea salt — 1 teaspoon
Step by Step Method
The very first thing you need to do is prepare your workspace so that everything goes smoothly without any stress. Choose a beautiful loaf pan that measures about eight inches by four inches and grease the inside surfaces thoroughly with a little bit of oil or melted butter. You can also place a piece of parchment paper along the bottom and sides to ensure that your finished creation slides out easily without sticking to the metal later.
Now it is time to wake up the tiny organisms that will make our mixture rise into a beautiful cloud. Take your warm water and make sure it feels like a cozy bath which means it should not be too hot or too cold because extreme heat will kill the yeast. Pour the warm water into a small bowl and stir in the honey until it dissolves completely before sprinkling the active dry yeast across the top surface. Let this mixture sit quietly on your counter for about ten minutes until you see a thick layer of foam forming on top which tells you the magic is working.
While your liquid mixture is getting nice and foamy you can focus on the dry components in a separate large mixing bowl. Pour in the white rice flour along with the tapioca starch and the potato starch which form the perfect base for our structure. Add the xanthan gum which acts like a special glue to hold everything together since we are not using traditional wheat protein today. Toss in the fine sea salt and use a large whisk to stir all these dry elements together for a full minute to make sure they are perfectly combined.
In another medium bowl you will want to prepare the wet elements by whisking the three large room temperature eggs until they are smooth and yellow. Pour in the melted butter or olive oil along with the apple cider vinegar which helps create a wonderful rise and an airy texture inside the loaf. Once these are mixed you can pour the foamy yeast liquid directly into this bowl of wet ingredients and give it a gentle stir to combine them.
Now comes the exciting moment where the liquid components meet the dry powder mixture in your large bowl. Pour all the wet ingredients into the dry bowl and start stirring with a sturdy wooden spoon or an electric hand mixer set to a low speed. You will notice that this mixture looks much wetter and stickier than traditional bread dough which is completely normal and exactly what we want for this method. Continue mixing energetically for about five full minutes because this long mixing time helps activate the binding agents and builds a strong structure.
Once your mixture looks smooth like a thick cake batter you can stop mixing and prepare to transfer it into your greased baking pan. Use a rubber spatula to scrape every bit of the sticky batter out of the bowl and smooth it down into the corners of the pan. Dip your spatula or your fingers into a little bit of warm water and gently rub the top surface until it is completely flat and beautiful. This water trick prevents the top from drying out and helps it bake into a gorgeous even shape in the oven.
Cover the baking pan loosely with a clean kitchen towel or a piece of plastic wrap that has been greased with a tiny bit of oil. Place the pan in a warm and cozy spot in your kitchen where there are no cold drafts blowing around to disturb the rising process. Let the mixture sit undisturbed for about one hour or until you see the top rise just above the rim of your baking pan. While it is rising you should turn your oven on to three hundred and seventy five degrees Fahrenheit so it becomes perfectly hot.
When the rising time is finished carefully remove the towel and slide the pan onto the middle rack of your preheated oven. Let it bake for about forty five minutes without opening the oven door too early because a sudden rush of cold air can cause it to sink. You will know it is fully cooked when the top turns a beautiful deep golden brown color and sounds hollow when you tap it with your knuckle. Carefully remove the pan from the oven and let it cool for ten minutes before turning the loaf out onto a wire rack to cool completely.
Why This Recipe Is Special
This specific recipe stands out from all the rest because it delivers an incredibly light and airy texture that most alternative baked goods simply cannot achieve. It uses a clever combination of gentle starches that mimic the bounce of traditional baking without causing any weight or discomfort in your digestive system. Children and adults love it equally because it does not have that strange sour aftertaste or heavy density found in many store brands. It is packed with clean energy from simple grains that keep you feeling satisfied and fueled for all your daily adventures.
Baking this loaf at home also means you are avoiding standard artificial additives and excess sugar that companies often use to preserve packaged goods. You are getting a pure product made with love and wholesome ingredients that support a happy lifestyle and a peaceful mind. It is highly versatile which means you can use it for simple morning jam toast or heavy afternoon sandwiches packed with fresh vegetables and meats. This creation brings back the absolute joy of eating regular sandwiches without compromising on your health goals or your love for fine textures.
Extra Tips for Better Taste
If you want to take your creation to an even higher level of deliciousness you can easily customize the flavor profile with a few simple additions. Try sprinkling a handful of sesame seeds or sunflower seeds over the wet top surface right before you slide the pan into the hot oven. This adds a beautiful rustic look and a wonderful nutty crunch to every single slice you cut throughout the week. You can also mix in some dried herbs like rosemary or garlic powder into the dry ingredients for a savory twist that pairs beautifully with evening soups.
Another great trick for keeping your loaf incredibly fresh is to slice the entire thing once it has cooled down completely to room temperature. Place the individual slices into a tight freezer bag and store them away so you can pull out exactly what you need each morning. Dropping a frozen slice straight into a hot toaster creates an incredibly crispy exterior while restoring that beautiful cloud like softness on the inside. You can also replace the melted butter with rich coconut oil if you want to keep the entire recipe completely free from dairy products.
Final Thoughts
Baking your own soft loaf at home is a truly rewarding experience that fills both your kitchen and your heart with immense warmth and satisfaction. It proves that choosing a mindful path regarding your food does not mean you have to leave behind the comforting textures that make meals memorable. This simple recipe is a gift to your kitchen routine that will bring everyone running to the breakfast table with big smiles on their faces. Enjoy the wonderful process of creating something beautiful from scratch and share a warm slice with someone you love today.
Nutrition Details
| Nutrient Type | Amount Per Single Slice | Daily Value Percentage |
| Calories | 140 calories | 7 percent |
| Total Fat | 3 grams | 4 percent |
| Saturated Fat | 1 gram | 5 percent |
| Sodium | 190 milligrams | 8 percent |
| Total Carbohydrates | 26 grams | 9 percent |
| Dietary Fiber | 2 grams | 7 percent |
| Sugars | 2 grams | 2 percent |
| Protein | 3 grams | 6 percent |
This helpful nutrition table is calculated based on a standard loaf that is cut evenly into twelve generous slices. Your individual numbers may vary slightly depending on the specific brands of flour and starches you choose to purchase at your local market. This dish provides a clean source of carbohydrates for daily movement while remaining remarkably low in total fats and unwanted sugars. It fits beautifully into a balanced eating plan designed to keep your body feeling light and properly nourished throughout the day.
Disclaimer
Please remember that every single human body is completely unique and will react differently to various ingredients and lifestyle choices. The health information and nutritional estimates provided in this baking guide are meant for general educational purposes and simple kitchen enjoyment only. If you have severe allergies or specific medical conditions you should always consult with a professional doctor or a certified nutrition expert before changing your diet. The success of your baking can vary based on your local kitchen altitude or the specific tools you use while preparing this dish.