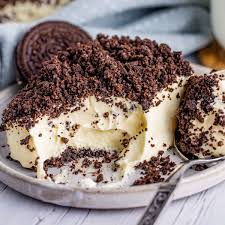
Dirt cake is one of the most playful and delicious desserts you can ever make in your kitchen. It is a classic treat that looks exactly like a pot of real soil but tastes like an absolute dream. This sweet creation is made by layering rich chocolate cookies with a smooth, velvety pudding mixture that melts in your mouth. The best part about this dessert is that it requires absolutely no baking at all. You do not need to turn on an oven or worry about your cake burning or sinking in the middle. It is a simple, foolproof recipe that relies on the magic of chilling in the refrigerator to set perfectly. The presentation is always a huge hit because people are instantly tricked by the clever look of the crushed cookies. When you top it with a few colorful candy worms, it looks just like a fresh patch of garden earth. It is a wonderful mix of textures, combining the crunchy bite of chocolate with the deep creaminess of the filling.
People absolutely love this dessert for many reasons, but the main one is pure nostalgia. For many adults, eating a bowl of this sweet treat brings back fond memories of childhood birthday parties and family gatherings. It is a dish that does not take itself too prestigious or serious, making it an instant conversation starter at any dinner table. Kids go crazy for it because they get to eat something that looks like actual mud from the backyard. Parents love it because it is incredibly easy to prepare and requires very minimal cleanup afterward. The flavor profile is a universal favorite, blending the deep cocoa notes of cookies with the sweet vanilla cream. It is also highly customizable, allowing you to switch up the flavors or add different decorations based on your personal preferences. Every single spoonful delivers a perfect balance of smooth cream and crunchy biscuit crumbs that keeps people coming back for more.
You should make this wonderful dessert whenever you want to bring a sense of fun and joy to a special occasion. It is the ultimate choice for children birthday parties, summer backyard barbecues, Halloween celebrations, or family potlucks where you want to impress guests. Beyond the fun look, it also serves as a great comfort food when you need a sweet escape after a long, stressful week. From a fitness perspective, while it is a rich treat, making it at home gives you full control over the ingredients. You can easily choose lower fat cream cheese or sugar free pudding mixes if you want a lighter version that fits better into your health goals. This flexibility means you can enjoy a childhood favorite without feeling like you are completely ruining your balanced lifestyle. It is a dessert that connects people through shared laughter and pure, unadulterated happiness. Sharing a big bowl of this sweet treat creates a relaxed atmosphere where everyone can let loose and just enjoy the sweet side of life.
Making this dessert is also a fantastic way to introduce young children to the joys of simple home cooking. Since there are no hot ovens or sharp electric tools strictly required for the assembly, kids can safely help crush the cookies and stir the pudding. This hands on experience builds confidence in the kitchen and creates beautiful memories that last a lifetime. It teaches them how simple ingredients can come together to create something beautiful and delicious. The process of building the layers feels like an arts and crafts project, which keeps young minds engaged and excited. It is an amazing activity for a rainy afternoon when you need to keep everyone entertained indoors. By the time the dessert is chilled and ready to eat, everyone feels a sense of pride in what they created. It turns a simple afternoon snack into a memorable event filled with laughter and proud smiles.
Ingredients You Will Need
To create this wonderful dessert, you will need to gather a few simple items from your local grocery store. Please ensure you have the exact amounts listed below to get the best texture and flavor.
-
One package of chocolate sandwich cookies, which is about fourteen ounces or four hundred grams
-
One package of cream cheese, which is eight ounces or two hundred and twenty five grams, softened at room temperature
-
One half cup of unsalted butter, which is four ounces or one hundred and fifteen grams, softened at room temperature
-
One cup of powdered sugar, which is about one hundred and twenty grams
-
Two packages of instant vanilla pudding mix, each package being three point four ounces or ninety six grams
-
Three cups of cold whole milk, which is seven hundred and twenty milliliters
-
One tub of frozen whipped topping, which is twelve ounces or three hundred and forty grams, completely thawed
-
One package of gummy worms, which is about eight ounces or two hundred and twenty五个 grams for the final decoration
Step by Step Method
Follow these simple, easy instructions to create your beautiful and delicious dessert. You do not need any professional baking skills to master this recipe.
Step One: Prepare the Cookie Soil
Take your chocolate sandwich cookies and place them all inside a large, clear plastic storage bag. Seal the bag tightly, making sure to push out most of the extra air so the bag does not pop. Use a rolling pin or a heavy wooden spoon to gently smash the cookies until they turn into fine crumbs. You want the cookies to look just like rich, dark garden soil, though a few small chunks are perfectly fine. If you own a food processor, you can pulse the cookies inside the machine for a faster result. Once all the cookies are crushed, set the big bowl of crumbs aside for later use.
Step Two: Beat the Cream Layer
In a large mixing bowl, combine your softened cream cheese and your softened unsalted butter. Use a hand mixer or a sturdy wooden spoon to beat them together until the mixture is completely smooth and free of lumps. Slowly add the powdered sugar into the bowl, mixing gently at first so the sugar does not fly out. Beat the ingredients on medium speed until the entire mixture becomes light, fluffy, and well combined. This creamy base will give your dessert its rich, cheesecake like flavor.
Step Three: Mix the Pudding
In a separate large bowl, pour in your two packages of instant vanilla pudding mix. Add the three cups of cold whole milk to the dry pudding powder. Whisk the liquid vigorously for about two full minutes until the mixture begins to thicken up. Let the pudding sit undisturbed for five minutes so it can set completely. Once the pudding is firm, gently fold in your thawed whipped topping using a rubber spatula. Mix it slowly until the yellow pudding and white cream are fully integrated into a beautiful, fluffy cloud.
Step Four: Combine the Fillings
Now it is time to bring your two creamy mixtures together into one magnificent filling. Pour your thick pudding and whipped topping mixture into the bowl containing the sweetened cream cheese and butter. Use your spatula to fold the two mixtures together very gently. You want to maintain as much air in the filling as possible so your dessert stays light and fluffy. Stir until the color is uniform and you can no longer see any distinct streaks of white or yellow.
Step Five: Assemble the Layers
Grab a large glass dish, a clean plastic sand bucket, or small individual serving cups depending on how you want to present the treat. Start by scattering a generous layer of your crushed chocolate cookies at the very bottom of the container. Next, spoon a thick layer of your creamy pudding mixture directly over the cookie crumbs, smoothing it out with the back of a spoon. Repeat this layering process, alternating between cookies and cream, until you run out of ingredients. Make sure your very top layer is a thick coating of the crushed cookies so it looks like real dirt.
Step Six: Decorate and Chill
Take your gummy worms and push them halfway down into the top layer of cookie crumbs so they look like they are crawling out of the earth. You can also add fake plastic flowers or mint leaves to make the garden theme look even more authentic. Cover your dish tightly with plastic wrap and place it inside the refrigerator. Let the dessert chill for at least three to four hours, though leaving it overnight is even better. Chilling allows the cookie crumbs to soften slightly and lets all the delicious flavors blend together beautifully. Serve the dessert cold and enjoy the smiles on everyone faces.
Why This Recipe Is Special
This recipe stands out from other traditional desserts because it perfectly combines fun presentation with an incredible taste profile. It appeals to people of all ages, breaking down the barrier between adults and children through a shared sense of playfulness. The texture is a magnificent combination of velvety, smooth cream and dense, chocolate crunch that satisfies multiple cravings at once. It is a highly forgiving recipe, meaning that even if your layers look messy, the final product will still look amazing and taste fantastic.
From a nutritional and health adaptation standpoint, this recipe is special because it can easily change to fit your specific needs. If you are watching your sugar intake, you can find sugar free pudding mixes and reduced sugar cookies at your local store. You can also use low fat cream cheese and skim milk to reduce the overall calorie count without sacrificing the creamy texture. For people with gluten sensitivities, using gluten free chocolate sandwich cookies works perfectly and tastes just like the original version. This adaptability means you can serve it to a diverse group of guests with different dietary restrictions.
The psychological benefit of this dessert is another reason why it remains so incredibly popular. It brings pure joy and lighthearted fun to the dining table, which can instantly lift the mood of your guests. It encourages people to smile, laugh, and talk about their childhood memories, making your gathering feel much more warm and intimate. In a world where food can sometimes feel complicated, this simple treat reminds us that eating should be an enjoyable experience. It proves that you do not need expensive ingredients or hours of hard work to make a dessert that people will remember for years.
Extra Tips for Better Taste
To take your dessert to the absolute next level of deliciousness, you can try a few creative upgrades. Try using chocolate pudding instead of vanilla pudding if you want an extra deep, rich chocolate experience throughout the entire dish. You can also stir a cup of mini chocolate chips into the cream layer to add a surprising little crunch inside the smooth filling. If you want a more complex flavor profile, add a single teaspoon of pure vanilla extract or a tiny pinch of salt to the cream cheese mixture. This small addition helps balance the intense sweetness of the sugar and cookies.
For a fun presentation twist, try serving this dessert inside individual, brand new terracotta flower pots. Line the inside of each clean pot with plastic wrap before adding your layers to ensure it is completely safe for eating. You can stick a long sprig of fresh mint right into the center of each pot to mimic a real growing plant. Another great idea is to drop a few gummy bugs, chocolate rocks, or candy stones on top of the cookie soil. These small details add to the illusion and make the dessert even more exciting for themed birthday parties.
If you prefer a texture that is a bit more firm, you can freeze the assembled dish for about one hour before serving it to your guests. This gives it a texture that is very similar to rich ice cream cake, which is incredibly refreshing on hot summer days. Alternatively, if you like soft cookies, assemble the dish a full twenty four hours before your event. The cookie crumbs will absorb the moisture from the pudding, turning into a soft, cake like layer that melts instantly on your tongue.
Final Thoughts
This delightful treat is a wonderful reminder that cooking does not always have to be serious to be absolutely amazing. It brings together simple ingredients in a way that sparks imagination and satisfies your sweet tooth perfectly. Whether you are hosting a large neighborhood party or just making a weekend treat for your family, this recipe is guaranteed to bring success. It is easy to prepare, beautiful to look at, and incredibly delicious to eat down to the very last spoonful. Grab your ingredients, have fun crushing those cookies, and enjoy creating a dessert that everyone will talk about for a very long time.
Nutrition Details
Here is an approximate breakdown of the nutritional information for this delicious recipe. Please remember that these numbers are estimates based on standard grocery store ingredients. The actual values may change depending on the specific brands of cookies, pudding, and cream cheese you choose to use.
The values above are calculated based on a standard single serving size, assuming the total recipe is divided equally into twelve generous servings.
Disclaimer
Please keep in mind that every individual human body is completely unique and processes food in different ways. Your personal nutritional needs, metabolism, and health results may change depending on your activity level and health history. The information provided in this article is meant for educational and entertainment purposes only and should not replace professional medical or dietary advice. If you have specific health concerns, food allergies, or unique dietary restrictions, please consult with a qualified doctor or a certified nutritionist. Enjoy your treats responsibly as part of a balanced and healthy lifestyle.