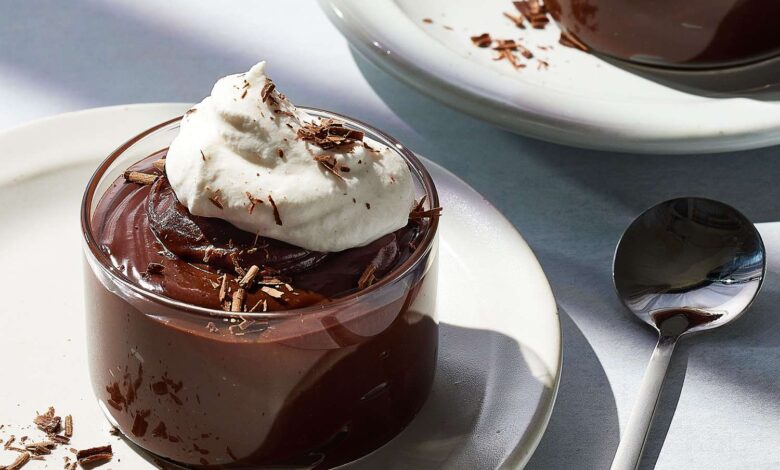
Making a special dessert at home does not have to be a stressful or complicated task at all. If you are looking for a sweet treat that looks beautiful and tastes like it came from a fancy bakery, this creamy two layer chocolate custard dessert recipe is exactly what you need. Dessert lovers always look for something that balances a deep flavor with a smooth texture, and this recipe delivers exactly that balance in every single spoonful. The magic of this dish lies in its gorgeous contrast because you get a rich dark chocolate layer sitting perfectly next to a sweet and silky vanilla cream layer. It is a timeless classic that brings together simple ingredients from your kitchen pantry and turns them into a true masterpiece of flavors. You do not need any expensive tools or professional baking skills to make this happen, which makes it perfect for anyone who wants to try their hand at making sweets.
People absolutely love this particular dessert because it feels like a comforting hug in a bowl while still looking elegant enough for a big celebration. There is something deeply satisfying about digging your spoon through two different colored layers and getting a taste of both chocolate and vanilla at the exact same time. It is a crowd pleasing treat that appeals to children who love sweet things as well as adults who prefer a more sophisticated and rich chocolate flavor profile. The texture is incredibly smooth and velvety, meaning it melts in your mouth almost instantly and leaves a wonderful aftertaste that makes you want to go back for another bite. Another reason for its massive popularity is how budget friendly it is to create since it relies on everyday staples like milk, sugar, and cocoa powder instead of costly specialty items. It is proof that you can create an absolute showstopper of a sweet treat without breaking the bank or spending your entire day standing over a hot stove.
There are so many wonderful moments and reasons to whip up this beautiful two layer treat for your friends, family, or even just for yourself after a long week. You can make it for a festive holiday gathering, a cozy weekend family dinner, a casual backyard barbecue, or a romantic date night where you want to impress someone special with your cooking skills. Food has a powerful way of connecting people and creating happy memories, and serving a beautiful homemade dessert is one of the best ways to show your loved ones how much you truly care about them. From a lifestyle perspective, this dessert is actually quite wonderful because it allows for easy portion control when you serve it in individual small glass cups or mason jars. If you are watching your fitness goals but still want a comforting reward, you can easily enjoy a smaller portion of this homemade custard without feeling like you are completely ruining your healthy eating habits for the week.
Understanding how ingredients work together will give you total confidence before you even turn on your stove to start cooking this amazing recipe. This dessert relies on the simple science of starch and heat to transform liquid milk into a thick, luxurious cream that coats the back of your spoon beautifully. By separating the mixture into two parts, you can flavor one half with warm vanilla and the other half with rich cocoa, creating a beautiful visual contrast that looks amazing in clear glass dishes. Making desserts at home is a joyful experience because you can control exactly what goes into your food, avoiding the strange artificial preservatives and chemical additives found in store bought box mixes. This recipe celebrates the pure joy of simple home cooking, giving you a reliable and foolproof guide to creating a memorable sweet that will have everyone asking you for the secret recipe.
Ingredients You Will Need
To make this beautiful and creamy two layer chocolate custard dessert, you will need to gather a few basic items from your kitchen. The measurements below are designed to create a perfectly balanced sweetness and the ideal velvety texture for six individual servings.
-
Four cups of whole milk divided into equal parts
-
One cup of granulated white sugar divided into equal parts
-
Four tablespoons of cornstarch divided into equal parts
-
Four large egg yolks at room temperature
-
Three tablespoons of unsweetened cocoa powder
-
Two teaspoons of pure vanilla extract
-
Two tablespoons of unsalted butter at room temperature
-
Half a cup of dark chocolate chips for extra richness
-
One pinch of salt to balance the sweet flavors
Step by Step Method
Please read through all these instructions before you begin cooking so that you know exactly what to expect at each stage of the preparation. This method is divided into clear sections for the vanilla layer and the chocolate layer so that you can work smoothly without any confusion.
Preparing Your Serving Dishes
The very first thing you need to do is prepare your serving glasses or bowls so they are ready when the hot custard is finished. Choose six clear glasses, small bowls, or elegant jars so that you will be able to see the beautiful contrasting layers clearly once the dessert is fully assembled. Place these glasses on a sturdy baking sheet or a large tray so that you can easily move them into your refrigerator later without spilling anything. Set this tray aside on your counter space while you focus on the cooking process.
Cooking the Classic Vanilla Layer
Take a medium saucepan and pour in two cups of the whole milk, making sure to keep the heat off for now. In a separate small bowl, whisk together half a cup of the granulated white sugar, two tablespoons of the cornstarch, and a tiny pinch of salt until there are no large lumps left. Add two of the large egg yolks into this dry sugar mixture and whisk vigorously until it forms a thick, smooth, pale yellow paste.
Slowly pour about half a cup of the cold milk from your saucepan into this egg paste, stirring constantly so that the mixture becomes smooth and liquid. Now, turn your stove heat to medium low and warm up the remaining milk in the saucepan until it is hot but not boiling yet.
Gradually pour your smooth egg and starch liquid into the warm milk while whisking the saucepan continuously to prevent any lumps from forming. Cook this mixture on medium low heat for about five to seven minutes, stirring non stop with a wooden spoon or a whisk. You must make sure to scrape the bottom and the corners of the pan so the mixture does not burn.
As the heat activates the cornstarch, you will notice the liquid suddenly transforming into a thick and glossy custard. Once it starts to bubble gently, let it cook for one more minute while stirring, then remove the saucepan completely from the hot stove. Stir in one teaspoon of the pure vanilla extract and one tablespoon of the unsalted butter, mixing until the butter melts completely and the custard looks incredibly shiny.
Assembly of the First Layer
Carefully pour the hot vanilla custard into your prepared serving glasses, filling each glass exactly halfway up to leave room for the next layer. Use a small spoon to smooth out the top surface of the vanilla cream so that it forms a flat, even line across the glass. Place the tray of glasses into your refrigerator for about fifteen to twenty minutes so that the top surface can form a firm skin, which prevents the two layers from mixing together.
Cooking the Rich Chocolate Layer
While your vanilla layer is cooling down and setting in the fridge, you can start making the rich chocolate layer in a clean saucepan. Pour the remaining two cups of whole milk into the pan while keeping the stove turned off. In your mixing bowl, combine the remaining half cup of granulated white sugar, the remaining two tablespoons of cornstarch, and three tablespoons of high quality unsweetened cocoa powder.
Add the remaining two egg yolks to this dry mixture and stir well until a thick, dark paste forms. Just like before, pour a little bit of the cold milk from your pan into this chocolate paste to thin it out into a smooth liquid.
Turn the stove heat to medium low and warm the milk in your saucepan until it is warm to the touch. Pour the chocolate egg liquid into the warm milk, whisking constantly to blend everything together smoothly. Cook this chocolate mixture over medium low heat for six to eight minutes, stirring without stopping.
When the mixture becomes thick and starts to bubble, add your half cup of dark chocolate chips into the pan. Stir vigorously for another minute until the chocolate chips melt completely into the cream, creating a very deep and dark color. Remove the pan from the stove and stir in the remaining teaspoon of vanilla extract and the final tablespoon of unsalted butter until smooth.
Final Assembly and Chilling
Take your serving glasses out of the refrigerator and check to ensure the vanilla layer is firm enough on top. Carefully spoon the hot chocolate custard over the vanilla layer in each glass, filling them up near the top. Use the back of your spoon to smooth out the dark chocolate layer beautifully.
Let the desserts sit on your kitchen counter for about thirty minutes until they cool down to room temperature. Once they are no longer hot, cover each glass loosely with some plastic wrap to prevent a hard skin from forming on top. Place the tray into your refrigerator and let the desserts chill completely for at least four hours, though leaving them overnight is even better for the texture.
Why This Recipe Is Special
This two layer chocolate custard dessert is special because it combines traditional comfort with a beautiful presentation that looks like a high end restaurant treat. One of the best benefits of this recipe is that it uses real, whole food ingredients like fresh milk and eggs rather than artificial powders and chemical thickeners. This means you are serving your family a clean dessert that is completely free from mysterious preservatives, artificial colors, or high fructose corn syrup.
From a taste perspective, it offers a wonderful experience because the light aromatic sweetness of the vanilla layer perfectly balances the deep bitterness of the dark chocolate layer. It satisfies your sweet tooth completely without being overly sugary, making it an excellent choice for people who appreciate balanced and refined flavors.
Additionally, this dessert is naturally gluten free because it uses cornstarch as the thickening agent instead of wheat flour, which is fantastic for people with gluten sensitivities. Eggs provide a good dose of natural protein and healthy fats, while milk delivers essential calcium for bone health. It is a comforting and wholesome option that feels indulgent while keeping the ingredient list short, simple, and clean.
Extra Tips for Better Taste
To take this dessert to an even higher level of deliciousness, you can try a few creative improvements and fun toppings before serving.
-
To elevate the flavor of the chocolate layer, you can add half a teaspoon of instant espresso powder to the cocoa mixture because coffee naturally intensifies the deep flavor of chocolate without making it taste like coffee.
-
You can add a layer of crushed graham crackers, vanilla wafers, or chocolate sandwich cookies at the very bottom of the glass before pouring the vanilla custard to give the dessert an amazing crunchy texture.
-
For a beautiful presentation, top the chilled desserts with a large dollop of homemade whipped cream and some fresh raspberries, strawberries, or black cherries right before you serve them to your guests.
-
You can use a vegetable peeler on a block of milk chocolate to create beautiful chocolate curls or shavings to sprinkle generously over the top of each dessert glass.
-
If you love a salty and sweet flavor combination, sprinkle a few flakes of sea salt over the finished chocolate layer just before chilling to bring out the richness of the dark cocoa.
Final Thoughts
Making this creamy two layer chocolate custard dessert is a wonderful way to bring joy, warmth, and sweetness into your home kitchen. It shows that you do not need to be a professional pastry chef or own complicated kitchen gadgets to create something truly beautiful and delicious for the people you love. The process of watching simple milk, sugar, and eggs transform into a velvety smooth pudding is incredibly rewarding and fun for cooks of all skill levels. Whether you serve this at a large family party or enjoy it quietly on your couch after a busy day, it is guaranteed to make the moment feel extra special. Gather your ingredients, take your time stirring the pot, and enjoy every single bite of this classic homemade treat.
Nutrition Details
The nutrition values listed below are approximate estimations calculated per individual serving based on a standard recipe split into six equal portions. Your actual numbers might vary slightly depending on the specific brands of milk, cocoa powder, and chocolate chips you choose to purchase at your local grocery store.
| Nutrient Type | Amount Per Serving | Percentage of Daily Value |
| Calories | Three hundred and twenty calories | Sixteen percent |
| Total Fat | Fourteen grams | Eighteen percent |
| Saturated Fat | Eight grams | Forty percent |
| Cholesterol | One hundred and forty milligrams | Forty seven percent |
| Sodium | Eighty milligrams | Three percent |
| Total Carbohydrates | Forty two grams | Fifteen percent |
| Dietary Fiber | Two grams | Seven percent |
| Total Sugars | Thirty five grams | Seventy percent |
| Protein | Seven grams | Fourteen percent |
| Calcium | Two hundred milligrams | Fifteen percent |
| Iron | One point five milligrams | Eight percent |
Disclaimer
This recipe and the accompanying nutritional information are provided for educational and entertainment purposes only. Everyone has a unique body, different health goals, and individual metabolic rates, which means your personal dietary needs and nutritional results may change. If you have specific medical conditions, severe food allergies, or strict dietary restrictions, you should always consult with a qualified doctor or a registered dietitian before making major changes to your eating habits. The author of this recipe is not a medical professional or a certified nutritionist, and readers are fully responsible for checking their own ingredients for safety, quality, and freshness before consumption.