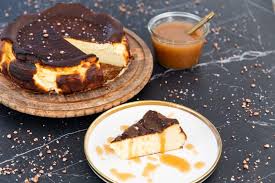
Are you ready to discover the most amazing dessert that will absolutely change the way you think about baking forever and ever? This incredible culinary masterpiece is known as the Basque Burnt Cheesecake and it is taking the entire world by storm because of its unique look and taste. Unlike traditional cheesecakes that require a lot of careful work and a perfect water bath to prevent cracking, this specific recipe embraces imperfections and actually celebrates a dark scorched top. It originates from the beautiful Basque region in Spain where local bakers realized that high heat could create a deeply caramelized exterior while keeping the inside unbelievably soft and gooey. When you take your very first bite you will notice a wonderful contrast between the rich Custard like center and the deeply bittersweet top layer that tastes a bit like toasted marshmallows. It is the ultimate dessert for anyone who wants a sophisticated treat without spending hours stressing over cracks or leaky pans in the kitchen oven.
The main reason why people all over the globe are completely falling in love with this dessert is its pure simplicity and its honest rustic charm. You do not need to worry about crushing graham crackers for a crust or making sure the top stays perfectly white and smooth because this cake is meant to look delightfully messy. The deep dark color on top provides a beautiful smoky sweetness that perfectly cuts through the rich and heavy cream cheese underneath. Food lovers adore how the texture transitions seamlessly from a firm and structured outer edge to a completely molten and velvety center that almost flows like warm lava. It feels incredibly luxurious on the tongue and it offers a complex flavor profile that is both deeply comforting and intensely satisfying at the exact same time. It is a true crowd pleaser that looks like it came straight out of a high end French bakery but it actually requires less effort than a standard batch of chocolate chip cookies.
There are so many wonderful occasions that call for this beautiful cake because it brings immense joy and a sense of celebration to any dining table. You might want to bake it for a cozy family gathering on a rainy Sunday afternoon when everyone needs a warm and sweet pick me up to brighten the mood. It is also the perfect showstopper dessert for a fancy dinner party where you want to impress your close friends without spending your entire evening trapped in the kitchen away from the fun. From an emotional standpoint baking this cake fills your entire house with the most intoxicating aroma of caramelized sugar and rich vanilla which instantly makes your home feel warm and inviting. Even if you are trying to stay mindful of your fitness goals you can easily enjoy a small slice of this homemade treat because it uses real whole food ingredients without any artificial preservatives or mystery chemicals. It provides a deep sense of psychological satisfaction and pure happiness that makes it worth every single calorie for your special cheat day.
Baking this cheesecake is also a fantastic way to build your confidence if you are a complete beginner who feels intimidated by the complex rules of traditional pastry making. It teaches you to trust the process of high heat caramelization and shows you how simple ingredients can transform into something magical when combined correctly. You do not need any fancy tools or specialized equipment other than a basic mixer and a standard springform pan lined with basic baking paper. The beautiful burnt top means you can relax completely and enjoy the creative process of cooking without any fear of failure hanging over your head. It is a highly forgiving recipe that rewards patience and love with a texture that is so silky and a flavor that is so deeply complex you will want to make it week after week. So let us gather our fresh ingredients and get ready to create a memorable dessert that will leave your family and friends begging for your secret recipe.
Ingredients You Will Need
To create this magnificent dessert you will need to gather a few simple but high quality ingredients from your local grocery store. It is very important that all of your dairy items are sitting at complete room temperature before you begin mixing them together so that you get a perfectly smooth batter without any annoying lumps.
-
1000 grams of full fat cream cheese standard block style
-
300 grams of white granulated sugar
-
6 large whole eggs at room temperature
-
500 milliliters of heavy whipping cream with high fat content
-
30 grams of all purpose flour
-
1 tablespoon of pure vanilla extract
-
1 half teaspoon of fine sea salt
Step by Step Method
Please read through these instructions carefully before you start so you know exactly what to expect during each phase of the baking process.
Step 1 Preparing Your Kitchen and Tools
Start by turning on your oven and setting the temperature to 200 degrees Celsius which is about 400 degrees Fahrenheit. Let the oven preheat completely for at least twenty minutes so that the heat is perfectly even inside. Take a standard nine inch springform pan and grease the inside lightly with a little bit of butter or cooking spray. Take two large sheets of parchment paper and press them into the pan one after the other making sure they cross over each other. The paper should stick up at least two inches above the rim of the pan because the cheesecake will rise up high like a soufflé while it bakes. Do not worry about the creases or folds in the paper because these wrinkles give the cake its famous rustic look on the sides.
Step 2 Creaming the Cheese and Sugar
Place your one thousand grams of softened cream cheese into a large mixing bowl or the bowl of your stand mixer. Use the paddle attachment or a standard hand mixer on medium speed to beat the cream cheese until it is completely smooth and creamy. This should take about three minutes of continuous mixing. Slow down the mixer and gradually pour in your three hundred grams of white granulated sugar along with the half teaspoon of fine sea salt. Turn the mixer back up to medium speed and beat the mixture for another two to three minutes until the sugar has completely dissolved and the mixture looks fluffy. Use a rubber spatula to scrape down the sides and the very bottom of the bowl to ensure no random lumps of cheese are hiding.
Step 3 Incorporating the Eggs
Turn your mixer down to low speed because you do not want to whip too much air into the batter at this stage. Add your six large eggs one at a time waiting until each egg is fully blended into the cheese before adding the next one. Scrape the bowl again after every two eggs to keep the texture uniform. Adding the eggs slowly ensures that the batter stays stable and emulsifies perfectly with the fat from the cream cheese. Once all the eggs are in the batter should look glossy and quite liquid.
Step 4 Adding Flavor and Cream
With the mixer still running on low speed slowly pour in your one tablespoon of pure vanilla extract. Next gently pour in the five hundred milliliters of heavy whipping cream in a slow steady stream. Mix just until the cream is fully integrated into the batter. The mixture will now look very thin and watery which is completely normal for this specific style of cheesecake so do not be alarmed.
Step 5 Sifting the Flour
Take your thirty grams of all purpose flour and place it into a small bowl. Scoop out a few spoonfuls of your liquid cheesecake batter and mix it into the flour using a small whisk until it forms a smooth paste. This clever trick prevents the flour from forming dry lumps in your main batter. Now pour that smooth flour paste back into the large mixing bowl and blend on low speed for about thirty seconds until everything is perfectly combined. Give the entire batter one final stir with your rubber spatula making sure everything is smooth.
Step 6 Baking to Perfection
Gently pour your finished cheesecake batter through a fine mesh strainer straight into your prepared springform pan to catch any tiny lumps that might remain. Place the pan on a sturdy baking sheet and slide it onto the middle rack of your preheated oven. Bake the cake for about fifty to fifty five minutes without opening the oven door during the first forty minutes. Watch the top closely as it turns from golden brown to a deep dark mahogany brown and finally to a charred blackish color around the edges. The cake is done when the top is deeply caramelized but the center still jiggles like jelly when you gently shake the pan.
Step 7 The Cooling Process
Remove the baking sheet from the oven very carefully because the cake will be extremely delicate and wobbly. Place the pan on a wire cooling rack and leave it completely alone at room temperature. As the cake cools down it will slowly sink back into the pan and develop beautiful deep cracks on the surface which is exactly what we want. Let it cool completely for about two to three hours on your counter. Once it reaches room temperature place the pan into the refrigerator for at least four hours or preferably overnight so that the interior can set into a dense fudge like texture.
Step 8 Slicing and Serving
When you are ready to serve take the cake out of the fridge and open the springform pan latch. Gently pull back the parchment paper from the sides of the cake to reveal the beautiful caramelized edges. Dip a sharp knife into hot water and wipe it dry before making your first cut. Clean the knife after every single slice to get beautiful clean cuts that show off the contrast between the dark top and the creamy pale yellow interior. Serve the slices at room temperature for the best flavor and texture experience.
Why This Recipe Is Special
This particular recipe stands out from all other dessert options because it completely redefines what a traditional cheesecake can be. The primary benefit of this method is that it is virtually foolproof for home cooks because it eliminates the need for complex techniques like water baths or precise temperature drops. If your cake burns on top it means you did it right and if it cracks it simply adds to the gorgeous rustic aesthetic. This removes all the anxiety and pressure that usually accompanies high stakes baking projects.
From a flavor standpoint this cake offers a magical experience that standard cheesecakes simply cannot match. The high heat baking process creates a chemical reaction known as the Maillard reaction which turns ordinary sugar and dairy proteins into complex flavor compounds. You get notes of caramel and toffee along with a pleasant bitterness that balances out the intense richness of the dairy fat. It is a sophisticated balance of sweet and savory elements that keeps your palate excited with every single forkful.
On a health note while this is certainly an indulgent treat that should be enjoyed in moderation it does offer some notable benefits over processed store bought desserts. It relies entirely on whole natural ingredients like fresh eggs and real cream without any artificial flavorings or chemical stabilizers. This means your body is processing real food that provides high quality fats and clean proteins from the eggs and cheese. It is also naturally low in carbohydrates compared to traditional cakes that feature a thick flour based crust which makes it a slightly better option for those watching their starch intake.
Extra Tips for Better Taste
To elevate this incredible dessert to an even higher level of culinary perfection you can try a few creative adjustments and expert techniques. First consider using a mix of different cheeses to add more depth to the flavor profile. You can substitute one hundred grams of the standard cream cheese with a high quality goat cheese or a rich blue cheese if you want a savory kick that pairs beautifully with sweet wines.
Another wonderful tip is to infuse your heavy cream with natural aromatics before mixing it into the batter. You can gently warm the cream on the stove with a few sprigs of fresh rosemary or some crushed espresso beans then let it cool completely and strain out the solids before using it. This subtle touch introduces a beautiful layer of hidden flavor that will leave your guests wondering how you achieved such complexity.
Paying attention to temperature is also vital for maximizing taste and texture. Always make sure to bring your individual slices to room temperature for about thirty minutes before serving them to your guests. When the cake is cold the dairy fats are firm and the flavors are muted but when it warms up slightly the center becomes incredibly silky and the vanilla aromas truly bloom. You can also serve each slice with a tiny sprinkle of flaky sea salt on top to enhance the caramelized notes.
Final Thoughts
Baking this gorgeous cream cheese creation is a wonderful journey that brings the warmth and romance of Spanish cafes right into your own home kitchen. It shows us that beauty can be found in imperfection and that sometimes the most delicious things in life are the ones that look a bit rough around the edges. Whether you are baking this for a grand holiday celebration or simply as a fun weekend project you are bound to create lasting memories around the dinner table. Do not be afraid of the dark color because that beautiful burn is where the magic truly lives. Grab your mixing bowl and enjoy every single step of this simple artisan experience.
Nutrition Details
Here is an approximate breakdown of the nutritional content for this delicious cheesecake based on standard ingredients and a total of twelve equal servings.
| Nutrient Type | Amount Per Individual Serving | Percentage of Daily Value |
| Total Calories | 485 calories | 24 percent |
| Total Fat | 42 grams | 54 percent |
| Saturated Fat | 26 grams | 130 percent |
| Cholesterol | 195 milligrams | 65 percent |
| Sodium | 310 milligrams | 13 percent |
| Total Carbohydrates | 21 grams | 7 percent |
| Dietary Sugars | 18 grams | 20 percent |
| Dietary Protein | 8 grams | 16 percent |
| Vitamin D | 1 microgram | 5 percent |
| Calcium | 95 milligrams | 8 percent |
| Iron | 1 milligram | 6 percent |
| Potassium | 140 milligrams | 3 percent |
Disclaimer
Please remember that everyone has a unique body with individual health requirements and nutritional needs. This recipe is meant for general enjoyment and educational purposes only and individual nutritional values may change depending on the specific brands of ingredients you choose to use in your kitchen. If you have specific dietary restrictions or medical conditions related to fat or sugar intake please consult with a qualified health professional or a registered dietitian before enjoying this dessert.