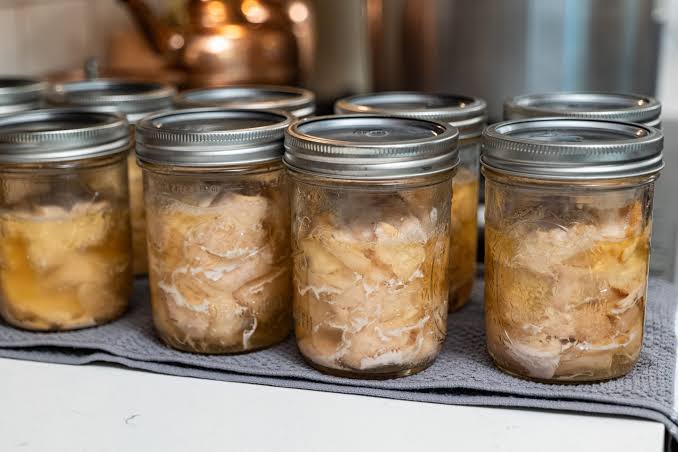
Canning chicken breast at home is one of the most rewarding kitchen projects you can ever start. This traditional preservation method turns fresh raw meat into tender juicy chunks that sit ready on your pantry shelves for months. When you open a home canned jar you get soft flavor rich chicken that falls apart with a simple tap of your fork. Unlike store bought canned meats which often taste salty or metallic, home canned chicken breast tastes remarkably fresh, clean, and savory. It saves you tons of dinner prep time because the meat is already fully cooked and sitting in its own natural broth. You can simply unscrew a lid, dump the contents into a hot skillet or a bubbling soup pot, and have a rich delicious meal ready in less than ten minutes.
Busy parents, meal planners, and outdoor lovers absolutely adore this canned chicken breast recipe. People love it because it completely removes the stress of daily dinner prep and eliminates the annoying need to thaw frozen meat after a long tiring day at work. Instead of standing in front of an open freezer wondering what to cook, you can pull a golden jar of pre cooked meat right off your pantry shelf. It makes homemade cooking feel effortless, fun, and reliable no matter how chaotic your schedule becomes. Beyond the incredible convenience, home cooks love the total control over ingredients. You get to decide exactly how much salt goes into the jar, which natural herbs to add, and what quality of meat your family eats every day.
There are so many wonderful emotional and practical reasons to start canning your own fresh chicken breasts today. If you care deeply about fitness and healthy eating, having instant access to clean high protein food prevents you from ordering unhealthy junk food when you are exhausted. Fitness enthusiasts can easily track their daily protein intake by grabbing a jar that contains precise portions of cooked lean chicken meat. From an emotional perspective, building a fully stocked food pantry brings a deep sense of security, comfort, and self reliance to your heart. Walking into a pantry filled with shiny glass jars packed with wholesome home cooked food makes you feel prepared for winter storms, power outages, sudden guests, or tight budget months.
The incredible melt in your mouth texture and pure savory taste will make this recipe a staple in your home kitchen routine. Freshly canned chicken breasts absorb the natural flavors of simple seasalt and warm broth during the long high pressure processing cycle. The meat becomes far more tender than traditional baked or boiled chicken breast because it cooks slowly inside its own sealed jar. Every single bite delivers a warm comforting flavor that works perfectly in spicy tacos, creamy pasta sauces, fresh garden salads, or hot chicken noodle soup. Once you experience how tender this meat is, you will never want to go back to expensive store bought options again.
Ingredients You Will Need
To safely make this delicious canned chicken breast recipe at home, gather these simple pantry ingredients and equipment:
-
10 pounds fresh boneless skinless chicken breasts
-
4 teaspoons canning salt or pure sea salt without additives
-
4 cups clean filtered water or low sodium chicken broth
-
4 tablespoons lemon juice for optional washing
-
4 whole bay leaves for natural aromatic flavor
Step by Step Method
-
Clean your work station, kitchen counter, and all metal utensils thoroughly with warm soapy water. Inspect every glass canning jar carefully to check for tiny chips, hair cracks, or sharp rough edges along the top rim. Wash four quart size glass jars, metal bands, and brand new canning lids in hot soapy water, then rinse them completely with clean warm water.
-
Place your fresh boneless skinless chicken breasts on a clean cutting board. Trim away any excess visible white fat, thick tough cartilage, or loose skin using a sharp kitchen knife. Cut the trimmed chicken breasts into uniform cubes that measure roughly one inch to two inches in size so they cook evenly inside the jars.
-
Choose between the raw pack method or the hot pack method based on your personal preference. For the popular raw pack method, pack the raw cut chicken pieces tightly into your clean room temperature glass jars without adding extra boiling liquid. For the hot pack method, simmer the chicken pieces in boiling water for five minutes, then pack the hot meat loosely into warm jars and pour the hot cooking broth over the top.
-
Add exactly one teaspoon of pure canning salt to each quart jar if you want extra flavor, though salt is completely optional for safety. Place one whole bay leaf inside each jar to infuse the meat with a delicate herbal aroma during the long heating process.
-
Leave exactly one inch of empty space, known as headspace, between the top of the chicken meat or liquid and the top rim of the glass jar. This empty space allows the food to expand safely during high heat processing without pushing broth out past the seal.
-
Dip a clean paper towel into warm water or white vinegar and carefully wipe the top flat rim of every glass jar. Removing all grease, meat particles, or water drops from the glass rim ensures the rubber ring under the metal lid makes direct contact with clean glass.
-
Place a prewashed flat lid on top of each jar rim, centering it carefully. Screw a metal band down over the lid until you feel resistance, turning it until it is finger tip tight. Do not use extra force to wrench the band down overly tight, as air needs to escape from inside the jar during processing.
-
Add three quarts of warm water to your pressure canner, or follow the specific water depth level recommended in your pressure canner manual. Place the jar rack at the bottom of the canner to prevent the glass jars from sitting directly on the hot metal bottom.
-
Use jar tongs to gently lower your filled jars into the pressure canner, keeping them completely upright so no liquid spills. Lock the canner lid securely in place, leave the vent pipe open without the pressure weight, and turn your stove burner to medium high heat.
-
Allow a strong steady stream of visible steam to escape from the open vent pipe for ten full minutes to exhaust all trapped air from inside the canner vessel. After ten minutes of continuous venting, place your pressure regulator weight over the vent pipe.
-
Bring the internal pressure up to eleven pounds of pressure on a dial gauge, or ten pounds of pressure on a weighted gauge, adjusting for your local altitude if you live far above sea level. Once the target pressure is reached, start your kitchen timer immediately.
-
Process quart jars continuously for ninety minutes, or pint jars for seventy five minutes, keeping the pressure steady the entire time. Monitor the heat on your stove constantly to make sure the pressure gauge never drops below your required target number.
-
Turn off the stove burner completely when the timer finishes, and let the pressure canner cool down naturally on the stove without touching it. Never force the canner to cool down by running cold water over the lid or lifting the weight early, as sudden pressure shifts break glass jars.
-
Wait until the pressure dial reaches zero and the safety lock drops down completely. Carefully remove the weight from the vent pipe, unlock the canner lid away from your face to avoid steam burns, and let the open canner sit untouched for ten minutes.
-
Use jar tongs to lift the hot jars straight up out of the canner without tilting them, and set them gently onto a thick bath towel laid on your kitchen counter. Allow the hot jars to rest undisturbed at room temperature for twelve to twenty four hours while they seal completely.
-
Listen for the satisfying popping or pinging sound as the center of each metal lid pulls down tight against the glass. After twenty four hours, press the middle of each lid to verify it is solid and does not flex or pop up and down. Remove the metal screw bands, wipe the glass jars clean, label them with the contents and date, and store your clear sealed jars in a cool dark pantry.
Why This Recipe Is Special
This home canned chicken breast recipe is truly exceptional because it turns a plain high protein staple into a super convenient pre cooked luxury. Unlike industrial canned chicken from grocery stores, this homemade version contains no mystery additives, chemical preservatives, heavy artificial sodium levels, or strange gelatinous liquids. You hold absolute power over what goes into your body, making it a fantastic solution for clean eating routines. The intense heat pressure method breaks down tough meat fibers, yielding an unbelievably soft texture that melts on your tongue.
From a health standpoint, boneless skinless chicken breasts offer high quality lean protein that supports muscle repair, weight management, and steady daily energy levels. Having fully cooked chicken sitting on your shelf removes the friction of eating well when time is short. Furthermore, this processing method creates a rich natural bone broth right inside the jar from the meat juices, retaining valuable vitamins and minerals that are often lost during open pan frying or boiling.
Extra Tips for Better Taste
If you want to raise the flavor profile of your canned chicken to new culinary heights, consider customizing your jars with natural dry seasonings before processing. Try adding half a teaspoon of dry onion powder, garlic powder, or paprika to each jar along with the salt. A small pinch of crushed red pepper flakes creates a wonderful kick for future taco fillings, while dried thyme or rosemary yields an exquisite base for home style chicken pot pies.
Another great trick is using warm homemade chicken stock instead of plain water when utilizing the hot pack method. The rich stock infuses deep flavor straight into the center of each chicken cube as it processes under pressure. Just remember to always keep extra added liquids completely oil free and butter free, as added liquid fats can creep onto jar rims during heat expansion and compromise your safety seal.
Final Thoughts
Canning your own chicken breasts is one of the single best habits you can build for long term kitchen efficiency, monthly food savings, and daily healthy eating habits. Taking a few quiet hours over the weekend to process a bulk package of fresh meat pays huge dividends on busy weeknights when you need a wholesome dinner fast. You will love opening your pantry to see rows of beautiful homemade jars ready to transform into tasty soups, salads, casseroles, and wraps at a moment’s notice. Give this simple recipe a try and enjoy the incredible peace of mind that comes with a well stocked home pantry.
Nutrition Details
| Component | Amount Per Serving | | * | * | | Serving Size | 4 Ounces (113 grams) | | Calories | 110 kcal | | Total Fat | 1.5 grams | | Saturated Fat | 0.5 grams | | Cholesterol | 65 milligrams | | Sodium | 290 milligrams | | Total Carbohydrate | 0 grams | | Dietary Fiber | 0 grams | | Total Sugars | 0 grams | | Protein | 24 grams |
Disclaimer
Every human body is unique and nutritional needs or health responses vary from person to person. The nutritional values provided above are estimations based on standard unflavored chicken breast raw ingredients and can change depending on your specific meat cuts, trimming precision, and seasoning choices. Always follow safe home canning guidelines published by official agricultural extension services to ensure food safety. If you have underlying health concerns, dietary restrictions, or metabolic conditions, consult with a qualified medical healthcare provider or certified nutritionist.