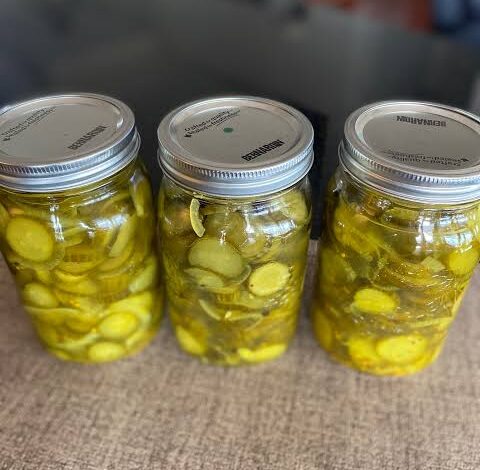
Canning sliced pickled cucumbers is one of the most rewarding home kitchen projects you can ever start because it brings the fresh taste of summer right into your pantry for the entire year. This timeless recipe transforms simple fresh cucumbers into crunchy, tangy, and extremely flavorful pickles through a very simple and safe home canning method. Many people think that home canning is a difficult or scary process reserved only for expert grandmothers, but making your own jars of sliced pickled cucumbers is actually very easy when you follow basic kitchen rules. When you slice green garden cucumbers and steep them in a warm blend of water, pure vinegar, salt, and aromatic spices, a wonderful chemical process happens that locks in crispness while infusing every single bite with bright zest. You do not need any fancy or expensive equipment to get started today, just fresh ingredients, clean glass jars with tight lids, and a deep pot of boiling water. Learning this basic preservation skill lets you control every single ingredient that goes into your body, keeping away unnecessary commercial chemicals while creating delicious homemade food.
People all over the world absolutely fall in love with homemade pickled cucumbers because the taste and texture are miles ahead of anything you can buy at a standard grocery store. Commercial store pickles are often soft, overprocessed, and packed with strange artificial colorings, harsh chemical preservatives, or hidden high fructose corn syrup that ruins the genuine pickle experience. When you make your own sliced pickled cucumbers at home, you get an incredible, sharp crunch that sounds as good as it tastes, combined with a perfectly balanced sour and salty brine that makes your mouth water instantly. Kids and adults alike adore the cheerful popping sound a fresh jar makes when you open it for lunch, as well as the vibrant green color that brightens up any plate. There is also a unique feeling of deep comfort and joy in pulling a glistening glass jar off your kitchen shelf during a cold winter day and tasting summer sunshine in every bite. It is a classic food tradition that connects families across generations, turning basic garden abundance into shared joy around the dinner table.
There are so many wonderful reasons and special occasions to start canning sliced pickled cucumbers in your own home kitchen right now. If you grow your own backyard vegetable garden, you already know how quickly cucumber vines can produce massive amounts of fresh produce that need to be used before they spoil. Canning is the ultimate food waste solution that preserves your garden harvest so nothing goes to waste while saving you money on your monthly family food budget. Beyond practical garden savings, this recipe is a amazing choice for anyone focused on healthy eating, weight loss, or simple fitness goals because pickled cucumbers are very low in calories while being packed with bold flavor. Eating a few crunchy pickle slices before or after meals satisfies your savory food cravings without adding heavy fats, extra sugars, or unwanted calories to your daily diet. Emotionally, opening a homemade jar of bright pickles during family summer barbecues, holiday dinners, or weekend picnic lunches brings a huge sense of personal pride because you crafted something wonderful with your own two hands.
Making homemade sliced pickled cucumbers also creates wonderful opportunities to share love, warmth, and handmade gifts with your friends, neighbors, and extended family members. A lovely glass jar filled with neatly arranged green cucumber slices, bright golden mustard seeds, and fresh dill sprigs tied with a simple ribbon makes one of the most thoughtful gifts you can give to anyone. People appreciate receiving real food made with care much more than expensive plastic trinkets bought from store shelves, making these pickles perfect for holiday presents, housewarming parties, or simple neighborhood visits. Creating your own custom batch also allows you to tailor the flavor profile to match your exact personal taste, whether you like your pickles extra sour, pleasantly sweet, or packed with spicy red pepper heat. Once you experience how quick, easy, fun, and economical the process is, preserved cucumbers will quickly become a permanent staple in your refrigerator and food storage pantry. You will feel empowered as a home cook, knowing that you hold the simple secret to preserving peak seasonal freshness with ease and total confidence.
Ingredients You Will Need
To make six pint jars of crisp sliced pickled cucumbers, gather the following fresh ingredients with exact measurements:
-
8 pounds of fresh firm green picking cucumbers (about 15 to 20 medium cucumbers)
-
6 cups of pure water (filtered water works best)
-
6 cups of white distilled vinegar (5 percent acidity strength)
-
half cup of pickling salt or non iodized sea salt
-
third cup of granulated white sugar (optional, balances the sharp sourness)
-
12 fresh dill sprigs or 6 tablespoons of dried dill seed
-
6 whole peeled garlic cloves (slightly crushed)
-
3 tablespoons of whole yellow mustard seeds
-
3 tablespoons of whole black peppercorns
-
1 and half teaspoons of red pepper flakes (optional, for mild heat)
-
6 bay leaves (one leaf per jar)
Step by Step Method
Step 1: Clean and Prepare Your Equipment
Start by inspecting your six pint glass canning jars to make sure there are no cracks, chips, or rough edges around the top rims. Wash the glass jars, metal bands, and brand new metal lids thoroughly using hot water and liquid dish soap. Place your clean jars inside a large deep pot filled with hot water, ensuring the jars are fully submerged, and bring the water to a gentle simmer for ten minutes to sanitize them completely. Keep the jars resting inside the warm water until you are ready to pack them so the glass does not break when filled with hot liquid. Place your new metal lids into a small bowl of warm water to soften the soft rubber seal around the edges.
Step 2: Wash and Slice the Fresh Cucumbers
Wash all eight pounds of fresh cucumbers thoroughly under cool running tap water to remove any dirt or garden debris. Use a small sharp knife to trim away a tiny slice from both ends of every cucumber, making sure to cut off the blossom end which contains natural enzymes that can make pickles soft. Place the trimmed cucumbers on a sturdy cutting board and slice them into clean, even rounds about one quarter of an inch thick. You can use a sharp kitchen knife, a simple mandoline slicer, or a crinkle cutter tool if you like decorative wavy pickle edges.
Step 3: Prepare the Pickling Brine Liquid
In a large non reactive stainless steel or enamel saucepan, combine six cups of pure water, six cups of white distilled vinegar, half cup of pickling salt, and one third cup of white sugar. Turn the stovetop heat to medium high and bring the liquid mixture to a full rolling boil, stirring continuously with a wooden spoon until all the salt and sugar crystals dissolve completely. Once the brine boils and becomes completely clear, lower the heat to low, cover the pan with a lid, and let it simmer gently while you pack your glass jars.
Step 4: Pack Aromatics into Warm Glass Jars
Carefully remove one warm sanitized glass jar from the hot water pot using sturdy jar tongs and place it on a clean kitchen towel on your counter. Drop one whole peeled garlic clove, one bay leaf, half tablespoon of yellow mustard seeds, half tablespoon of black peppercorns, one fourth teaspoon of red pepper flakes, and two fresh dill sprigs into the very bottom of the warm jar. These dry spices and herbs will infuse the liquid as the pickles rest in storage over time.
Step 5: Pack Cucumber Slices Securely
Tightly pack your cut cucumber slices into the glass jar on top of the spices, stacking them horizontally or pressing them down gently to fill as much open space as possible without crushing the green slices. Leave about half an inch of empty space at the very top of the jar, which is known in home canning as headspace. Packing the cucumber slices tightly prevents them from floating up to the top once the hot liquid brine is poured into the glass jar.
Step 6: Pour Hot Brine over Cucumbers
Place a clean wide mouth canning funnel on top of your filled jar. Carefully ladle the boiling hot vinegar brine over the cucumber slices, leaving exactly half an inch of empty space between the top of the liquid and the top rim of the glass jar. Make sure all cucumber slices are completely covered under the liquid so they preserve safely without spoiling.
Step 7: Remove Air Bubbles and Adjust Headspace
Gently slide a clean plastic butter knife, a silicone spatula, or a wooden chopstick down along the inside walls of the glass jar to release trapped air bubbles. Gently press against the cucumber slices so any hidden air pockets rise up and pop at the surface. Check the top liquid level again, and add a small splash of additional hot brine if needed to maintain that exact half inch headspace.
Step 8: Clean Rims and Secure Metal Lids
Take a clean paper towel dampened with warm water and wipe the top glass rim and outer threads of the jar completely clean to remove any drops of salt brine or food particles that might block a tight seal. Place a soft warm metal lid directly centered on top of the clean glass rim. Screw the metal outer band over the lid until it is fingertip tight, meaning you turn it until you feel resistance, but do not twist it super hard with full hand force.
Step 9: Process Jars in Boiling Water Bath
Lower your filled, sealed jars carefully into a large canning pot or deep stockpot fitted with a metal wire rack at the bottom so the glass jars do not touch the direct metal bottom of the pot. Ensure the warm water covers the tops of all jars by at least one to two inches of standing water. Turn the stove heat up high, cover the pot with a heavy lid, and bring the water to a full roaring boil. Once the water boils vigorously, start a timer for ten minutes to process pint jars safely.
Step 10: Cool and Check Seals
When the ten minute boiling timer finishes, turn off the stovetop heat, remove the pot lid carefully away from your face, and let the jars sit still in the hot water for five minutes. Use jar tongs to lift each jar straight up out of the pot without tilting them, and set them on a dry towel in a quiet kitchen area away from cold air drafts. Let the jars sit undisturbed for twelve to twenty four hours. As the jars cool down, you will hear a sharp, satisfying popping sound, which means the lids have sucked down tight and created a safe vacuum seal. Test each cooled jar by pressing the center of the metal lid; if it stays flat and does not spring up and down, your pickles are safely preserved for long term storage. Store sealed jars in a dark cool pantry for two weeks before opening to allow the full tangy pickle flavor to develop.
Why This Recipe Is Special
This homemade sliced pickled cucumber recipe stands out as a truly wonderful addition to your daily cooking routine because it balances unbelievable crisp texture, vivid natural taste, and healthy nutrition in one simple package. Unlike store bought pickles that sit on hot warehouse shelves for many months soaking in harsh artificial chemicals, sodium benzoate, and synthetic food dyes like yellow number five, these homemade pickles contain only pure natural ingredients that you select yourself. You get total control over your family health by choosing organic green cucumbers, pure water, and clean spices without any hidden high fructose corn syrup or unwanted synthetic flavor enhancers.
From a health standpoint, pickled cucumbers offer fantastic benefits for your body, digestion, and daily energy levels. Cucumbers are naturally loaded with water, essential minerals, and useful antioxidants like beta carotene that protect your body cells from standard environmental damage. The simple fermentation and vinegar pickling process creates a low calorie food that supports active weight management and healthy digestion. Consuming vinegar along with meals can help support healthy blood sugar balance after eating carbohydrate heavy foods like sandwiches or pasta dishes. Additionally, the natural salt brine provides important electrolytes that can help restore balance in your body after intense workout sessions or active summer sports.
The amazing taste and satisfying mouthfeel of these homemade sliced pickles make them a absolute winner in every home kitchen. The clever combination of aromatic whole mustard seeds, fragrant fresh garlic, earthy bay leaf, sharp peppercorns, and bright green dill delivers a rich complex flavor that unfolds beautifully on your palate. The mild touch of white sugar softens the sharp bite of distilled white vinegar, creating a smooth sour note that wakes up your taste buds without burning your mouth. Every single cucumber slice retains a firm, fresh snap that makes lunch salads, burgers, and simple snack plates feel instantly special and full of vibrant life.
Extra Tips for Better Taste
To make your homemade sliced pickled cucumbers taste even more amazing, consider using these fun creative kitchen variations and expert texture tips:
-
Select very firm, freshly picked cucumbers that feel heavy for their size, avoiding any soft or yellowing vegetables from the market.
-
Add one clean grape leaf, cherry leaf, or oak leaf to the bottom of each glass jar before packing, because natural tannins in wild leaves keep cucumber slices exceptionally crisp.
-
Soaking your sliced fresh cucumbers in a bowl of cold ice water for two hours before canning hydrates the vegetable cells and gives you maximum crunch.
-
Swap white distilled vinegar for raw unpasteurized apple cider vinegar if you prefer a deeper, fruitier, and slightly sweeter pickling brine profile.
-
Introduce exciting new flavor accents by adding half a teaspoon of whole coriander seeds, dried dill seed, or fresh sweet onion slices into each jar.
-
Increase the spicy chili heat level by dropping two fresh jalapeno slices or whole small dried red chili peppers into the bottom spice mix.
-
Always use specialized non iodized pickling salt or coarse kosher salt, as standard table salt contains anti caking chemicals that make your pickle brine look cloudy.
-
Keep your processed pickle jars stored in a cool, dark, dry pantry closet, as direct sunlight and heat can degrade the bright green color and crisp texture over long months.
Final Thoughts
Canning your own sliced pickled cucumbers at home is a wonderfully satisfying experience that brings simple joy, wholesome nutrition, and delicious classic flavor right into your daily lifestyle. Taking a few humble fresh green garden cucumbers and turning them into glowing jars of crunchy, tangy pickles is a basic home skill that boosts your cooking confidence while saving money. Whether you enjoy these crisp green slices tucked inside a warm grilled burger, chopped into fresh potato salad, or eaten cold straight out of the jar on a hot afternoon, you will love the incredible quality of real homemade food. Gather your glass jars, choose the freshest green cucumbers you can find today, and enjoy the timeless craft of home preservation with your family.
Nutrition Details
Here is the simple nutritional breakdown for a batch recipe and per individual serving size of these delicious sliced pickled cucumbers:
| Nutritive Element | Amount Per Whole Batch | Amount Per Serving (30 grams) |
| Total Energy | 420 Calories | 10 Calories |
| Total Carbohydrates | 90 Grams | 2 Grams |
| Dietary Fiber | 12 Grams | 0.3 Grams |
| Total Sugars | 54 Grams | 1.2 Grams |
| Total Protein | 15 Grams | 0.3 Grams |
| Total Fat | 3 Grams | 0 Grams |
| Saturated Fat | 0.3 Grams | 0 Grams |
| Sodium Content | 8800 Milligrams | 210 Milligrams |
| Potassium Content | 1800 Milligrams | 43 Milligrams |
| Vitamin C | 45 Milligrams | 1 Milligram |
| Calcium | 240 Milligrams | 6 Milligrams |
| Iron | 3.6 Milligrams | 0.1 Milligrams |
Disclaimer
This article, recipe, and nutritional information are presented solely for educational, informational, and recreational kitchen purposes. Everyone’s body, digestive system, dietary needs, and medical health requirements are completely different, so individual health results and nutritional impacts may vary from person to person. If you are on a strict low sodium diet, managing blood pressure issues, or dealing with specific digestive conditions, please consult your personal medical doctor or a certified registered dietitian before adding high sodium pickled foods into your regular daily meal plans. Always practice proper, clean, and safe home food preservation standards to prevent food spoilage and ensure complete family safety.