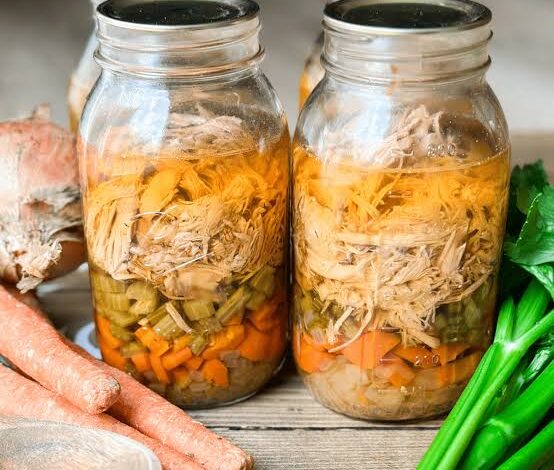
Canning chicken noodle soup at home is one of the most rewarding and comforting food preparation projects you can ever try in your kitchen. This complete guide will teach you how to create rich homemade chicken broth, tender chicken pieces, vibrant vegetables, and delicious soup bases that you can store safely on your pantry shelves for months. When you preserve your own soup in glass mason jars, you take full control of the ingredients, meaning you can avoid artificial preservatives, excessive sodium levels, and mysterious chemical additives often found in commercial canned foods. Learning this skill brings incredible satisfaction because you are turning fresh, raw pantry staples and farm veggies into a quick, hearty meal ready at a moment notice. This recipe is all about creating wholesome food that tastes like a warm hug on a cold day while building up your home emergency food stock.
People absolutely love home preserved chicken noodle soup because the flavor is far superior to anything you can purchase at a grocery store. When you make your own soup base, the bone broth develops a deep savory depth, the carrots and celery retain their sweet freshness, and the cooked chicken stays wonderfully tender and juicy. Traditional store bought cans often contain mushy ingredients, watery broth, and far too much salt, but home canned versions allow every single natural flavor to shine bright. Families love having these convenient jars ready on busy weeknights when nobody has time or energy to cook a complex dinner from scratch. Children and adults alike adore the familiar comfort of opening a jar, heating it on the stove, adding fresh noodles, and enjoying a rich meal in less than ten minutes.
There are so many wonderful reasons and special occasions to prepare a big batch of canned chicken noodle soup base. Emotionally, chicken soup is the ultimate comfort food that instantly reminds people of childhood care, cozy rainy afternoons, and family holiday warmth. From a fitness and wellness perspective, real chicken broth is packed with natural collagen, essential minerals, and hydrating fluids that support joint health, digestive wellness, and immune strength. It is the absolute best meal to serve when someone in your home feels under the weather with a winter cold or seasonal flu. Having pre made soup jars ready in your pantry means you can immediately nourish a sick family member or offer a supportive home cooked meal to a neighbor in need without spending hours over a hot stove.
Preserving your own food is also a smart financial decision and a fantastic fitness fuel strategy for busy athletes or busy parents. You can buy fresh whole chickens, bulk carrots, onions, and celery when they are on sale at your local market, which saves a lot of money over time. Fitness enthusiasts love this soup because it provides clean lean protein from chicken breast and rich amino acids from simmered bone stock without unneeded fats or heavy fillers. You can easily adjust the salt to match your personal diet plan, making it a very healthy lunch option after a hard workout session. No matter your main motivation, mastering this canning recipe gives you peace of mind, excellent nutrition, incredible natural taste, and total mealtime convenience every single day of the year.
Ingredients You Will Need
To prepare eight full quart jars of delicious home canned chicken soup base, gather the following high quality ingredients:
- Raw chicken meat without bones or skin cut into small cubes: 5 pounds
- Large yellow onions finely diced: 4 medium onions
- Fresh carrots washed peeled and sliced into rounds: 8 large carrots
- Fresh celery stalks cleaned and sliced into bite size pieces: 8 celery stalks
- Homemade or low sodium store bought chicken broth: 12 cups
- Fresh garlic cloves peeled and minced: 6 cloves
- Dried thyme leaves: 2 teaspoons
- Dried oregano leaves: 1 teaspoon
- Dried parsley flakes: 2 tablespoons
- Salt free vegetable seasoning blend: 1 tablespoon
- Pure sea salt or canning salt: 2 teaspoons
- Freshly ground black pepper: 1 teaspoon
- Olive oil or vegetable oil for light cooking: 2 tablespoons
- Fresh egg noodles cooked separately just before serving: 4 cups dry weight
Note regarding noodles: Do not add dry or cooked pasta egg noodles rice or flour thickeners directly into the canning jars before processing. Starchy foods like pasta expand inside the jar during high heat steam processing, absorbing broth and changing the density of the jar contents. This can prevent heat from reaching the center of the jar properly, creating a safety hazard. Always process the chicken broth and vegetable base in your pressure canner first. When you are ready to eat, simply heat the jar contents in a pot on your stove, boil your favorite egg noodles separately in water, and mix them together right before serving.
Step by Step Method
Follow these clear detailed instructions carefully to prepare and process your chicken noodle soup base safely using a pressure canner:
Phase 1: Preparation of Jars and Equipment
- Clean your workspace thoroughly and wash eight quart size mason jars in warm soapy water. Rinse them completely with clean water to remove all soap residue.
- Place the clean jars inside a large pot filled with warm water or inside your pressure canner with two inches of warm water to keep the jars hot while you prepare the soup. Keeping jars hot prevents glass breakage when hot liquid is poured inside.
- Inspect all glass jars carefully around the top rims for any small chips cracks or sharp rough edges. Discard any damaged jars immediately.
- Prepare new canning lids and metal screw bands by washing them in clean warm soapy water. Set them aside on a clean towel.
Phase 2: Preparing the Soup Base
- Place a large stainless steel soup pot on your stove top over medium heat. Add two tablespoons of olive oil.
- Add the diced yellow onions sliced carrots and sliced celery into the pot. Cook and stir the vegetables gently for about five minutes until the onions become soft and translucent. Do not brown or fry the vegetables deeply.
- Add the minced garlic into the pot and stir constantly for one minute until fragrant.
- Place the raw cubed chicken meat directly into the pot with the vegetables. Stir well to mix all contents together.
- Pour twelve cups of rich chicken broth into the pot over the meat and vegetables.
- Stir in the dried thyme dried oregano dried parsley salt free vegetable seasoning blend sea salt and freshly ground black pepper.
- Turn the stove burner to high heat and bring the entire pot of soup to a full rolling boil.
- Once boiling reduce the heat burner to medium low cover the pot with a lid and simmer the soup gently for ten minutes. The meat does not need to be completely cooked through at this stage because it will finish cooking inside the pressure canner.
Phase 3: Filling the Canning Jars
- Remove one hot glass jar from your pot of hot water using a sturdy jar lifter tool and place it on a clean kitchen towel on your counter.
- Place a canning funnel into the mouth of the hot jar.
- Use a large food ladle to fill the jar with soup, making sure to distribute a good balance of chicken meat vegetables and hot broth into each jar.
- Leave exactly one inch of space between the top layer of liquid and the very top rim of the glass jar. This empty space at the top is known as headspace and is crucial for proper vacuum sealing.
- Insert a plastic bubble remover tool or a thin plastic spatula down into the inside walls of the jar. Gently slide it around to release any trapped air bubbles trapped in the broth.
- Check the headspace again after removing air bubbles. Add a little extra broth if needed to maintain that exact one inch space from the top rim.
- Dip a clean paper towel into warm water or white vinegar and wipe the flat glass rim of the jar thoroughly. Removing grease chicken fat or tiny bits of food ensures a clean seal.
- Place a clean flat metal lid squarely on top of the jar rim.
- Screw a metal ring band over the lid until you feel light resistance, turning it until it is fingertip tight. Do not overtighten the metal band as air must escape during the heating process.
- Repeat this exact filling procedure for all remaining glass jars.
Phase 4: Pressure Canning the Soup
- Place your pressure canner on the stove burner. Pour about two to three inches of warm water into the bottom of the canner along with a splash of white vinegar to keep glass clear.
- Place the metal canning rack into the bottom of the canner.
- Use your jar lifter tool to lower each filled hot soup jar into the pressure canner keeping them upright and stable.
- Place the heavy lid onto the pressure canner and twist it locked securely into position according to the manufacturer instructions for your specific brand. Leave the weight or vent regulator off for now.
- Turn the stove burner to high heat. Allow steam to escape freely from the open vent pipe or petcock for a full ten minutes to vent all air from the canner body.
- Place the pressure regulator weight onto the vent pipe or adjust your dial gauge according to your altitude requirements. Standard safety protocol requires 10 pounds of pressure for weighted gauges or 11 pounds of pressure for dial gauges at altitudes below 1000 feet above sea level. Adjust upward for higher elevations as needed.
- Watch the gauge or wait for the weight to jiggle steadily. Once the correct safety pressure level is reached reduce your stove heat slightly to maintain a constant stable pressure level throughout the entire processing period.
- Start your timer. Process quart jars for exactly 90 minutes. If using pint jars, process for 75 minutes.
- Monitor the pressure gauge carefully during the entire 90 minute window. If pressure drops below the required level at any moment you must raise the heat and restart the processing time completely from zero for safety.
Phase 5: Cooling down and Storing
- Once the 90 minutes processing time is complete turn off the stove burner completely.
- Leave the pressure canner alone on the stove to cool down naturally. Do not move the canner do not run cold water over it and do not lift the pressure regulator weight. Let pressure drop to zero on its own which may take 45 to 60 minutes.
- After the pressure gauge reads zero and the safety cover lock drops down remove the weight regulator carefully. Wait five additional minutes before unlocking the main canner lid.
- Open the lid carefully lifting it away from your face to avoid hot steam burns.
- Use your jar lifter tool to carefully lift each hot jar straight up out of the canner without tilting them. Place jars onto a thick dry towel spread across your kitchen counter spaced one inch apart.
- Allow the hot jars to sit undisturbed at room temperature for 12 to 24 hours. You will hear satisfying ping sound effects as the jar lids pull downward and vacuum seal.
- After 24 hours press down on the center of each metal lid. If the lid is firm and does not flex or pop up and down the seal is successful.
- Remove the outer metal ring bands gently wash the outside glass jars label them with the date and store your soup in a cool dark pantry.
Why This Recipe Is Special
This homemade canned chicken noodle soup base stands out as a superior culinary option for many health and practical reasons. First and foremost, preparing food in your own home lets you select high quality cuts of lean chicken breast or whole farm raised chicken, fresh organic produce, and pure fragrant spices without relying on hidden chemical preservatives or modified corn starch thickeners. Store bought canned soups often contain high amounts of sodium and artificial flavor enhancers that can leave you feeling bloated or thirsty. When you follow this recipe, you get pure wholesome nutrition with clean clear broth that highlights true natural chicken flavor.
From a health perspective, real chicken bone broth is rich in naturally occurring collagen, gelatin, and essential amino acids like cysteine which helps clear mucus pathways when you are sick. The carrots deliver rich doses of beta carotene for eye health, while celery and onions offer powerful antioxidants, dietary fiber, and vitamin C to keep your immune system strong throughout cold winter months. Because you add egg noodles fresh at the moment of serving, the pasta maintains a perfect firm texture instead of turning mushy or absorbing all the broth like commercial shelf canned soups do. This simple step preserves the original texture of both the soup liquid and the noodles.
Another great aspect of this preserved recipe is convenience and self reliance. Having jars of fully cooked soup base sitting ready in your food storage gives you a sense of security and saves immense effort during hectic days. Whenever work or school schedule leaves you exhausted, you do not need to settle for fast food or expensive takeout meals. You simply open a jar, pour the contents into a pan, warm it over high heat, drop in a couple handfuls of quick cooking egg noodles, and enjoy a warm nourishing dinner in under ten minutes. It combines fast food convenience with homemade whole food quality.
Extra Tips for Better Taste
To take your homemade soup canned base from simple to extraordinary, consider these helpful creative preparation tips:
- Roast your chicken bones and fresh vegetables in the oven at 400 degrees Fahrenheit until lightly browned before simmering them to make broth. This extra step adds a deep golden color and rich caramelized roasted depth to the finished stock.
- Add fresh yellow turmeric powder or a small slice of fresh ginger root into the broth during the initial boiling stage. Turmeric gives the broth an attractive vibrant golden appearance while ginger adds a subtle cozy kick and extra soothing benefits for sensitive stomachs.
- Include fresh herbs like whole bay leaves, fresh rosemary sprigs, or fresh thyme bundles tied with cotton kitchen string while simmering the main stock. Remember to pull out the whole herb stems and bay leaves before ladling soup into jars.
- If you enjoy bright citrus notes, squeeze fresh lemon juice over your bowl right before eating. A fresh burst of lemon juice wakes up all savory flavors in chicken broth and balances rich meat notes.
- Swap standard egg noodles for rotini pasta, tortellini, rice, or barley when serving. Cook your choice of grain separately in plain salted water and add it directly to your soup bowl for fun menu variations each week.
- For those who love a spicy hit, add tiny red pepper flakes or finely chopped jalapeno peppers to the vegetable simmer. This adds a gentle warming heat that clears sinus passages quickly.
Final Thoughts
Canning your own chicken noodle soup base at home is a wonderfully practical skill that connects you to traditional culinary roots while improving your daily meal routine. It empowers you to build a healthy pantry stocked with rich wholesome ready to heat meals that preserve both time and money. Every single jar represents care, quality nutrition, and unmatched comfort for your loved ones. Once you experience the exceptional flavor of hot soup made from real chicken and fresh vegetables stored right in your own kitchen, you will never want to go back to buying industrial cans from the grocery store. Take your time, follow safety rules closely, and enjoy the delicious fruits of your preservation journey.
Nutrition Details
Below is an estimated nutrition overview for the homemade chicken soup base preserve. Figures are provided for the whole batch recipe as well as calculated per individual serving size of one quart jar without cooked egg noodles added.
| Calories | 2240 kcal | 280 kcal |
| Protein | 256 g | 32 g |
| Total Carbohydrates | 64 g | 8 g |
| Dietary Fiber | 16 g | 2 g |
| Sugars | 24 g | 3 g |
| Total Fat | 80 g | 10 g |
| Saturated Fat | 20 g | 2.5 g |
| Cholesterol | 640 mg | 80 mg |
| Sodium | 3600 mg | 450 mg |
| Potassium | 4000 mg | 500 mg |
| Vitamin A | 32000 IU | 4000 IU |
| Vitamin C | 48 mg | 6 mg |
| Calcium | 320 mg | 40 mg |
| Iron | 16 mg | 2 mg |
Note: Adding 1 cup of cooked egg noodles per serving to the heated soup base will add approximately 220 calories, 8 grams of protein, 40 grams of carbohydrates, and 2 grams of fat per bowl.
Disclaimer
This article is presented strictly for educational and informational purposes only. Everyone has unique health needs body responses dietary limits and metabolic conditions. Nutritional values provided above are estimated calculations and can vary depending on exact ingredient choices meat cuts fat ratios and brand measurements used in your kitchen. Always follow verified home food preservation safety standards established by trusted agricultural extension services when operating pressure canners. If you have specific dietary requirements medical concerns high blood pressure or food sensitivities consult a qualified professional healthcare provider or registered dietitian before making significant changes to your regular meal routine.