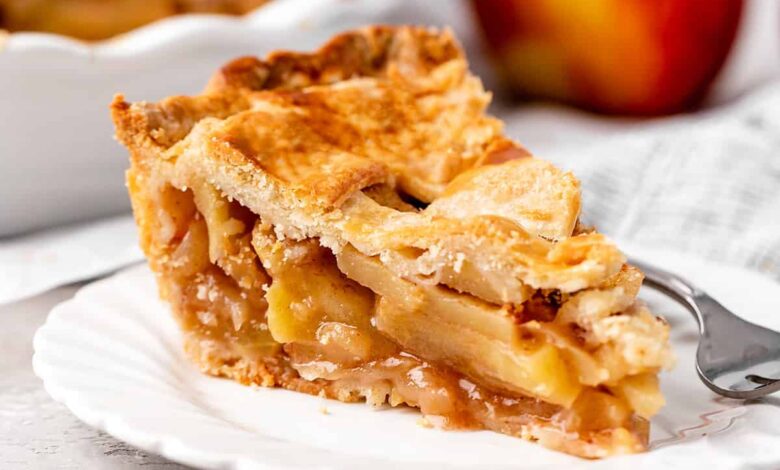
Welcome to the ultimate guide for making the most delicious homemade apple pie from scratch right in your own kitchen. This comprehensive recipe and guide is designed specifically for absolute beginners who want to learn how to bake a classic dessert without feeling overwhelmed by complicated culinary terms or fancy techniques. We are going to walk through every single detail together so that you feel totally confident when you put your pie into the oven. Baking a pie might seem scary at first because people often talk about making crusts from scratch as if it requires magical powers, but I promise you that it is just a simple process of mixing flour and butter together. By the time you finish reading this entire guide, you will know how to pick the right apples, how to roll out a flaky crust, and how to bake the whole thing until it smells like heaven inside your home.
Apple pie is one of those timeless desserts that instantly brings a smile to almost everyone’s face all around the world. People love this wonderful treat because it combines sweet and tart fruit flavors with a buttery and flaky crust that melts in your mouth with every single bite. The magic happens when the natural juices of the fruit bubble up and mix with warm spices like cinnamon and nutmeg, creating a thick and glossy sauce that coats every single piece of fruit. It reminds us of family gatherings during autumn holidays, Sunday afternoon dinners with grandparents, and cozy evenings spent indoors when the weather outside is cold and rainy. There is something deeply comforting about taking a warm slice of homemade pie and putting a big scoop of vanilla ice cream right on top so that it melts slowly into the warm pastry.
You should consider making this wonderful recipe whenever you want to show someone you care about them or when you simply want to treat yourself after a long and tiring week. Sometimes life gets very busy and stressful, so spending a quiet afternoon peeling fruit and listening to your favorite music can be the best form of therapy and relaxation. Even though this dessert contains sugar and butter, you can still enjoy it as part of a balanced lifestyle when you eat it in moderation as a sweet reward after eating healthy meals. Baking from scratch also lets you control every single ingredient that goes into your food, meaning you do not have to worry about weird preservatives or artificial flavors hiding in store bought treats. Whenever you feel like bringing warmth and joy into your living space, turning on your oven and baking a fresh fruit dessert is always the right answer.
Getting started with this baking adventure does not require any fancy professional equipment or expensive tools that take up too much space in your cupboards. All you really need is a mixing bowl, a rolling pin, a pie dish, and a little bit of patience to follow the steps carefully from start to finish. We will take everything one easy step at a time so you never feel lost or confused about what you are supposed to do next with your ingredients. Cooking is supposed to be a fun and joyful experience rather than a stressful test, so do not worry if your first pie does not look like it belongs on the cover of a magazine. The most important thing is how it tastes and the lovely memories you create while sharing it with the people you love the most in this world.
Ingredients You Will Need
For the delicious and flaky crust, you will need two and a half cups of all purpose flour, one teaspoon of white granulated sugar, one teaspoon of salt, one cup of cold unsalted butter cut into small cubes, and up to one half cup of ice cold water.
For the sweet and spiced fruit filling, you will need six cups of peeled and sliced baking apples such as Granny Smith or Honeycrisp, three quarters of a cup of granulated white sugar, two tablespoons of all purpose flour, one teaspoon of ground cinnamon, one quarter teaspoon of ground nutmeg, one tablespoon of fresh lemon juice, and two tablespoons of unsalted butter cut into small pieces to dot over the filling before baking.
For finishing the top of the pastry, you will need one large egg beaten with one tablespoon of milk to create an egg wash, and one tablespoon of coarse sparkling sugar to sprinkle over the crust for a crunchy texture.
Step by Step Method
Begin your baking journey by preparing your pastry dough so that it has enough time to chill properly in the refrigerator before you try to roll it out. Take a large mixing bowl and combine your all purpose flour, white sugar, and salt together using a whisk until everything is evenly mixed. Add your cold butter cubes into the dry flour mixture and use your fingers or a pastry blender to press the butter pieces into the flour until the mixture resembles coarse breadcrumbs with some pea sized pieces of butter still visible. Slowly pour in your ice cold water one tablespoon at a time, gently stirring the mixture with a wooden spoon or your hands until the dough just starts to come together into a ball. Be very careful not to overmix the dough, because leaving little bits of butter intact is the secret to getting a wonderfully flaky crust. Divide the dough into two equal halves, shape each half into a flat disk, wrap them tightly in plastic wrap, and place them in the refrigerator for at least two hours to chill completely.
While your dough is resting nicely in the refrigerator, you can start preparing the wonderful fruit filling that will make your dessert taste so incredible. Wash, peel, core, and slice your baking apples into uniform thickness pieces so they cook evenly inside the oven. Place all your sliced fruit into a large mixing bowl and immediately pour the fresh lemon juice over them, tossing gently to prevent the fruit from turning brown while you work on the other components. Sprinkle your granulated sugar, all purpose flour, ground cinnamon, and ground nutmeg directly over the fruit slices. Toss everything together thoroughly until every single slice of fruit is coated evenly with the sweet spice mixture and the flour is completely absorbed. Set this bowl aside for a few minutes while you roll out your pastry dough.
Take one disk of chilled dough out of the refrigerator and place it onto a clean countertop that has been lightly dusted with flour to prevent sticking. Use your rolling pin to roll the dough outward from the center in all directions until you have a circle that is about twelve inches wide and roughly one eighth of an inch thick. Carefully transfer this rolled piece of dough into a nine inch pie dish, pressing it gently down into the bottom and up along the sides without stretching it too much. Pour your prepared fruit mixture directly into the pastry lined pie dish, piling the fruit slightly higher in the middle so it creates a nice dome shape. Take your remaining two tablespoons of butter cut into small pieces and dot them all over the top of the fruit filling to add extra richness and flavor.
Take your second disk of chilled dough out of the refrigerator and roll it out on your floured surface just like you did with the first piece. You can either place this whole circle of dough directly over the top of the fruit filling for a solid top crust, or you can use a sharp knife to cut the dough into long strips to create a lovely woven lattice pattern. If you use a solid top crust, make sure to use a sharp knife to cut four small slits in the center of the top layer to allow steam to escape while the dessert bakes in the oven. Use a pair of kitchen scissors or a knife to trim any excess dough hanging over the edges of the pie dish, leaving about a half inch border. Fold the top edge of the dough under the bottom edge all the way around the rim of the dish, and use your fingers or a fork to crimp the edges into a decorative pattern.
Brush your beaten egg and milk mixture lightly over the top and edges of the pastry using a pastry brush to ensure a golden brown and shiny finish after baking. Sprinkle your coarse sparkling sugar evenly over the egg washed pastry to give the crust a delightful sweet crunch in every single bite. Place your pie dish onto a large baking sheet lined with aluminum foil to catch any fruit juices that might bubble over during the baking process, which saves you from cleaning up a messy oven later. Bake your creation in a preheated oven at four hundred degrees Fahrenheit for twenty minutes, then reduce the oven temperature to three hundred and fifty degrees Fahrenheit and continue baking for another forty to fifty minutes until the crust is a deep golden brown and the fruit juices are bubbling thickly through the vents. Remove the pie from the oven and place it on a wire cooling rack, allowing it to cool completely for at least four hours before slicing so that the filling can set properly without running all over the plate.
Why This Recipe Is Special
This recipe stands out from many others because it focuses on simple techniques that guarantee success for bakers of all skill levels without cutting corners on authentic homemade flavor. One of the main health and nutritional points of making this dessert at home is that you avoid all the hidden chemicals and high fructose corn syrup found in processed grocery store alternatives. By using fresh fruit, you provide your body with natural dietary fiber, vitamin C, and essential antioxidants that support overall health and digestion. Furthermore, the combination of warm cinnamon and nutmeg not only gives the dessert an irresistible aroma and cozy taste, but these spices also contain natural anti inflammatory properties that promote wellness. When you taste the balance of natural fruit sweetness combined with the buttery richness of a homemade pastry, you will instantly understand why this recipe brings so much joy to everyone who tries it.
Extra Tips for Better Taste
To take your homemade creation to the next level of culinary excellence, try using a combination of two different kinds of apple varieties, such as mixing tart Granny Smith fruits with sweet Honeycrisp fruits for a more complex and balanced flavor profile. Another fantastic trick is to brush the bottom crust with a thin layer of apricot jam or melted white chocolate before adding the fruit filling, which creates a moisture barrier that keeps your bottom crust wonderfully crisp and prevents it from getting soggy. Do not rush the cooling process at the end, because letting the dessert rest for several hours allows the natural starches in the fruit and flour to thicken the juices into a rich syrup. If you want to add an extra layer of gourmet flavor, try adding a tiny pinch of sea salt to your apple filling mixture to make the sweet and spiced flavors pop even more on your taste buds.
Final Thoughts
Baking a homemade dessert from scratch is a wonderful and rewarding journey that fills your heart with pride and your home with the most comforting and inviting aromas imaginable. Remember that every single time you bake, you gain more confidence and experience in the kitchen, so do not get discouraged if your first attempt looks slightly rustic or imperfect. The love and effort you put into preparing food for yourself and your family are what truly make every meal special and memorable. We hope this comprehensive guide inspires you to put on your apron, gather your ingredients, and create a sweet masterpiece that brings smiles to the faces of everyone around your dining table. Happy baking, and may every slice you serve bring warmth and happiness to your home.
Nutrition Details
Serving size is one slice, based on a total yield of eight servings per standard nine inch pie. Calories per serving are approximately four hundred twenty calories. Total fat content is twenty two grams, with saturated fat being twelve grams. Sodium content is three hundred milligrams. Total carbohydrate content is fifty six grams, with dietary fiber being four grams and total sugars being thirty two grams. Protein content is four grams per serving. Please note that these numbers are general estimates and can vary depending on the specific brands of ingredients you choose to use during your preparation process.
Disclaimer
The nutritional information and health notes provided in this article are intended for general informational and educational purposes only and should not be construed as professional medical or nutritional advice. Every single human body is completely unique, with different metabolism rates, dietary needs, health conditions, and fitness goals. Therefore, individual results, health impacts, and caloric requirements may vary significantly from person to person. Always consult with a qualified healthcare professional or a registered dietitian before making any major changes to your daily diet or nutrition plan, especially if you have existing health concerns or specific dietary restrictions.