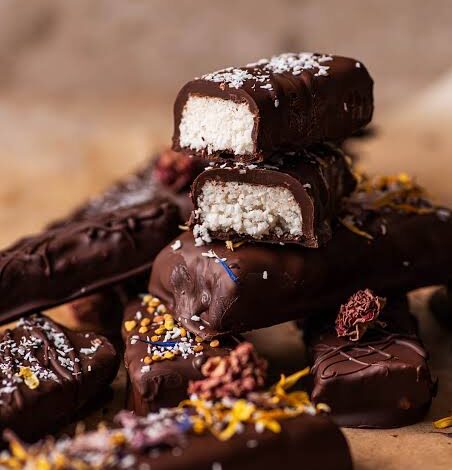
Welcome to the ultimate guide for making the most delicious homemade chocolate coconut bars you have ever tasted in your entire life. If you love the combination of sweet tropical coconut and rich smooth chocolate, you are in for a wonderful treat that will completely blow your mind. These little squares of joy combine a soft and chewy center filled with natural coconut flavor and a thick coating of decadent chocolate on the outside. Making sweets at home can sometimes feel very hard or intimidating, but this recipe is designed from scratch to be amazingly simple, quick, and foolproof for anyone to try today. You do not need any fancy baking tools or expensive kitchen gadgets to achieve bakery quality results right in your own kitchen. All you need are a few basic pantry items, a mixing bowl, a baking pan, and a little bit of patience while your treats chill in the refrigerator. Whether you are baking for a special weekend celebration, preparing a sweet surprise for your family, or simply craving something wonderful after a long day, this treat is guaranteed to satisfy your sweet tooth completely. Get ready to fall in love with baking because once you try this method, you will want to make these tasty little squares over and over again for all your friends and loved ones to enjoy together.
People absolute adore this specific recipe because it brings together two of the most popular dessert flavors in the world without requiring any complicated cooking steps. The texture is an absolute dream because you get a cool and creamy bite of coconut filling that melts softly in your mouth, followed by a satisfying snap from the chocolate shell. Unlike store bought candy bars that are usually packed with mysterious chemical preservatives and artificial sweeteners, homemade bars let you control every single ingredient that goes into your body. You can actually pronounce everything on the ingredient list, which gives you complete peace of mind while feeding yourself and your growing family. Furthermore, the tropical aroma of sweet coconut mixed with rich cocoa instantly fills your entire home with a warm and inviting scent that makes everyone feel happy and relaxed. Kids and adults alike go crazy for these treats because they taste just like expensive gourmet candy bars you would normally buy at a high end local chocolate shop. There is something truly magical about watching simple ingredients transform into an impressive dessert that looks like it came straight out of a professional magazine photoshoot. Once you share these with your neighbors or coworkers, be prepared because everyone is going to beg you for the secret recipe and you will proudly get to say you made them all by yourself.
You should definitely make these wonderful chocolate coconut bars whenever you need a quick mood boost, a fun kitchen project on a lazy Sunday afternoon, or a crowd pleasing dessert for your next big party. Imagine coming home after a long and exhausting day at work or school, opening your refrigerator, and finding a batch of these chilled treats waiting just for you. They make the ultimate afternoon pick me up when paired with a hot cup of freshly brewed coffee, a soothing mug of herbal tea, or a tall glass of cold milk. Fitness enthusiasts and active individuals also love having a homemade treat on hand because they can easily enjoy a small square to satisfy sugar cravings without ruining their daily nutrition goals. If you are hosting a birthday party, a family reunion, a holiday gathering, or a casual movie night with your best friends, placing a tray of these colorful bars on the table will instantly draw a huge crowd. You can even wrap a few bars nicely in decorative parchment paper and tie them with a colorful ribbon to create a thoughtful and inexpensive homemade gift for teachers or neighbors. There is truly never a bad time to enjoy a delicious piece of chocolate and coconut goodness, so whenever the mood strikes you, just grab your mixing bowl and get ready to create magic.
Creating memories in the kitchen is one of the best parts of life, and this recipe offers a wonderful opportunity to bring your family together for some wholesome and creative fun. You can easily invite your kids, partner, or roommates to help you mix the coconut filling, press it firmly into the pan, or help dip the pieces into melted chocolate. Working together turns a simple baking task into a joyful bonding experience filled with laughter, delicious tastes, and wonderful conversations that you will cherish for a very long time. Even if you consider yourself a total beginner who has never baked anything before in your life, you do not need to worry because every single step is explained clearly and simply. There are no hidden tricks or difficult techniques to master, meaning your very first batch will turn out looking gorgeous and tasting absolutely fantastic. By the time you finish reading this comprehensive guide, you will feel completely confident, inspired, and ready to take on this fun culinary adventure with a big smile on your face. So take a deep breath, tie your apron, and let us dive straight into the wonderful world of homemade chocolate coconut goodness where every single bite feels like a little piece of tropical paradise.
Ingredients You Will Need
-
Shredded coconut flakes (unsweetened): 3 cups
-
Sweetened condensed milk: 1 can (around 14 ounces)
-
Pure vanilla extract: 2 teaspoons
-
Salt: A small pinch
-
Dark or milk chocolate chips: 2 cups
-
Coconut oil: 2 tablespoons
Step by Step Method
To begin this fun and easy recipe, find a medium sized mixing bowl and make sure it is completely clean and dry before you add anything into it.
Measure out your three cups of unsweetened shredded coconut flakes and pour them directly into the large bowl so they have plenty of room to move around.
Take your can of sweetened condensed milk and carefully open it using a standard kitchen can opener, making sure not to spill any of the sticky liquid.
Pour the entire can of sweetened condensed milk directly over the top of the shredded coconut flakes sitting inside your mixing bowl.
Add two teaspoons of pure vanilla extract and that tiny pinch of salt to the bowl, which will help balance out the rich sweetness of the condensed milk.
Take a sturdy wooden spoon or a rubber spatula and begin stirring all the ingredients together with gentle and steady motions until they are thoroughly combined.
Keep mixing until every single piece of coconut is completely coated in the sticky sweet milk mixture, creating a thick and uniform dough texture.
Grab an eight by eight inch baking pan and line it carefully with parchment paper, leaving a little extra paper hanging over the edges for easy removal later.
Transfer your sticky coconut mixture directly from the mixing bowl into the prepared baking pan using your spatula to scrape down every last bit.
Spread the coconut mixture evenly across the bottom of the pan, making sure to push it firmly into all four corners so the layer is flat.
Use the back of your spoon or clean hands to press the coconut down as hard as you can so the bars hold together tightly without crumbling.
Place your baking pan into the refrigerator and let the coconut layer chill undisturbed for at least one hour until it feels firm to the touch.
While your coconut layer is chilling inside the fridge, prepare a heatproof glass or metal bowl to melt your chocolate coating for the outer shell.
Measure out two cups of your favorite chocolate chips and add them into the heatproof bowl along with two tablespoons of coconut oil for extra shine.
Fill a small saucepan with about one inch of water and bring it to a gentle simmer over medium heat on your stovetop burner.
Place your heatproof bowl directly on top of the simmering saucepan, making sure the bottom of the bowl does not touch the boiling water directly.
Stir the chocolate chips continuously with a spatula as the steam from the water gently melts them into a smooth and glossy liquid.
Once the chocolate is completely melted and free of any lumps, carefully remove the bowl from the heat and set it on your counter to cool.
Take your chilled coconut pan out of the refrigerator and grab the edges of the parchment paper to gently lift the solid block right out.
Place the solid coconut block onto a clean cutting board and use a sharp kitchen knife to slice it evenly into neat little rectangle bars.
Line a separate large tray or plate with fresh parchment paper so you have a safe place to rest your freshly dipped candy bars.
Take each individual coconut bar and dip it carefully into the melted chocolate, making sure all sides are completely covered in the rich liquid.
Use a fork to lift the chocolate coated bar out of the bowl, gently tapping the handle against the rim to let any extra chocolate drip away.
Place your freshly dipped chocolate coconut bar onto the parchment lined tray and repeat this process until every single bar is fully coated.
Put the tray of finished bars back into the refrigerator for another thirty minutes so the chocolate shell can harden completely into a crisp finish.
Once the chocolate shell is firm and dry, transfer your finished treats into an airtight container and keep them stored safely in your fridge until serving time.
Why This Recipe Is Special
This recipe stands out from ordinary desserts because it gives you an amazing balance of rich flavors and wonderful textures without demanding hours of exhausting labor in the kitchen. Coconut is naturally packed with dietary fiber and healthy plant fats that help keep your energy levels steady throughout a busy day without causing sudden sugar crashes. Dark chocolate, when chosen wisely, contains powerful antioxidants that promote good heart health and naturally boost your mood by releasing happy chemicals in your brain. By making these treats at home, you completely avoid all the artificial colors, hidden corn syrups, and strange chemical additives found in commercial candy bars. The rich tropical flavor transports your senses straight to a sunny beach vacation, offering a delightful mental escape whenever you take a sweet bite. Furthermore, these bars are naturally vegetarian and can easily be adapted to fit various dietary preferences by swapping ingredients based on your personal wellness needs. The contrast between the chewy tropical center and the crunchy outer chocolate shell creates a sensory experience that rivals any expensive gourmet dessert from a professional pastry shop.
Extra Tips for Better Taste
If you want to take your chocolate coconut bars to the next level of deliciousness, try adding a splash of almond extract along with the vanilla for a nutty aroma. You can also sprinkle a tiny pinch of flaky sea salt right over the top of the wet chocolate coating before it hardens to create a fancy salted caramel style flavor profile. For an extra tropical twist, consider mixing a tablespoon of finely chopped roasted almonds or crushed macadamia nuts directly into the coconut dough before pressing it into the pan. If you prefer a richer and more intense chocolate flavor, use dark chocolate chips with seventy percent cocoa content or higher instead of standard sweet milk chocolate. Always make sure your coconut layer is fully chilled and firm before you attempt to slice or dip it, as this prevents the bars from falling apart while you work. When melting your chocolate, take great care to ensure no water droplets get inside the bowl, because even a single drop of water can make your melted chocolate seize up into a grainy paste. Storing your finished bars in the refrigerator keeps them delightfully cool and firm, which enhances the refreshing taste experience every time you sneak a delicious bite.
Final Thoughts
Making your own sweet treats at home is one of the most rewarding and enjoyable hobbies you can possibly develop for yourself and your loved ones. These chocolate coconut bars prove that you do not need complicated culinary training or professional equipment to create something truly magical and mouth watering in your kitchen. Every step of the process is designed to be simple, stress free, and deeply satisfying, allowing you to focus on the joy of creating rather than worrying about mistakes. Sharing these homemade goodies with your friends, family members, or coworkers is guaranteed to bring bright smiles and warm compliments that will make all your kitchen efforts completely worthwhile. Remember to have fun, experiment with different flavors if you feel creative, and always enjoy every single bite of your delicious culinary masterpiece together with the people you cherish most.
Nutrition Details
| Nutrient Name | Amount Per Serving |
| Calories | 210 kcal |
| Total Fat | 14 g |
| Saturated Fat | 10 g |
| Sodium | 45 mg |
| Total Carbohydrates | 21 g |
| Dietary Fiber | 3 g |
| Sugars | 16 g |
| Protein | 3 g |
Note: The nutritional values provided above are estimated averages calculated based on standard ingredient measurements and standard serving sizes divided across twenty individual bars.
Disclaimer
Please keep in mind that every human body is completely unique, and individual nutritional requirements or health responses can vary significantly from one person to another. The nutrition information and health points provided in this article are intended for general informational and educational purposes only and should never replace professional medical guidance. If you have specific food allergies, underlying medical conditions, or unique dietary restrictions, it is always wise to consult with a qualified healthcare professional or registered dietitian before making major changes to your regular diet.