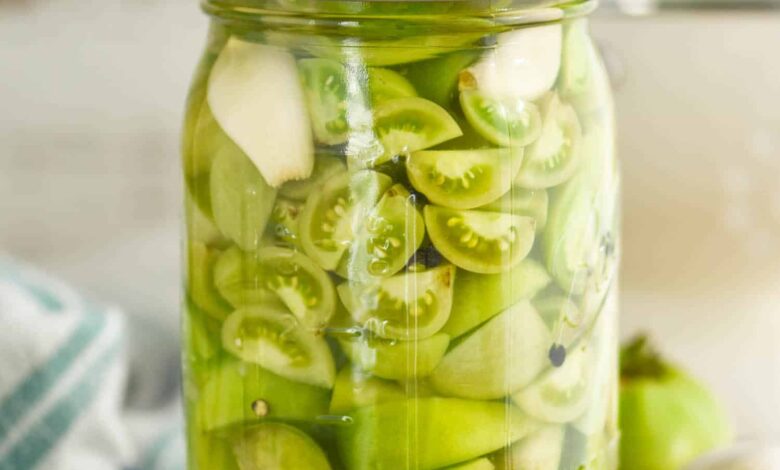
Have you ever looked at your garden at the end of summer and felt a little sad seeing all those hard green tomatoes still hanging on the vine before the cold frost arrives? Do not worry because those unripened green orbs are actually a secret treasure waiting to transform your kitchen into a magical place of wonderful food adventures. This amazing guide is all about making delicious canned green tomatoes right in your own kitchen using simple tools and easy steps that anyone can follow without any stress or worry. When the autumn air starts getting chilly and the red tomatoes slow down their growing process, those firm green beauties become the absolute stars of your pantry shelves. You are going to learn how to capture that bright and tangy summer garden taste so you can enjoy it all year long even when snow is falling outside your window. This recipe brings a burst of old fashioned charm and wonderful flavor straight to your family dinner table with very little effort required from you.
People all around the world absolutely love this timeless recipe because it turns what looks like garden waste into pure culinary gold that everyone fights over at dinner time. There is something truly magical about opening a glass jar in the dead of winter and smelling the fresh and vibrant aroma of garden harvested green tomatoes ready to eat. The secret lies in the wonderful texture of green tomatoes because they stay firm and crunchy unlike ripe red tomatoes that turn soft and mushy during the canning process. You can use these canned wonders in so many fun ways like frying them up for a crispy snack or tossing them into warm stews and hearty winter soups for an extra punch of flavor. Families have passed down this wonderful kitchen tradition for generations because it saves money and keeps local food from going to waste while creating memories that last a lifetime. Once you try this method you will look at green tomatoes in a completely different way and wait impatiently for the harvest season every single year.
You should definitely make this recipe whenever you have a surplus of unripened fruit sitting on your kitchen counter or when you want to connect with a simpler way of living. From a taste perspective these canned gems offer a delightful sour and tangy punch that wakes up your taste buds and cuts through rich heavy winter meals with total ease. Fitness enthusiasts and health conscious eaters also adore green tomatoes because they are wonderfully low in calories and packed with essential vitamins like vitamin C and vitamin K to keep your body strong. Making this recipe is a wonderful emotional anchor that brings comfort and joy on a stressful day because the rhythmic process of washing and packing jars is deeply relaxing. It gives you a great sense of accomplishment when you line up rows of shining glass jars on your pantry shelf and look at your hard work preserved for the future. You are not just preserving vegetables for later meals; you are bottling up sunshine and warmth to share with the people you love the most during cold months.
Getting ready for this fun canning adventure is a joyful experience that lets you slow down and enjoy the simple pleasures of home cooking on a quiet weekend afternoon. You do not need any fancy culinary school training or expensive restaurant equipment to make these wonderful canned green tomatoes taste like they came from a professional gourmet pantry. All you need is a big heart a willingness to try something new and a few basic kitchen tools that you probably already have sitting in your cupboards right now. As you move through the steps of this guide you will gain the confidence of an experienced home cook who can turn simple garden produce into long lasting treasures. So put on your favorite kitchen apron wash your hands and get ready to create a batch of canned green tomatoes that will make your taste buds dance with pure joy. Let us jump right into the wonderful world of home canning and discover how easy and rewarding this amazing kitchen project truly can be for you and your family.
Ingredients You Will Need
-
Fresh green tomatoes: Four pounds of firm and unripened green tomatoes washed and sliced into thick rounds or wedges.
-
White vinegar: Four cups of standard white vinegar with five percent acidity to ensure safe and proper home canning results.
-
Water: Four cups of clean filtered water to dilute the vinegar for the pickling brine solution.
-
Pickling salt: Four tablespoons of coarse pickling or canning salt because table salt contains additives that can cloud your liquid.
-
Granulated sugar: Two tablespoons of white sugar to balance out the sharp and tangy bite of the vinegar brine.
-
Garlic cloves: Eight peeled fresh garlic cloves to add a wonderful aromatic depth to your jars.
-
Dill weed: Four fresh sprigs of dill weed or one teaspoon of dried dill seeds for that classic garden fresh flavor.
-
Black peppercorns: One teaspoon of whole black peppercorns to give a gentle and warm spicy kick to each jar.
-
Mustard seeds: One teaspoon of yellow mustard seeds for an authentic and traditional pickling taste profile.
Step by Step Method
Begin your wonderful canning journey by gathering all your fresh ingredients and making sure your workspace is clean and ready for action. Wash your four pounds of green tomatoes thoroughly under cold running water to remove any dirt or garden debris left over from the vine. Pat the tomatoes dry with a clean kitchen towel and use a sharp knife to slice them into thick rounds or nice bite sized wedges depending on your preference.
Next you need to prepare your canning jars to make sure everything stays clean and safe for long term storage. Wash four mason jars and their matching lids in hot soapy water and rinse them thoroughly to remove all soap residue. Place a large pot of water on your stove and bring it to a rolling boil to sterilize your clean glass jars for ten minutes before using them.
Now it is time to make the flavorful pickling brine that will give your green tomatoes their wonderful taste and crisp texture. Grab a medium saucepan and pour in your four cups of white vinegar along with four cups of filtered water and four tablespoons of pickling salt. Add your two tablespoons of white sugar to the saucepan and place the pot over medium high heat on your stove. Stir the liquid mixture gently with a wooden spoon until the salt and sugar dissolve completely into the water and the brine comes to a rolling boil.
While your brine is heating up you can start packing your prepared green tomatoes into the sterilized glass jars. Divide your peeled garlic cloves evenly among the four jars placing two cloves into the bottom of each glass container. Add your fresh dill sprigs or dried dill seeds right on top of the garlic cloves in every single jar.
Carefully pack your sliced green tomatoes tightly into the jars making sure to leave a little bit of space at the top without crushing the fruit pieces. Drop your whole black peppercorns and yellow mustard seeds directly into the packed jars among the tomato slices to distribute the wonderful spices evenly.
Once your brine is boiling nicely take the hot saucepan off the burner and use a ladle to pour the hot liquid carefully over the tomatoes in each jar. Make sure you leave about a half inch of headspace at the top of every jar so the liquid has room to expand during the processing stage. Take a clean damp cloth and wipe the rim of each jar to remove any spilled liquid or food particles that might prevent a good seal.
Place your flat metal lids onto the top of the jars and screw the metal bands down until they are fingertip tight and secure. Transfer your filled jars into a large boiling water bath canner making sure the water level covers the tops of the jars by at least one inch. Bring the water back to a rolling boil and process the jars for fifteen minutes to seal them properly and ensure long lasting safety.
Carefully lift the hot jars out of the water using a jar lifter tool and place them on a folded kitchen towel on your counter away from any drafts. Let the jars cool undisturbed for twenty four hours while listening for the happy popping sound that tells you the lids have sealed correctly. Check the seals by pressing down on the center of each lid and if it does not flex your canned green tomatoes are ready for the pantry.
Why This Recipe Is Special
This delightful recipe is truly special because it solves a common seasonal problem while delivering incredible flavor straight to your dining table all year long. Green tomatoes contain wonderful natural acids and firm cell structures that hold up exceptionally well during the canning process without turning into a mushy disaster. You get a fantastic combination of crunch and tang that elevates simple sandwiches burgers and grain bowls into gourmet meals with almost zero effort.
From a health perspective this recipe allows you to enjoy garden produce without adding heavy fats or unnecessary artificial preservatives to your daily diet. Green tomatoes are naturally rich in beneficial plant compounds and dietary fiber that support healthy digestion and keep your gut feeling happy and balanced. Furthermore making your own preserved foods at home gives you complete control over the salt and sugar levels compared to commercial store bought jarred products.
The taste profile is another major highlight because the sharp vinegar brine mellows out the tartness of the unripened fruit and creates a harmonious flavor explosion. Every single bite offers a refreshing crunch that awakens your palate and makes your mouth water for more of that delicious homemade goodness. It is an eco friendly choice as well because you are preventing perfectly good garden food from going to waste at the end of the growing season.
Extra Tips for Better Taste
If you want to take your canned green tomatoes to the next level of deliciousness you can experiment with adding a few extra herbs and spices to the jars. Try dropping a dried red chili pepper or a pinch of red pepper flakes into each jar if you love a spicy kick in your pickled snacks. Adding a slice of fresh onion or a small clove of roasted garlic can also introduce a wonderful layer of deep savory flavor to the final product.
Always make sure to use fresh pickling salt rather than regular table salt because iodine and anti caking agents in table salt will turn your pickling liquid cloudy and unappealing. Letting your sealed jars rest in a cool dark pantry for at least two weeks before opening them will allow the flavors to meld together properly. The longer the tomatoes sit in the brine the more delicious and well rounded their tangy flavor profile will become over time.
If you notice any jars failing to seal properly after twenty four hours do not panic or throw them away simply store those unsealed jars in your refrigerator and eat them first. This ensures zero food waste while giving you an immediate batch of tasty green tomatoes to enjoy while you wait for your pantry jars to mature. Always label your jars with the date of canning so you can keep track of your wonderful homemade kitchen creations with ease.
Final Thoughts
Embarking on the journey of home canning might feel a little intimidating at first but this easy recipe proves that anyone can become a skilled kitchen wizard. There is a deep and rewarding satisfaction that comes from opening a jar of food you created with your own two hands on a cozy evening. We hope this guide inspires you to harvest those late season green tomatoes and turn them into something truly magical that your whole family will appreciate. Remember that cooking is an art form meant to be enjoyed so do not be afraid to have fun and make this recipe uniquely your own. May your pantry always be full of delicious treasures and may every meal you share bring warmth and happiness to your home.
Nutrition Details
| Nutrient | Per Serving | Daily Value Percentage |
| Calories | 25 kcal | 1% |
| Total Fat | 0.2 g | 0% |
| Sodium | 320 g | 14% |
| Total Carbohydrates | 5.5 g | 2% |
| Dietary Fiber | 1.2 g | 5% |
| Sugars | 3.1 g | N/A |
| Protein | 0.8 g | 2% |
| Vitamin C | 14 mg | 15% |
| Vitamin K | 8 mcg | 7% |
Note: Nutrition values are estimated per serving based on a standard recipe yield of twenty four servings total.
Disclaimer
Please remember that every human body is completely unique and individual health needs can vary greatly from person to person based on lifestyle and medical background. The nutritional information and health benefits discussed in this article are provided for general informational and educational purposes only and should not replace professional medical advice. Always consult with a qualified healthcare provider or a registered dietitian if you have specific dietary concerns or underlying health conditions before making major diet changes. Results from home canning and cooking can also vary depending on ingredient freshness and environmental factors so always use your best judgment when preparing food.