Canning chicken breast at home is one of the most rewarding kitchen skills you can learn because it transforms fresh raw meat into a shelf stable food that stays good for a very long time without any freezing. When you learn this simple traditional method, you take fresh lean meat and seal it tightly inside glass jars so that you always have quick access to healthy cooked protein whenever you need to make dinner in a hurry. Many people who love home cooking enjoy this process because it gives them complete control over what goes into their food without adding artificial chemicals or excess salt. Having a storage shelf full of tender canned meat means you can make a delicious warm dish in just five minutes after a long exhausting day at work. This complete guide will show you every single detail you need to know about canning lean white poultry at home so that you can feel fully confident in your kitchen even if you are an absolute beginner who has never preserved food before.
Food lovers around the world adore home preserved chicken breast because the texture becomes wonderfully soft and juicy as it cooks slowly inside the glass jar under high steam pressure. Unlike store bought canned meat which can sometimes taste salty or metallic, your homemade version tastes clean and pure like fresh home cooked soup meat. People love the amazing convenience of opening a sealed jar to instantly make warm chicken salad or hearty chicken noodle soup or tasty chicken tacos without needing to thaw frozen meat for hours. It saves you an enormous amount of time during busy weeknights when everyone in the family is hungry and asking for dinner right away. The natural meat juices that build up inside the jar create a rich broth that adds incredible flavor to any dish you decide to make. Once you taste how tender and flavorful this preserved poultry is, you will never want to go back to buying commercially processed cans from the grocery store.
There are so many wonderful reasons to start preserving your own poultry at home today, whether you want to save money on your grocery bill or reach your personal fitness goals with ease. Buying fresh meat in large bulk packages when it goes on sale at your local market is a smart financial choice, and canning it immediately allows you to lock in those savings before the food goes bad. Fitness enthusiasts and healthy eaters especially love having pre cooked lean protein ready to eat at any moment because it makes meal prepping and keeping track of daily protein intake super simple. It is also a fantastic feeling of security to know that your pantry is stocked with healthy wholesome food that does not rely on electricity or a working freezer during sudden power outages or bad winter storms. Every time you open your storage cupboard and see those clean glass jars lined up neatly on the shelf, you will feel a strong sense of pride in your self reliance and your ability to care for your family.
This preserve recipe is designed to be extremely easy so that anyone with basic kitchen gear can achieve perfect results on their very first attempt. You do not need any complicated cooking experience or secret skills to make tender preserver jars that taste amazing every single time. By following standard food safety rules and using proper equipment like a sturdy pressure container, you ensure that every jar stays completely safe and fresh for many months. Preserving lean white meat gives you a versatile base ingredient that fits into almost every culture and style of cooking, from creamy pasta dishes to hot spiced curries. Reading through this complete guide will give you all the motivation and knowledge you need to start your preservation journey and enjoy delicious home cooked meals whenever you want.
Ingredients You Will Need
To prepare seven quart jars or nine pint jars of preserved poultry, gather these clean ingredients and basic tools:
-
10 to 12 pounds of fresh boneless skinless chicken breast
-
4 to 5 teaspoons of pure canning salt or sea salt (optional for flavor, use 1/2 teaspoon for pint jars or 1 teaspoon for quart jars)
-
Clean hot water or warm chicken stock (optional if using the wet pack style)
-
2 tablespoons of fresh lemon juice or white vinegar (used only for wiping the glass jar rims clean)
Step by Step Method
Step 1: Clean and Prepare Your Equipment
Wash your glass jars, flat lids, and screw bands in warm soapy water and rinse them very well. Keep your jars hot by placing them in a large pot of warm water or keeping them in a warm oven on low heat so they do not break when filled with hot food.
Step 2: Trim and Cut the Meat
Place your fresh chicken breast on a clean cutting board. Trim away any excess fat, skin, or tough gristle using a sharp knife. Cut the white meat into uniform cubes that are about one inch or two inches in size so they pack evenly into the jars.
Step 3: Choose Your Packing Style
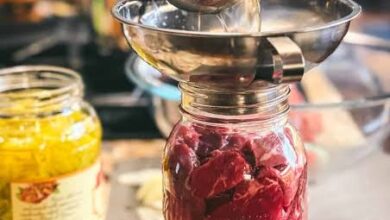
You can use the raw pack method or the hot pack method. For raw pack, simply pack the raw meat cubes tightly into the warm jars without adding any extra liquid because the meat will release its own natural juices during cooking. For hot pack, boil the meat cubes in water or broth for about five minutes first, then pack the hot meat into jars and cover it with the hot liquid.
Step 4: Fill the Glass Jars
Fill each jar with your prepared meat leaving exactly one inch of space at the top of the jar. This empty space at the top is vital because it allows the food to expand during the high heat pressure process.
Step 5: Add Preserving Salt
If you want extra flavor, add half a teaspoon of pure canning salt to each pint jar, or add one full teaspoon of salt to each quart jar. Salt is optional and only used for taste, so you can skip it if you are watching your sodium intake.
Step 6: Remove Air Bubbles and Clean Rims
Use a flat plastic tool or wooden stick to gently press down along the inside walls of the jar to release any trapped air bubbles. Dip a clean paper towel into white vinegar or lemon juice and wipe the top glass rim of every jar carefully to remove any fat or meat residue that could stop the lid from sealing tightly.
Step 7: Seal the Jars
Place a flat metal lid on top of each jar and screw the outer metal band down until it is fingertip tight. Do not force the band on too hard because air needs to escape during the pressure processing stage.
Step 8: Load the Pressure Container
Place your pressure container on the stove with two or three inches of warm water in the bottom. Set your filled glass jars upright inside the container on top of the bottom rack so they do not touch the direct heat.
Step 9: Vent and Process Under Pressure
Put the heavy lid on the pressure cooker and lock it tight. Turn the heat to high and let steam vent continuously out of the open pipe for ten full minutes to clear out all the air. Place the weighted gauge on the vent pipe and wait for the pressure to reach ten pounds (adjust for your local elevation if necessary). Process pint jars for 75 minutes or quart jars for 90 minutes while maintaining steady pressure.
Step 10: Cool Down and Store
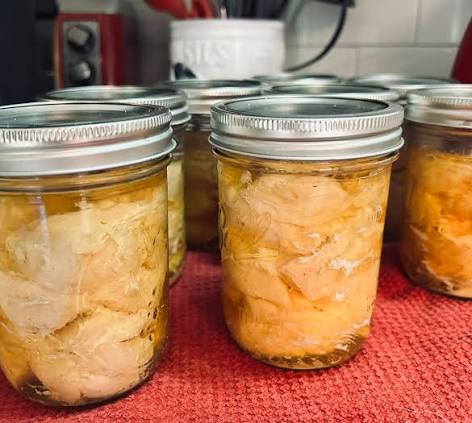
When the processing time is finished, turn off the heat completely and let the pressure drop down to zero on its own naturally. Never force the pressure down fast. Once safe, open the lid, carefully remove the hot jars with a jar lifter, and place them on a towel on your kitchen counter to cool for 24 hours. Listen for the satisfying popping sound that indicates a successful seal!
Why This Recipe Is Special
This home preservation method stands out as a top choice for busy families because it preserves pure lean meat without adding unnecessary chemicals or artificial additives. You know every single item that goes into your glass jars, which makes it far healthier than store bought processed foods that contain long lists of preservatives and high sodium levels. The process cooks the white poultry so gently under high pressure that the protein breaks down into incredibly tender morsels that fall apart with a fork. It is an amazing option for meal prep because it cuts down your active daily cooking time to under ten minutes. You can turn a simple jar of preserved poultry into a rich hot meal instantly without wasting time chopping raw meat or cleaning dirty cutting boards every evening.
From a health viewpoint, lean poultry breast provides high quality protein that helps build strong muscles and keeps you feeling full throughout the day. Having instant protein ready in your pantry prevents you from ordering unhealthy fast food when you are tired or short on time. Additionally, this preservation technique locks in vital nutrients so your food stays nutritious and wholesome for a long time. The rich natural broth created inside the jar during cooking contains healthy collagen and mineral flavors that elevate any simple dish. It is a cost effective and satisfying way to nourish your body with real wholesome food every day.
Extra Tips for Better Taste
To make your preserved poultry taste even more delicious, consider adding subtle seasonings inside the jar before processing. Adding a pinch of dried garlic powder, onion powder, or black pepper turns the natural broth into a flavorful base for quick soups and stews. You can also throw in a small bay leaf or a tiny sprig of fresh thyme into each jar for an earthy herbal aroma. If you prefer rich moist meat, try combining white breast meat with a few pieces of dark thigh meat inside the same jar to balance out the natural lean texture. Always ensure your herbs are clean and dry so you maintain excellent hygiene standards throughout the entire preservation process.
Final Thoughts
Canning your own poultry breast at home is an amazing way to save time and money while taking full control over the quality of food you eat. Once you experience the convenience of having fully cooked, tender lean protein sitting on your pantry shelf, you will wonder how you ever managed weeknight dinners without it. It brings a wonderful sense of warmth and traditional comfort to your home cooking routine while keeping your health goals right on track. Start with a small batch of a few jars today to build your kitchen confidence, and soon you will enjoy the great feeling of a well stocked pantry full of home cooked goodness.
Nutrition Details
Here is the estimated nutrition breakdown for one typical serving of home canned poultry breast packed in its natural juices:
| Nutrient | Amount Per Serving (100g) |
| Calories | 110 kcal |
| Total Protein | 23 grams |
| Total Fat | 1.5 grams |
| Saturated Fat | 0.4 grams |
| Trans Fat | 0 grams |
| Cholesterol | 55 milligrams |
| Sodium (with added salt) | 300 milligrams |
| Sodium (without added salt) | 65 milligrams |
| Total Carbohydrates | 0 grams |
| Dietary Fiber | 0 grams |
| Total Sugars | 0 grams |
Disclaimer
Every human body is unique, and individual dietary needs or health outcomes may vary based on your personal metabolic health and activity level. Home preservation requires careful adherence to tested safety rules and standard pressure processing guidelines to prevent food spoilage. Always inspect sealed glass jars for proper vacuum seals and fresh smell before eating any preserved food. Consult with a qualified healthcare professional or nutritionist if you have specific dietary restrictions, health conditions, or questions regarding your personal nutrition goals.