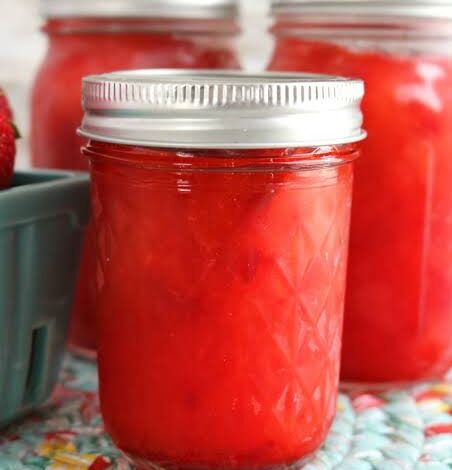
Making homemade fruit preserves at home is one of the most rewarding kitchen projects you can ever try because it brings back the wonderful taste of fresh summer fruits all year long. This simple recipe focuses on creating a rich, delicious, and natural fruit spread using only three basic components that you likely already have in your pantry or local grocery store. You do not need to be an expert cook or have years of kitchen experience to master this preservation method because the steps are straightforward and easy to follow. When you make your own preserve from scratch, you take full control over what goes into your food, which means you can avoid artificial preservatives, fake food colors, and strange chemical additives that are often hidden in store bought jars. Learning how to process and seal these jars properly allows you to build a pantry stocked with delicious treats that last for months, giving you a wonderful sense of self sufficiency and kitchen confidence.
People everywhere adore this particular preserve method because it removes all the complicated science and stress usually associated with traditional home food preservation. Most traditional recipes require precise measurements of commercial powdered pectin, which can sometimes fail to set correctly and leave you with a runny mess or a rubbery block of fruit. This simplified version relies entirely on the natural magic of fresh fruit, clean granulated sugar, and pure citrus juice to achieve the perfect spreadable texture every single time. Home cooks love how economical this process is because buying fresh seasonal fruit in bulk allows you to save money while creating high quality gifts for family and friends. The wonderful aroma of bubbling fruit filling your kitchen creates an inviting atmosphere that makes your house feel warm, cozy, and full of life, which is why so many families turn this activity into a beloved weekend tradition.
There are countless reasons to start boiling your own sweet fruit spread, whether you are chasing beautiful childhood memories or looking for a healthier lifestyle choice. From an emotional perspective, opening a fresh jar on a cold winter morning brings back memories of warm summer days, sunshine, and joyful family gatherings around the breakfast table. From a taste perspective, nothing you can buy at a superstore compares to the vibrant flavor of ripe fruit cooked down with just the right amount of sweetness and a splash of tangy citrus juice to balance it out. If you care about fitness and nutrition, making your own spread gives you total freedom to manage your sugar intake, select organic produce, and fuel your body with wholesome ingredients that support your daily energy needs without unwanted chemical fillers.
Whether you want to top your morning whole grain toast, swirl a sweet fruit layer into your high protein yogurt, or present a beautiful homemade jar to a dear friend, this simple technique fits into every lifestyle. The joy of listening to the satisfying pop sound of closing jar lids is an amazing feeling that keeps home cooks coming back to this rewarding craft season after season. You do not need expensive specialized machinery or fancy tools to get started today, as standard kitchen pots and basic glass containers work perfectly fine for this beginner friendly project. By setting aside just one afternoon, you can master a valuable skill, eliminate unnecessary food waste by preserving extra fruits, and enjoy the pure delight of eating real food made with your own hands.
Ingredients You Will Need
To make this delicious and simple fruit preserve, you only need three main items along with fresh water for your boiling water bath setup. Here is everything you need to collect before starting:
- Four cups of fresh, ripe fruit such as strawberries, raspberries, blackberries, or chopped peaches
- Three cups of pure granulated white sugar
- Two tablespoons of freshly squeezed lemon juice
- Four cups of clean water for boiling and processing standard glass jars
Step by Step Method
- Clean all your equipment thoroughly with warm water and mild soap. Ensure your glass jars, new lids, and metal bands are completely sanitized and free from any cracks or chips before you begin cooking.
- Prepare your fruit by washing it gently under cold running water. Remove any leaves, stems, or bruised parts. If you are using larger fruits like peaches or large strawberries, chop them into small, even pieces so they cook down smoothly.
- Place your prepared fruit into a large heavy bottomed cooking pot. A thick pot is very important because it spreads the heat evenly and prevents the sweet fruit mixture from burning on the bottom during the boiling process.
- Add the three cups of granulated white sugar directly over the fresh fruit in the pot. Stir the mixture gently with a wooden spoon until all the fruit pieces are completely coated in sugar.
- Pour in the two tablespoons of freshly squeezed lemon juice. The lemon juice adds a wonderful bright flavor that balances the sweetness, and its natural acid helps the jam set properly while keeping the color vibrant.
- Let the fruit, sugar, and lemon juice sit together in the pot for about fifteen minutes at room temperature. This resting step allows the sugar to draw out the natural juices from the fruit, creating a rich liquid base before you even turn on the stove.
- Place the pot on your stove over medium heat. Stir the mixture continuously until the sugar crystals melt completely into the fruit liquid.
- Once the sugar is fully dissolved, turn the heat up to medium high and bring the entire mixture to a full rolling boil. A rolling boil means the liquid continues to bubble vigorously even when you are actively stirring it with your spoon.
- Keep boiling the mixture for roughly fifteen to twenty minutes, stirring frequently to ensure nothing sticks to the bottom of the pot. Skim off any light foam that rises to the top using a clean spoon.
- Test if the jam is ready by placing a small drop of the hot liquid onto a chilled plate from your freezer. Wait one minute, then push the edge of the drop with your finger. If the surface wrinkles slightly and holds its shape, your preserve is fully cooked and ready for jars.
- Carefully ladle the hot liquid fruit mixture into your clean, warm glass jars. Leave about one quarter inch of space at the top of each jar so the food has room to settle properly.
- Wipe the top rim of every jar with a clean, damp cloth to remove any sticky drops or sugar residue that could prevent a proper seal.
- Place a flat lid on top of each jar, then screw the metal band down gently until it is fingertip tight. Do not overtighten the metal bands, as air needs to escape during the final hot water processing step.
- Carefully lower the filled jars into a deep pot of boiling water using jar tongs. Make sure the water level completely covers the tops of the jars by at least one inch.
- Process the jars in the boiling water bath for ten minutes. Start counting the ten minutes only after the water comes back to a strong, steady boil.
- After ten minutes, turn off the heat and let the jars sit in the hot water for five minutes to cool down slightly.
- Remove the jars from the water using your tongs and set them upright on a clean towel on your kitchen counter. Space them out so air can circulate around them freely.
- Allow the jars to cool undisturbed for twelve to twenty four hours. As they cool, you will hear a distinct popping sound, which tells you that the vacuum seal has formed successfully.
- Check each lid by pressing down in the center. If the lid stays down and does not bounce up and down, your jar is properly sealed and ready for long term storage in a cool, dark pantry.
- If any lid fails to seal, simply place that jar in your refrigerator and enjoy it fresh within three weeks.
Why This Recipe Is Special
This simple three ingredient approach stands out because it focuses on purity, tradition, and ease. Many modern store bought spreads are packed with high fructose corn syrup, synthetic gelatin, artificial flavorings, and chemical stabilizers designed to extend shelf life artificially. By using real whole fruit, natural sugar, and fresh citrus juice, you create a wholesome spread that tastes like pure fruit goodness. The process requires no fancy equipment or hard to find commercial pectin powders, making it the most accessible entry point for complete kitchen beginners.
From a health perspective, preparing your own preserves allows you to know every single element that goes into your body. Fresh fruits are naturally full of beneficial antioxidants, essential vitamins, and plant compounds that support overall wellness. Because you control the quality of the produce, you can choose organic options or buy fresh local fruit directly from nearby farms during peak season. Furthermore, the natural acid from fresh lemon juice acts as a natural preservative while adding a bright flavor profile that makes the natural fruit notes shine without needing excessive chemical enhancements.
The taste profile of this homemade preserve is unmatched by industrial brands. Industrial processing cooks fruit at ultra high temperatures for long periods, which destroys the delicate flavor compounds and changes the natural texture. This rapid home cooking method preserves the lively, fresh notes of the fruit while creating a wonderful texture with real fruit pieces throughout. The balance of rich sweetness from pure sugar combined with the sharp tang of real citrus creates a deep, satisfying flavor that transforms plain bread, oatmeal, or desserts into gourmet treats.
Extra Tips for Better Taste
To take your homemade creation to an even higher level, consider adding a pinch of fresh citrus zest along with your lemon juice. Grating a bit of lemon, orange, or lime peel into the pot releases natural aromatic oils that deepen the overall aroma and give the spread an extra layer of gourmet sophistication.
Another wonderful tip is to experiment with whole spices. You can drop a whole cinnamon stick, a star anise, or a couple of crushed cardamom pods into the boiling fruit mixture while it cooks. Remember to remove these whole spices with a spoon right before ladling the hot preserve into your jars so the spice flavor remains balanced and pleasant.
If you love a warm depth of flavor, adding a teaspoon of pure vanilla extract right after you turn off the stove burner adds a rich, creaminess to fruits like strawberries, peaches, or blackberries. Vanilla pairs extraordinarily well with natural fruit acids, giving your final product a smooth dessert like quality.
For a subtle herbal twist, try infusing your cooking pot with fresh herbs. Steeping a few fresh basil leaves, mint sprigs, or a tiny stem of rosemary into the hot fruit liquid for a few minutes before jarring creates a unique blend that pairs amazingly well with sharp cheeses, crusty sourdough bread, or roasted meat dishes.
Always remember that the quality of your finished product depends directly on the quality of your fresh fruit. Using ripe, sweet fruit at the peak of its season will give you maximum natural flavor and the best texture. Avoid using overripe or spoiled fruit, as it can ruin the texture and lower the natural acid levels needed for safe preservation.
Final Thoughts
Taking the time to preserve fresh fruit at home is a simple yet deeply satisfying activity that connects you to time honored cooking traditions. With just three basic ingredients, a couple of standard kitchen pots, and a short afternoon of fun, you can create delicious jars of sweet preserve that bring pure joy to your table. You will love the wonderful control over your ingredients, the incredible fresh taste, and the pride that comes from sharing hand crafted treats with the people you love most. Give this easy technique a try in your own kitchen today and enjoy the sweet rewards for months to come.
Nutrition Details
Below is an estimated nutrition breakdown for the full recipe batch as well as for a single standard serving size of one tablespoon.
| Serving Size | 32 Tablespoons | 1 Tablespoon (approx. 20g) |
| Calories | 2800 kcal | 87 kcal |
| Total Fat | 1.5 grams | 0 grams |
| Saturated Fat | 0 grams | 0 grams |
| Sodium | 10 milligrams | 0 milligrams |
| Total Carbohydrates | 710 grams | 22 grams |
| Dietary Fiber | 12 grams | 0.4 grams |
| Sugars | 690 grams | 21 grams |
| Protein | 3 grams | 0 grams |
| Vitamin C | 120% Daily Value | 4% Daily Value |
| Calcium | 80 milligrams | 2.5 milligrams |
Disclaimer
This recipe and its nutrition details are provided for general educational and informational purposes only. Everyone’s body is different, and individual nutritional requirements, dietary restrictions, and health responses may vary based on personal health conditions. Nutritional values provided in the chart above are estimates based on standard calculation tools and can change depending on the specific type of fruit used, fruit ripeness, and exact brand of ingredients. Always consult with a qualified health professional or registered dietitian for specific medical advice, individual dietary recommendations, or food safety guidelines tailored to your personal needs.