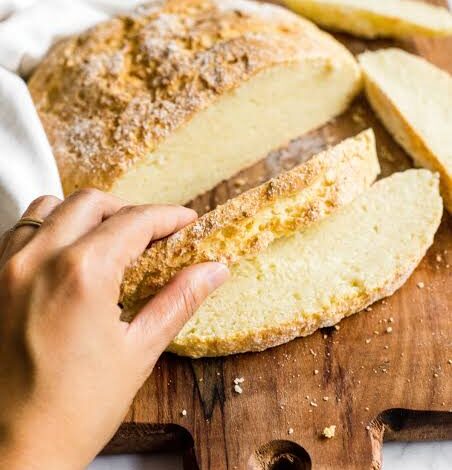
Sourdough gluten free bread is one of the most comforting foods you can bake in your home kitchen today because it combines the wholesome goodness of natural fermentation with the freedom of a gluten free lifestyle. Many people who follow a gluten free diet miss the delightful chewy texture, the crispy golden crust, and the complex tangy flavor that traditional sourdough bread offers. This special recipe bridges that gap completely by giving you a beautiful homemade loaf that tastes like it came straight from an artisanal bakery. You do not need any advanced baking skills or expensive kitchen equipment to pull this off, making it a welcoming project for complete beginners. By using a natural sourdough starter made from gluten free grains, you are creating a loaf that is gentle on your digestive system while delivering amazing flavor. Baking your own bread at home allows you to take full control over every single ingredient, ensuring that no artificial preservatives or unwanted chemicals end up on your family dinner table. This recipe brings back the simple joy of eating real, flavorful bread without worrying about gluten sensitivity or heavy stomach discomfort.
The reason why home bakers and food lovers adore this particular bread recipe so much is because it removes all the stress and hard physical effort usually associated with traditional bread making. Most conventional bread recipes require long minutes of intense hand kneading to build structure, but this no knead approach relies entirely on time and natural hydration to do the work for you. You simply mix your simple ingredients together in a bowl, let the wild yeast do its magic overnight, and then bake it to perfection. The long fermentation process breaks down complex starches and phytic acid in the grains, making the final loaf much easier to digest compared to quick yeast breads. People also love the incredible sensory experience that comes with baking sourdough at home, from the warm yeasty aroma that fills the kitchen to the satisfying sound of the crackling crust as it cools. It gives you a sense of pride and accomplishment when you see a gorgeous, golden brown loaf emerging from your oven after minimal hands on effort.
You might want to bake this wonderful gluten free sourdough bread on a quiet weekend morning when you want to fill your home with cozy warmth and inviting scents. It is the perfect recipe to make when you are hosting a family meal, preparing healthy school lunches, or simply craving a warm slice of fresh bread slathered with creamy butter. If you or a loved one are transitioning to a gluten free lifestyle for health reasons, this recipe acts as a comforting reminder that you do not have to give up delicious food. It fits beautifully into a wellness focused lifestyle because sourdough contains beneficial organic acids and prebiotics that support overall gut health. Making this loaf can also become a calming personal ritual, a peaceful moment in your busy week where you slow down and nourish your body with wholesome food. Whether you are baking for pure emotional comfort, health goals, or just love great food, this sourdough recipe offers a deeply rewarding experience that satisfies both your body and your soul.
Another major reason this bread recipe stands out is its incredible versatility in everyday meal planning and dietary lifestyle choices. Standard store bought gluten free bread is often dry, crumbly, and filled with extra sugars and thickeners that leave you feeling unsatiated. In sharp contrast, this homemade sourdough loaf holds its structure remarkably well, allowing you to cut neat slices without the bread falling apart into sad crumbs. You can toast a slice for breakfast and top it with mashed avocado, poached eggs, or sweet berry jam for a nourishing start to your day. It also works wonderfully for making hearty lunch sandwiches packed with fresh vegetables, savory roasted meats, or melted cheese. Because this bread is so nutrient dense and filling, just one or two slices will keep you energized and satisfied for hours without causing sudden energy crashes. Investing a little bit of time into mixing this simple dough rewards you with a week of delicious, high quality bread that truly nourishes your entire body.
Ingredients You Will Need
Active gluten free sourdough starter: 150 grams Psyllium husk powder: 20 grams Warm filtered water: 400 milliliters Brown rice flour: 250 grams Tapioca starch: 100 grams Sorghum flour: 50 grams Fine sea salt: 10 grams Olive oil for coating: 15 milliliters
Step by Step Method
-
Prepare your sourdough starter early in the day so it is active, bubbly, and ready to use. A healthy gluten free starter should double in size and show plenty of small air bubbles before you mix it into your bread dough.
-
Take a small glass bowl and pour in the warm filtered water. Add the psyllium husk powder into the water and whisk well for about one minute. Leave this mixture sitting on your kitchen counter for roughly ten minutes until it forms a thick gel like consistency. This psyllium gel provides the flexibility and structure that gluten free bread usually lacks.
-
In a large mixing bowl, combine the brown rice flour, tapioca starch, sorghum flour, and fine sea salt. Use a manual wire whisk to mix these dry ingredients together thoroughly so the salt and starches are evenly spread throughout the flour blend.
-
Pour your bubbly gluten free sourdough starter and the prepared psyllium gel directly into the large bowl with the dry flour mixture. Use a sturdy wooden spoon or a silicone spatula to combine everything together until no dry white powder remains visible.
-
Use your hands to gently press the dough into a smooth ball inside the bowl. The dough will feel slightly sticky and moist, which is completely normal for gluten free sourdough recipes. Do not add extra dry flour, as the psyllium husk will continue to absorb moisture as it rests.
-
Cover the mixing bowl with a clean damp kitchen towel or a reusable bowl cover. Place the bowl in a warm spot in your kitchen away from direct cold drafts. Let the dough ferment undisturbed for about eight to twelve hours, or overnight, to allow the wild yeast to expand the dough and build a lovely sour flavor.
-
The next morning, check your dough. It should look slightly expanded, feel softer to the touch, and smell gently sour and pleasant. Gently turn the dough out onto a piece of parchment paper.
-
Lightly coat your clean hands with a few drops of olive oil. Gently shape the dough into a smooth round loaf shape by tucking the edges underneath itself.
-
Lift the parchment paper with the shaped loaf and place it inside a medium size bowl or a traditional proofing basket. Cover the loaf loosely with a towel and let it rest for another two hours so it can relax and expand further.
-
Place a heavy Dutch oven pot with its lid inside your oven. Preheat your oven to 230 degrees Celsius or 450 degrees Fahrenheit while the shaped bread dough finishes its second rest. Heating the pot ensures a powerful blast of heat that helps the bread rise high.
-
Carefully pull the hot Dutch oven out of your preheated oven using thick oven mitts. Use a sharp knife or a razor blade to score a quick slash across the top of your loaf. This simple cut helps the steam escape evenly so your bread rises smoothly without bursting at the sides.
-
Lift the paper containing the scored dough and carefully lower it into the hot Dutch oven pot. Put the lid back on the pot firmly and return it to the oven. Bake with the lid on for thirty five minutes. The trapped steam inside the pot creates a crispy crust and allows the inside of the bread to cook thoroughly.
-
After thirty five minutes, carefully remove the pot lid. Lower the oven temperature to 210 degrees Celsius or 410 degrees Fahrenheit. Continue baking uncovered for another twenty to twenty five minutes until the outer crust turns a deep golden brown color and sounds hollow when you tap the bottom of the loaf.
-
Carefully remove the bread from the hot pot and place it onto a wire cooling rack. Allow the bread to cool completely at room temperature for at least two hours before cutting into it. Cutting warm gluten free bread too early will make the inside texture feel gummy, so patience is key for the best results.
Why This Recipe Is Special
This gluten free no knead sourdough recipe is truly special because it solves the biggest problems people face with traditional gluten free baking. Conventional gluten free bread recipes often rely on artificial gums, processed sugars, and chemical leavening agents to achieve volume, which can leave the loaf tasting bland and dry. This natural recipe relies entirely on organic fermentation and simple whole food ingredients to build structure and deep flavor. The inclusion of psyllium husk powder creates a natural, elastic web that mimics gluten, allowing the bread to hold moisture and stay fresh for several days without drying out.
From a health standpoint, this bread offers immense benefits for your digestive system. The slow fermentation process breaks down complex carbohydrates and phytic acid present in grains, making the vitamins and minerals like iron, magnesium, and zinc much easier for your body to absorb. Wild sourdough starter introduces beneficial organic acids that lower the glycemic index of the bread, meaning it produces a slow, steady rise in blood sugar rather than a sharp spike. People with mild digestive sensitivities often find that long fermented sourdough causes no stomach bloat or heaviness at all.
The overall taste and texture of this loaf are superior to anything you can buy in a commercial grocery store. The long resting period allows the sourdough bacteria to develop a rich, complex sour taste balanced by the nutty notes of brown rice and sorghum flour. The crust bakes up remarkably crunchy and dark, while the crumb inside stays soft, airy, and gently chewy. It is a true artisanal loaf that looks, smells, and tastes like real traditional bread while remaining hundred percent gluten free and safe for celiac diets.
Extra Tips for Better Taste
To make your sourdough loaf taste even more impressive, consider adding custom flavor ingredients into your dough during the final mixing stage. You can fold in two tablespoons of fresh chopped rosemary along with a half cup of roasted garlic cloves for a savory herbs loaf that pairs amazingly with soup. Alternatively, mixing in a handful of toasted sunflower seeds, pumpkin seeds, and chia seeds gives the bread an enjoyable crunchy texture and boosts the healthy fat content of every slice.
Another easy way to elevate the flavor profile is to experiment with different gluten free flour combinations. Replacing a small portion of the sorghum flour with buckwheat flour adds a earthy, robust flavor that resembles traditional European rye bread. If you prefer a lighter and sweeter loaf, you can substitute a portion of the water with sparkling water, which introduces extra micro bubbles into the mixture and yields an even lighter interior texture.
Paying close attention to your baking equipment also makes a massive difference in crust development. Using a heavy cast iron Dutch oven is the absolute best method because it captures steam during the first half of baking, preventing the crust from setting too quickly before the loaf reaches its maximum rise. If you want an extra shiny, bakery style crust, you can spray the top of the loaf with a light mist of water right before putting the lid on the hot pot.
Final Thoughts
Baking your own gluten free sourdough bread without kneading is a joyful, empowering journey that brings wholesome, real food back to your kitchen table. Once you experience the incredible aroma of fresh sourdough baking in your own oven and taste that first crispy, warm slice, you will never want to go back to store bought bread again. It takes only a little bit of planning and simple ingredients to create something truly nourishing for yourself and the people you love. Embrace the peaceful process, enjoy the wonderful flavors, and feel proud of creating real bread from scratch.
Nutrition Details
Below is the nutritional breakdown for this homemade sourdough loaf based on ten equal slices per bread recipe.
Nutritional Component | Amount Per Serving | Percentage Daily Value Total Calories | 185 kcal | 9 percent Total Fat | 2 grams | 3 percent Saturated Fat | 0.3 grams | 1 percent Sodium | 390 milligrams | 17 percent Total Carbohydrates | 38 grams | 14 percent Dietary Fiber | 4 grams | 16 percent Sugars | 0.5 grams | 1 percent Protein | 4 grams | 8 percent Calcium | 25 milligrams | 2 percent Iron | 1.2 milligrams | 7 percent
Disclaimer
Please remember that every individual body is unique, so personal health responses and dietary needs may vary from person to person. While this recipe is naturally gluten free and made with simple ingredients, individuals with severe celiac disease or specific food allergies should always double check that all packaged ingredients and flour products are certified gluten free. Nutritional values provided in the table above are general estimates calculated for standard servings and may change depending on the exact brands or ingredient swaps you choose to use in your home kitchen.