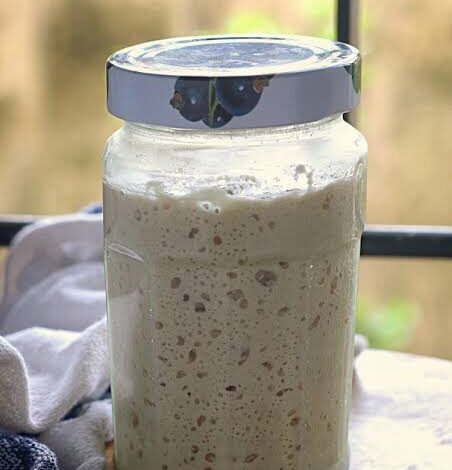
Welcome to the wonderful and exciting world of making your very own sourdough starter right at home. This complete and friendly guide will walk you through every single simple step to create a bubbly and alive yeast culture using only flour and water. Sourdough starter is a natural mixture of wild yeasts and friendly bacteria that live in the air and on flour grains. Instead of buying dry yeast from the store to bake bread, you grow your own living helpers that make your bread rise and give it that famous tangy flavor. This ancient way of baking has been used by families for thousands of years to create delicious bread that smells amazing and tastes incredible. When you start this fun kitchen project you are bringing a living tradition into your home and learning a rewarding skill that will last you a lifetime.
People all over the world completely love making and baking with a sourdough starter because it turns simple ingredients into absolute magic. There is a deep and joyful feeling of pride that comes from watching your flour and water bubble up into a strong and active culture. Many bakers love the wonderful sour taste and the chewy texture of homemade bread which tastes much better than regular store bought sandwich bread. Furthermore watching the dough rise and bake into a golden loaf gives you a happy sense of accomplishment that feels very relaxing after a long day. Baking with your own starter also lets you connect with friends and family because sharing a warm loaf of crusty bread brings everyone together around the kitchen table with big smiles.
You should make your own sourdough starter whenever you want to slow down and enjoy a fun and rewarding kitchen hobby. This is a wonderful weekend project or a peaceful daily routine that gives you a nice break from busy modern screens. From a taste perspective nothing compares to the rich and complex flavor of fresh sourdough bread toasted with a little bit of butter or jam. From a wellness perspective many people find that sourdough bread is much easier on their tummy compared to regular white bread because the natural fermentation process breaks down the grains. Making your own starter also means you always have a natural leavening agent ready whenever the baking mood strikes you and your kitchen can smell like a cozy bakery.
Creating a sourdough starter does not require fancy equipment or difficult cooking skills because nature does most of the hard work for you. All you need is a clean glass jar some unbleached flour and regular tap water along with a little bit of patience and daily love. As you feed your starter day by day you will notice it growing stronger changing its smell and forming lovely bubbles that show it is happy and healthy. This guide is written in very easy words so that absolute beginners can follow along without feeling confused or overwhelmed by baking terms. Let us put on our aprons get our jars ready and begin this delicious journey into the art of homemade sourdough.
Ingredients You Will Need
-
Unbleached All Purpose Flour: 2 cups total over the week (about 240 grams) for feeding and building your culture.
-
Whole Wheat Flour or Rye Flour: Half cup total (about 60 grams) to help kickstart the wild yeast in the beginning days.
-
Filtered Water or Spring Water: 2 cups (about 480 milliliters) at room temperature so you do not harm the friendly yeast with chlorine.
Step by Step Method
Day One: Starting Your Culture
To begin your sourdough journey you need to find a clean glass jar that holds about one quart. Add one half cup of whole wheat flour and one half cup of filtered water into your glass jar. Stir the flour and water together using a clean spoon until there are no dry spots left at the bottom of the jar. The mixture should look like a thick pancake batter that is easy to stir but not too watery. Put a loose lid or a clean cloth secured with a rubber band over the top of your jar so air can get in while keeping dust out. Place your jar in a warm spot in your kitchen away from direct sunlight and let it rest for twenty four hours.
Day Two: Watching and Waiting
On the second day you might not see many bubbles yet and that is completely normal so do not worry at all. Sometimes a little bit of clear liquid forms on top which is just hungry yeast letting you know it is time for a snack. Take off your jar cover and give the mixture a thorough stir with your clean spoon to mix everything back together nicely. Put your cover back on loosely and place the jar right back into its cozy warm spot for another full day of resting.
Day Three: The First Feeding
By day three you should start seeing a few tiny bubbles forming inside the jar and the mixture might smell slightly sweet or a bit sour. Now it is time to give your baby starter its very first official feeding to keep the yeast strong and happy. First scoop out half of the mixture from your jar and throw it away so you do not end up with too much batter to manage. Add one half cup of unbleached all purpose flour and one quarter cup of filtered water right into the remaining starter in your jar. Stir everything together very well until smooth make sure no dry flour remains and put your loose cover back on for the day.
Day Four: Feeding and Growing
On day four you will likely see more bubbles rising to the top and the jar might smell a bit more tangy and active than before. Repeat the exact same feeding steps you did yesterday by removing half of the jar contents into the trash or a bowl. Add another half cup of unbleached all purpose flour and one quarter cup of filtered water into your jar and stir well. Put the jar back in your warm spot and watch how the mixture starts to double in size over the next twenty four hours.
Day Five and Six: Twice Daily Care
On days five and six your starter is becoming very strong and hungry because the wild yeast population is growing rapidly inside the jar. During these two days you should feed your starter twice every single day once in the morning and once again in the evening. For each feeding remove half of the starter add a half cup of flour and a quarter cup of water and stir until completely smooth. You will notice the jar filling up with fluffy bubbles and the starter rising nicely after each feeding session.
Day Seven and Beyond: Ready to Bake
By day seven your sourdough starter should be bubbly active and smell wonderfully fresh and tangy whenever you open the jar lid. To test if it is ready fill a small cup with room temperature water and gently drop a small spoonful of starter into the water. If your starter floats right to the top of the water like a happy little cloud it means it is fully mature and ready to bake bread. Keep feeding your starter once a day if you keep it on the counter or once a week in the fridge if you take a break from baking.
Why This Recipe Is Special
This homemade sourdough starter is truly special because it brings traditional baking skills back into your modern kitchen without any complicated stress. One of the greatest benefits of making your own culture is that you control every single ingredient ensuring there are no hidden chemicals or artificial preservatives. From a health perspective natural fermentation helps break down gluten proteins and phytic acid found in wheat grains making your homemade bread much gentler on your digestive system. This means you can enjoy your favorite morning toast or sandwich bread without feeling heavy or bloated afterward.
From a taste standpoint nothing in the world compares to the incredible flavor profile of genuine sourdough baked right in your own oven. The combination of wild yeast and friendly bacteria creates a wonderful sour tang that balances out the rich taste of toasted wheat grains. Every single loaf you bake will have a gorgeous crispy golden crust on the outside and a soft chewy texture on the inside. Furthermore making sourdough is an amazing mindfulness activity that teaches you patience and helps you slow down during busy days. When you share a slice of your warm homemade bread with loved ones you create special memories that last a lifetime.
Extra Tips for Better Taste
-
Keep Your Kitchen Warm: Wild yeast loves a cozy temperature so try to keep your jar in a spot that stays around seventy five degrees Fahrenheit for the best bubbling action.
-
Use Quality Flour: Switching to organic unbleached flours gives the wild yeast extra nutrients which makes your starter grow stronger and smell even more delicious.
-
Do Not Waste Discard: Instead of throwing away your extra starter during feedings you can save it in a separate container and use it to make delicious pancakes waffles or crackers.
-
Set a Daily Reminder: Feeding your starter at the exact same time every single day helps create a steady routine so your yeast stays happy and never gets too hungry.
-
Clean the Jar Weekly: Every week or two transfer your active starter into a fresh clean jar to prevent dry crusts from forming around the rim and keeping things nice and tidy.
Final Thoughts
Making your own sourdough starter is an amazing adventure that transforms basic kitchen staples into a living source of delicious homemade bread. Even though it takes a little bit of time and daily care the reward of pulling a warm golden loaf from your oven is well worth every single moment. We hope this easy guide gives you all the confidence you need to start your baking journey today with a big smile on your face. Remember that every baker makes mistakes in the beginning so just have fun learn as you go and enjoy the wonderful process. Happy baking to you and your family, and may your kitchen always be filled with the wonderful smell of fresh bread.
Nutrition Details
The table below shows the estimated nutrition details for a standard feeding portion of active sourdough starter based on a serving size of fifty grams.
| Nutrient Category | Amount Per Serving |
| Calories | 65 kcal |
| Total Carbohydrates | 14 grams |
| Dietary Fiber | 1 gram |
| Sugars | 0 grams |
| Protein | 2 grams |
| Total Fat | 0 grams |
| Sodium | 2 milligrams |
Disclaimer
Please remember that everyone and every body is completely unique and different in how they process various foods and ingredients. The nutritional information and health points provided in this article are meant for general informational purposes only and should not replace professional medical advice. If you have specific health conditions or food allergies always consult with a qualified healthcare provider before making major changes to your daily diet. Enjoy your baking journey safely and listen to your body always.