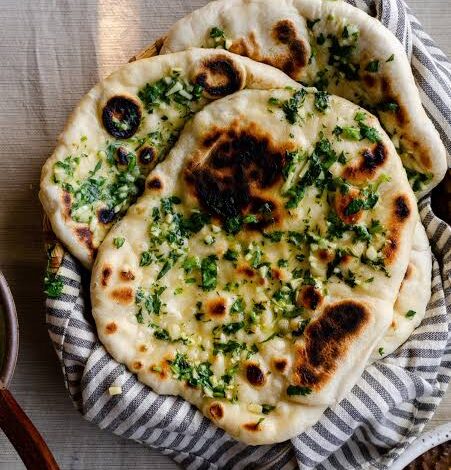
Garlic butter naan is one of the most famous soft flatbreads in the world that originates from South Asia and brings extreme joy to every dinner table. This recipe is all about creating a restaurant quality bread right inside your home kitchen without needing any special tandoor clay oven. When you prepare this flatbread, you are blending simple kitchen items like refined flour, warm milk, active dry yeast, yogurt, melted butter, and fresh minced garlic into a wonderful dough. The whole concept of this dish is to bring you soft, fluffy bread with dark toasted blisters on top that smells like pure garlic heaven. Cooking it on a hot skillet or cast iron pan allows the dough to puff up with warm air bubbles, creating those irresistible pockets of flavor. Once you brush that hot golden surface with rich melted garlic butter and freshly chopped cilantro leaves, you get a beautiful bread that instantly turns any normal meal into an incredible dining experience. Learning how to bake or cook this flatbread at home gives you total control over the ingredients, allowing you to enjoy fresh baked goodness whenever you crave something warm, cozy, and thoroughly satisfying.
People around the globe fall completely in love with garlic butter naan because it hits every single sensation that makes comfort food so deeply satisfying. The moment you take a warm piece in your hands, you feel how pillowy and soft the texture is, which contrasts wonderfully with the light crispy spots from the hot pan. The incredible aroma of cooked garlic combined with melted buttery goodness fills your entire kitchen and immediately makes your mouth water. Every single bite delivers a wonderful balance of mild tanginess from the fermented yogurt dough, rich creaminess from butter, and a punchy kick from fresh garlic cloves. It is completely versatile, meaning it pairs seamlessly with thick creamy curries, spiced lentil soups, grilled meats, or even works as a standalone snack enjoyed hot right off the stove. Kids, adults, and grandparents all share the exact same excitement when a basket of warm garlic bread arrives at the dinner table. It feels fancy like something from a high end dining place, yet it is made with pure love and very basic ingredients that anyone can easily afford and master.
There are so many wonderful emotional, sensory, and lifestyle reasons to make this amazing bread in your own home kitchen. On rainy evenings or cold weekends, gathering your family around the table to share warm homemade flatbread creates deep emotional feelings of comfort, home, and safety. If you are hosting a dinner party or a casual festive get together with close friends, serving fresh garlic bread instantly elevates your hosting game and makes everyone feel deeply cared for. From a fitness and health perspective, making your own bread at home allows you to skip all artificial preservatives, hidden sugars, unhealthy hydrogenated oils, and unnecessary chemical dough conditioners found in store bought packaged breads. You get to choose organic flour, fresh garlic, real wholesome butter, and natural yogurt, giving you a far healthier product that nurtures your body while satisfying your cravings. Whether you need a comforting reward after a long working week or want to introduce your kids to the joyous science of yeast dough, baking this dish brings pure fun and relaxation into your daily cooking routine.
Mastering this flatbread recipe will permanently change how you view weeknight dinners and special family gatherings. Cooking dough from scratch might feel a little scary if you are an absolute beginner, but this easy approach breaks down every single barrier so you can cook with complete confidence. You do not need any high tech machines, expensive baking tools, or professional culinary skills to achieve incredible results that look and taste truly professional. As you watch the soft dough rise in a warm bowl, you gain a deep appreciation for homemade cooking and the magical way simple ingredients transform into something extraordinary. Sharing this delicious bread with people you care about builds wonderful memories around the food table, making your house feel warmer and much more welcoming. Once you taste a fresh slice dripping with golden garlic butter, you will realize that store bought alternatives simply cannot compare to the magic you can create right on your own stovetop.
Ingredients You Will Need
Below is the complete list of ingredients required to make perfect garlic butter naan at home. All measurements are given clearly so you can measure everything easily.
- Three cups of all purpose flour
- One teaspoon of active dry yeast
- One teaspoon of granulated white sugar
- One teaspoon of fine salt
- One half cup of warm water
- One half cup of warm whole milk
- One third cup of plain plain yogurt at room temperature
- Two tablespoons of vegetable oil or olive oil
- Four tablespoons of unsalted butter melted
- Four cloves of fresh garlic finely minced
- Two tablespoons of fresh cilantro or coriander leaves finely chopped
- One tablespoon of black sesame seeds or nigella seeds for garnish optional
Step by Step Method
Step One: Activate The Yeast
Take a small bowl and pour in one half cup of warm water. Make sure the water is warm to the touch but not boiling hot, as extreme heat can destroy the active yeast. Add one teaspoon of white sugar and one teaspoon of active dry yeast directly into the warm water. Stir the liquid gently using a spoon until the yeast and sugar dissolve completely. Leave the bowl untouched on your kitchen counter for about ten minutes. After ten minutes, you should see a thick, foamy layer of bubbles forming on top of the liquid. This foam indicates that your yeast is alive, active, and ready to make your dough rise into fluffy bread.
Step Two: Prepare The Dry Ingredients
While your yeast is activating in the small bowl, take a very large mixing bowl. Sift three cups of all purpose flour into this large bowl to remove any lumps and incorporate air into the flour. Add one teaspoon of fine salt to the flour and whisk them together so the salt spreads evenly throughout the dry mixture. Creating a smooth dry base ensures that your bread will have a consistent texture and balanced flavor in every single bite.
Step Three: Combine And Knead The Dough
Make a small well in the center of your dry flour mixture. Pour in the foamy activated yeast mixture, one half cup of warm whole milk, one third cup of plain yogurt, and two tablespoons of vegetable oil. Stir everything together using a wooden spoon until a shaggy dough begins to form. Once the flour absorbs the liquid, dust your clean hands with a little dry flour and start kneading the dough directly in the bowl or on a clean kitchen counter. Knead the dough gently for about eight to ten minutes until it becomes completely smooth, soft, and slightly elastic. If the dough feels way too sticky, add one extra tablespoon of flour. If it feels too dry, add one extra teaspoon of warm water.
Step Four: Let The Dough Rise
Form your smooth kneaded dough into a nice round ball. Lightly grease the inside of a large clean bowl with a few drops of vegetable oil to prevent the dough from sticking as it expands. Place your dough ball inside the greased bowl and turn it over once so the entire surface of the dough is lightly coated in oil. Cover the bowl tightly with a clean kitchen towel or plastic wrap to keep the moisture inside. Place the covered bowl in a warm, draft free spot in your kitchen, such as inside an turned off oven with the light on. Let the dough rest and rise undisturbed for about one to two hours, or until it doubles in total size.
Step Five: Divide And Shape The Dough Balls
Once your dough has doubled in size, gently press your fist into the center of the dough to release the trapped air bubbles. Transfer the dough onto a clean, lightly floured working surface. Divide the dough evenly into six or eight equal portions using a knife or dough scraper. Take each portion of dough and roll it between your hands to form smooth, round balls. Cover these small dough balls with a damp cloth and let them rest on your counter for ten extra minutes. Resting the dough allows the gluten strands to relax, which makes rolling out the naan much easier later on.
Step Six: Prepare The Garlic Butter Topping
While your dough balls are resting, prepare your delicious aromatic garlic topping. Take a small heatproof bowl and melt four tablespoons of unsalted butter in your microwave or on your stove. Add four cloves of finely minced fresh garlic and two tablespoons of finely chopped fresh cilantro leaves into the warm melted butter. Stir the garlic butter mixture thoroughly so all the wonderful aromatic flavors blend together nicely. Keep this brushable garlic butter warm near your cooking station.
Step Seven: Roll Out The Naan
Take one dough ball and place it on your floured surface. Sprinkle a tiny bit of dry flour on top of the ball and on your rolling pin to prevent sticking. Roll the dough gently outward into a traditional oval or teardrop shape that is roughly one quarter inch thick. Do not make the dough too thin like a thin tortilla, because you want your flatbread to retain a soft pillowy layer inside. If you like extra flavor, you can sprinkle a few black sesame seeds on top of the rolled dough and press them lightly into the dough with your rolling pin so they stay in place.
Step Eight: Cook The Naan On Hot Skillet
Place a heavy cast iron skillet or nonstick pan on your stove over medium high heat. Let the pan get very hot before you start cooking. Brush one side of your rolled dough lightly with a little plain water using your fingers or a pastry brush. Carefully pick up the dough and lay it into the hot pan with the wet side facing down. The water helps the dough stick briefly to the hot pan and creates massive steam pockets. Within one to two minutes, you will see big bubbles puffing up across the surface of the dough and dark golden spots forming on the bottom side.
Step Nine: Flip And Finish Cooking
Once the top surface is full of airy bubbles and the bottom has lovely dark toasted spots, use a spatula to flip the flatbread over to the second side. Cook the second side for another one to two minutes until it shows nice brown blistered spots as well. If you are using a cast iron skillet and feel comfortable with kitchen tongs, you can even flip the bread directly over an open gas flame for a few seconds to get authentic smoky charred edges. Remove the hot cooked flatbread from the pan and place it on a clean serving plate.
Step Ten: Brush With Garlic Butter And Serve
Immediately brush a generous amount of your warm melted garlic butter mixture all over the hot, freshly cooked flatbread. The heat from the fresh bread will absorb the rich garlic butter instantly, making the surface glossy, fragrant, and incredibly delicious. Repeat this exact rolling, cooking, and buttering process for all the remaining dough balls. Stack the warm buttered flatbreads on top of each other under a clean cloth towel to keep them soft and hot until you are ready to serve your meal.
Why This Recipe Is Special
This homemade garlic butter naan recipe is truly special because it combines traditional flatbread textures with the absolute comfort of fresh homemade cooking. Unlike generic store bought versions that often taste dry, dense, or rubbery, this recipe produces a bread that is remarkably soft, tender, and chewy all at the exact same time. The inclusion of plain yogurt and warm milk in the dough creates a mild natural lactic fermentation that tenderizes the wheat flour proteins. This unique moisture balance keeps the bread soft for hours, even after it cools down from the hot skillet.
From a wellness perspective, making your own bread provides immense health benefits compared to commercial baked goods. You have full control over every single ingredient entering your body. There are no artificial preservatives, chemical dough conditioners, excessive sodium levels, or cheap industrial oils used here. Fresh garlic is well known around the world for its natural antibacterial properties and cardiovascular health benefits. Using wholesome ingredients like real garlic, pure butter, and fresh herbs brings nutritional value directly to your dinner plate while delivering pure satisfaction.
The overall taste experience of this recipe is nothing short of incredible. The dark blistered spots created by the hot pan provide a subtle smoky flavor that contrasts beautifully with the rich creamy butter and pungent fresh garlic. The fresh cilantro leaves add a bright pop of color and a fresh grassy note that cuts through the richness of the butter. Whether you serve it alongside spicy curries, comforting stews, or use it as a wrap for grilled vegetables, this bread enhances every single food it touches with its remarkable taste and aroma.
Extra Tips For Better Taste
To take your homemade flatbread from good to absolute restaurant standard, try incorporating a few clever kitchen secrets. First, always make sure your garlic is freshly minced rather than taken from a commercial jar. Jarred garlic often carries a sour preserved taste that ruins the pure aromatic sweetness of freshly crushed cloves. Grating your fresh garlic on a microplane yields a fine paste that releases maximum garlic juice into your warm melted butter.
Another great trick involves adjusting your baking pan temperature carefully. The secret to getting huge puffy bubbles in your bread is a screaming hot pan. A lukewarm pan will cook your dough very slowly, drying out the moisture inside and resulting in a tough, hard flatbread instead of a soft pillowy one. Cast iron skillets work best because they retain high heat evenly across the surface. If you want an even softer dough, you can substitute half of the warm water with warm carbonated sparkling water, which adds extra tiny air pockets into the gluten structure.
For those who love creative flavor variations, feel free to customize your melted butter mixture. You can mix in a pinch of red chili flakes for a spicy kick, add grated parmesan cheese right after buttering for an Italian twist, or fold in fine chopped fresh mint leaves alongside cilantro for a cool herb aroma. If you have extra time, letting your kneaded dough rest in the refrigerator overnight allows the yeast to ferment slowly, developing a complex sourdough like flavor profile that tastes truly gourmet.
Final Thoughts
Cooking fresh garlic butter naan at home is an immensely satisfying cooking journey that anyone can easily accomplish right in their own kitchen. There is something profoundly special about transforming basic pantry items into a hot, pillowy, aromatic flatbread that brings instant happiness to everyone around your table. Once you experience the incredible taste, wonderful texture, and delightful garlic aroma of fresh flatbread hot off your own stove, you will never want to purchase stale packaged options again. Gather your simple ingredients, embrace the fun process of kneading soft dough, and enjoy serving this delicious staple to your family and friends today.
Nutrition Details
Below is an estimated nutritional breakdown for this garlic butter naan recipe. Please keep in mind that these values are approximate estimates calculated per individual serving, assuming the entire batch yields eight individual flatbreads.
Nutrient CategoryAmount Per ServingPercent Daily Value
| Calories | 245 kcal | 12% |
| Total Fat | 8.5 grams | 11% |
| Saturated Fat | 4.2 grams | 21% |
| Trans Fat | 0.2 grams | 0% |
| Cholesterol | 18 milligrams | 6% |
| Sodium | 340 milligrams | 15% |
| Total Carbohydrates | 36 grams | 13% |
| Dietary Fiber | 1.5 grams | 5% |
| Total Sugars | 1.8 grams | 2% |
| Protein | 5.5 grams | 11% |
| Calcium | 45 milligrams | 4% |
| Iron | 2.1 milligrams | 12% |
| Potassium | 85 milligrams | 2% |
Disclaimer
This recipe, dietary information, and health tips provided in this article are meant strictly for general educational and informational purposes. Every individual body responds differently to foods, carbohydrates, dairy products, and fats based on unique metabolism, activity levels, and underlying medical conditions. Nutritional values provided in the table above are general estimates that may fluctuate based on specific ingredient brands, exact measurement variations, and individual portion sizes. If you have specific dietary restrictions, gluten sensitivities, lactose intolerance, or health conditions, please consult with a qualified doctor or registered dietitian before making significant changes to your regular meal plan.