Making ice cream at home usually sounds like a very long and complicated project that needs special tools. Many people think that to get a scoop of soft and creamy ice cream, you must buy a heavy ice cream maker or spend hours stirring a mixture in the freezer. However, this simple recipe changes everything you know about homemade frozen treats. By using just a few basic ingredients that you can buy at any local grocery store, you can create a bowl of rich ice cream right in your own kitchen without any special machinery at all. The entire process takes only a few minutes of active preparation before you place it into your freezer to set. You do not need to worry about ice crystals forming or about constantly checking on your dessert every thirty minutes. It is a completely hassle free way to bring the classic ice cream shop experience straight to your family dinner table without any extra stress or complicated steps.
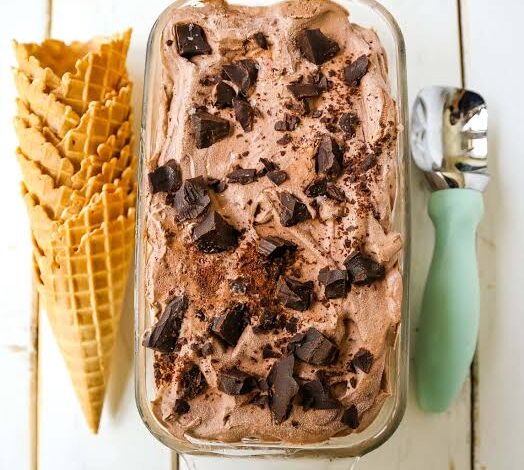
People absolutely love this simple frozen dessert because the overall texture and rich flavor are just as good as high end store bought brands. When you take your very first bite, you will notice how smooth and velvety the cream base feels, which is perfectly balanced by the crunch of real chocolate pieces. Most commercial ice creams are pumped with a lot of extra air and artificial preservatives to keep them soft on store shelves for months, which often waters down the true flavor. In contrast, this easy homemade version relies on natural fat from fresh heavy whipping cream and the rich sweetness of sweetened condensed milk. These two main ingredients work together in complete harmony to create a dense and silky scoop that melts slowly on your tongue. Kids and adults alike quickly fall in love with the combination of sweet vanilla cream and deep cocoa chunks, making it an instant favorite for anyone who gets a chance to try it.
There are so many wonderful moments and emotional reasons to make this delicious treat for your loved ones. Summer afternoons are obvious times when everyone is looking for a cold and refreshing snack to beat the extreme heat outside. However, this rich dessert is also perfect for movie nights with family, cozy weekend celebrations, or late night cravings when you want a high quality sweet treat without leaving your house. Making this treat can also bring a lot of happiness and satisfaction because cooking from scratch gives you full control over every single item that goes into your food. For people who care about their daily food choices, making dessert at home allows you to pick dark chocolate with higher antioxidants or reduce unnecessary additives that are commonly found in processed options. It is a wonderful feeling to open your freezer and find a tub of fresh ice cream that you prepared with your own hands using real and honest ingredients.
Learning how to prepare your own cold treats at home is also a fantastic way to bring your family together in the kitchen. Children especially love helping out with this recipe because there are no dangerous hot stoves or complicated sharp tools involved in the mixing process. They can easily help with whipping the fresh cream, pouring in the sweet milk, or tossing in massive handfuls of broken chocolate pieces. The excitement of checking the freezer after a few hours to see the liquid cream transform into a solid and scoopable dessert creates lasting memories for young kids. Food has a unique power to bring comfort and joy into our everyday lives, and serving a cold bowl of sweet cream topped with dark chocolate chunks is one of the easiest ways to spread happiness among your friends and family members. Once you see how effortless this method is, you will likely never want to buy expensive tub options from the supermarket again.
Ingredients You Will Need
To make this amazing frozen treat, you only need five basic ingredients that are very easy to find. Make sure your liquid ingredients are completely cold before you begin mixing them together.
-
2 cups of heavy whipping cream, kept very cold in the refrigerator
-
1 can of sweetened condensed milk, which is about 14 ounces or 396 grams
-
1 tablespoon of pure vanilla extract for a rich aroma
-
1 cup of dark chocolate chunks or roughly chopped chocolate bars
-
1 pinch of fine sea salt to balance the overall sweetness
Step by Step Method
-
Place your mixing bowl and metal beaters into the refrigerator or freezer for about fifteen minutes before starting. Keeping your tools super cold helps the cream whip up faster and holds a much better volume.
-
Take your cold heavy whipping cream out of the fridge and pour the full two cups into your chilled mixing bowl.
-
Use an electric hand mixer or a stand mixer to whip the heavy cream on medium speed. Keep whipping for a few minutes until stiff peaks form, which means the cream holds its shape firmly when you lift the beaters up.
-
In a separate medium bowl, open your can of sweetened condensed milk and pour it all out. Add the pure vanilla extract and the small pinch of fine sea salt directly into the milk, then stir well with a spoon until completely smooth.
-
Take a large spoonful of the whipped cream and gently mix it into the sweet milk mixture to lighten the texture up a bit.
-
Slowly pour the sweet milk mixture into the large bowl containing the rest of the whipped cream.
-
Use a rubber spatula to fold the two mixtures together very gently. Move your spatula down through the middle, across the bottom of the bowl, and up the sides. Do not mix fast or stir roughly, as you want to keep all the air inside the whipped cream.
-
Once the mixture looks smooth and combined, gently throw in your cup of chocolate chunks. Keep a small handful of chunks to the side so you can scatter them over the very top later.
-
Fold the chocolate pieces gently into the cream until they are spread out evenly throughout the whole bowl.
-
Pour the smooth liquid ice cream base into a freezer safe container, such as a standard metal loaf pan or an airtight plastic tub.
-
Smooth the top surface gently with your spatula and scatter the remaining chocolate chunks over the top so it looks beautiful.
-
Cover the container tightly with plastic wrap or a secure lid to prevent ice crystals or freezer odors from getting inside.
-
Place the container into the coldest part of your freezer and leave it alone for at least six hours, or preferably overnight, until it is completely firm and ready to serve.
Why This Recipe Is Special
This special recipe is a total game changer for home cooks because it removes all the complicated technical steps usually linked with making homemade frozen treats. Traditional ice cream relies on making a hot egg custard base over a stove, chilling it for hours, and then running it through a noisy machine that churns for a long time. This easy method skips every single one of those long steps while still delivering a texture that is super creamy and free from unwanted ice crystals. The secret lies in the heavy whipping cream, which holds thousands of tiny air bubbles, and the sweetened condensed milk, which prevents the water content from freezing into hard ice blocks.
From a wellness perspective, making your own frozen treats at home gives you complete freedom over the quality of your food. Supermarket brands often contain high fructose corn syrup, artificial food dyes, chemical stabilizers, and low quality vegetable oils that are not ideal for a balanced diet. When you make this recipe, you know every single ingredient that goes into your body. You can select organic pasture raised cream and high percentage dark chocolate that contains helpful antioxidants for your heart. Dark chocolate is well known for boosting your overall mood and supplying essential minerals like magnesium, making this treat both satisfying and somewhat nourishing when enjoyed in moderation.
The taste profile of this dessert is also far superior to standard mass produced options. Because the cream is whipped fresh, it leaves a clean and rich feeling on your palette without any greasy aftertaste. The contrast between the soft vanilla cream and the solid crunch of real chocolate chunks provides a super fun sensory experience with every single bite. It feels like a high end artisan product that you would purchase at a specialty boutique shop, yet it costs a fraction of the price and requires minimal effort to prepare right in your kitchen.
Extra Tips for Better Taste
To take your homemade creation to an even higher level of quality, you can try several creative adjustments and simple kitchen tricks. First, always choose a high quality bar of chocolate instead of standard baking chips. Chocolate chips often contain additives that help them hold their shape under high heat, which makes them a bit harder to melt in your mouth when frozen. Chop up a bar of dark or semi sweet chocolate with a serrated knife so you get a mix of large crunchy blocks and fine chocolate dust that swirls through the white cream.
Another fantastic idea is to toast the chocolate pieces slightly or use a pinch of flaky sea salt on top of the finished pan right before freezing. A tiny sprinkle of sea salt highlights the deep cocoa flavors and cuts through the richness of the sweet milk, giving you a wonderful sweet and salty balance. You can also infuse the liquid cream with extra natural flavors before whipping it. Adding a teaspoon of instant espresso powder to the sweet milk base does not make the ice cream taste like heavy coffee, but it significantly deepens the rich flavor of the dark chocolate chunks.
If you enjoy different textures in your dessert, feel free to fold in additional mix-ins alongside your chocolate pieces. Roasted almonds, chopped pecans, or crushed walnuts add a wonderful nuttiness that pairs brilliantly with vanilla and cocoa. You could also swirl in a few spoonfuls of warm peanut butter, fresh raspberry puree, or rich salted caramel right before you put the container into the freezer. Just drop small dollops on top of the cream and use a butter knife to create pretty swirls through the mixture for an amazing visual look and extra flavor in every scoop.
Final Thoughts
Creating delicious and high quality frozen treats at home does not have to be a difficult task reserved only for expert chefs or people with expensive equipment. This super simple method proves that with basic ingredients and a little bit of patience, anyone can make a world class dessert in their own kitchen. The wonderful combination of velvety vanilla cream and rich dark chocolate chunks is sure to bring bright smiles to everyone at your table. Give this effortless recipe a try today, share it with the people you love, and enjoy the pure delight of fresh homemade ice cream whenever a sweet craving strikes.
Nutrition Details
Here is an estimated breakdown of the nutritional content for one standard serving of this rich homemade treat. The recipe naturally yields about eight generous scoops or individual servings in total.
| Nutritional Component | Amount Per Serving | Daily Value Percentage |
| Serving Size | 1 Scoop (1/8th of batch) | Not Applicable |
| Total Calories | 380 Calories | 19 Percent |
| Total Fat | 24 Grams | 31 Percent |
| Saturated Fat | 15 Grams | 75 Percent |
| Trans Fat | 0.5 Grams | 0 Percent |
| Cholesterol | 70 Milligrams | 23 Percent |
| Sodium | 85 Milligrams | 4 Percent |
| Total Carbohydrates | 36 Grams | 13 Percent |
| Dietary Fiber | 1.5 Grams | 5 Percent |
| Total Sugars | 32 Grams | 64 Percent |
| Protein | 5 Grams | 10 Percent |
| Calcium | 140 Milligrams | 11 Percent |
| Iron | 1.2 Milligrams | 7 Percent |
Disclaimer
Please keep in mind that nutritional needs and dietary reactions vary from person to person. The health information and nutritional estimates provided in this article are for general educational purposes only and should not replace professional medical advice. Individuals with lactose intolerance, dairy allergies, diabetes, or specific dietary restrictions should consult with a qualified healthcare provider or certified nutritionist before adding new high calorie treats to their regular daily meal plan. The final nutritional values of your dish may also change depending on the exact brands and types of ingredients you choose to use in your home kitchen.