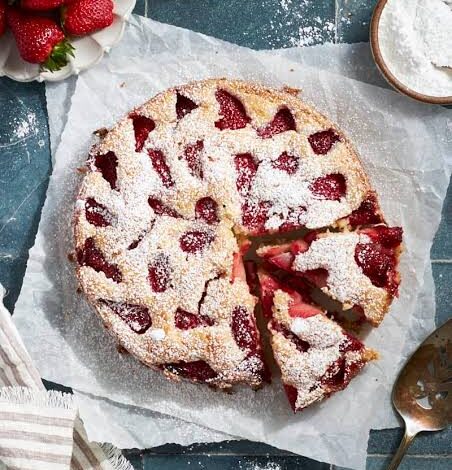
Sourdough discard strawberry cake is one of the most comforting and delightful baked treats you can create right in your own home kitchen. This amazing recipe combines the gentle tang of leftover sourdough starter with the bright sweetness of ripe fresh strawberries to make something truly unforgettable. When you maintain a sourdough culture, you often end up throwing away a portion of the mixture during daily feedings, which can feel very wasteful over time. Turning that leftover mixture into a soft fruit cake gives your kitchen waste a completely new and delicious purpose while creating a moist dessert that everyone in your home will love.
People fall in love with this sweet strawberry creation for so many wonderful reasons, especially because it balances complex flavors in a way that regular cakes simply cannot match. The subtle sour depth from the starter cuts through the rich sugar, meaning every slice tastes well balanced and never overly sweet or heavy on your stomach. The fresh strawberries soften as they bake in the hot oven, bursting into tiny pockets of warm jam that keep the tender interior crumb incredibly soft for several days. It is a fantastic rustic treat that looks like it came from a high end neighborhood bakery while requiring minimal effort from your end.
There are countless perfect moments throughout the week to prepare this comforting homemade fruit cake for your family or close friends. You can bake it during a quiet weekend morning to enjoy alongside a warm cup of coffee, or serve it as a light afternoon snack when you need a gentle pick me up. It is also an excellent option for health conscious individuals who want to enjoy a sweet dessert without feeling overly heavy afterward. The natural fermentation process from your sourdough starter helps break down difficult grains, making the final baked good much easier on your digestive system compared to standard store bought options.
Sharing this lovely homemade loaf with the people you care about brings a deep sense of emotional warmth and cozy satisfaction to any ordinary afternoon. Taking something that usually gets discarded into the trash bin and turning it into a beautiful golden dessert feels like a small magical victory for any home cook. The uplifting aroma of sweet vanilla, fresh melting berries, and warm buttery dough filling up your house creates an instant feeling of peace and comfort. Whether you are celebrating a special occasion or simply trying to clear out extra ingredients from your pantry, this reliable dish will quickly become a cherished favorite in your regular kitchen routine.
Ingredients You Will Need
To make this delicious sourdough discard strawberry cake, gather the following ingredients with their exact measurements ready on your kitchen counter.
-
Unsalted butter, softened to room temperature: 115 grams or 1 half cup
-
White granulated sugar: 200 grams or 1 cup
-
Large whole eggs, kept at room temperature: 2 pieces
-
Sourdough starter discard, unfed and at room temperature: 120 grams or 1 half cup
-
Pure vanilla extract: 5 milliliters or 1 teaspoon
-
All purpose flour: 240 grams or 2 cups
-
Baking powder: 5 grams or 1 teaspoon
-
Baking soda: 2 grams or 1 half teaspoon
-
Fine sea salt: 3 grams or 1 half teaspoon
-
Whole milk or plain yogurt: 120 milliliters or 1 half cup
-
Fresh strawberries, washed, hulled, and diced: 300 grams or 2 cups
-
Extra all purpose flour for coating the berries: 15 grams or 1 tablespoon
-
Coarse sparkling sugar for topping: 15 grams or 1 tablespoon
Step by Step Method
Follow these easy instructions step by step to bake your fresh loaf to absolute perfection.
First, prepare your work area by setting your oven temperature to 175 degrees Celsius or 350 degrees Fahrenheit. Allow the oven to heat up completely while you assemble your ingredients. Line a standard loaf pan or an eight inch round baking dish with parchment paper, leaving a slight overhang on the sides so you can lift the cake out easily later. Spray the paper lightly with nonstick cooking spray to guarantee that nothing sticks to the sides.
Second, take your fresh strawberries and wash them under cold running water. Pat them completely dry using clean paper towels because extra surface moisture can make your batter soggy. Chop the strawberries into small, even bite sized pieces. Place the chopped fruit into a small bowl, add one tablespoon of all purpose flour, and toss gently until every berry piece is lightly coated. Coating the fruit in flour stops the pieces from sinking down to the bottom of the pan while baking.
Third, grab a large mixing bowl and add your softened unsalted butter along with the white granulated sugar. Using an electric hand mixer or a strong manual whisk, beat the butter and sugar together on medium speed for about three to four minutes. The mixture should turn pale in color and look light and fluffy. This step incorporates small air bubbles into the fat, which helps your cake rise evenly and achieve a light crumb structure.
Fourth, add the room temperature eggs into the creamed butter mixture one at a time. Beat well after adding each egg so the mixture stays smooth and fully emulsified. Once the eggs are fully mixed in, pour in your unfed sourdough discard and the pure vanilla extract. Whisk gently until the liquid components are completely combined and smooth. Do not worry if the mixture looks slightly curdled at this point, as adding the dry ingredients will bring everything back together nicely.
Fifth, take a separate medium sized bowl and combine the remaining dry ingredients. Measure out your all purpose flour, baking powder, baking soda, and fine sea salt into the bowl. Use a dry whisk to mix these dry items together for roughly thirty seconds. Mixing the leavening agents into the flour beforehand ensures that the baking powder and baking soda are evenly distributed throughout your final cake batter, preventing strange hollow air pockets or uneven rising.
Sixth, begin combining your dry and wet ingredients using a gentle alternating method. Add about one third of your flour mixture into the large bowl with the wet ingredients, stirring gently with a silicone spatula just until the white flour spots disappear. Next, pour in half of the whole milk or plain yogurt and stir again. Repeat this process by adding another third of the flour, the rest of the milk, and finishing with the final portion of flour. Be very careful not to overmix the batter, as mixing too much creates tough gluten strands that make the cake dense rather than fluffy.
Seventh, gently fold your flour coated strawberries into the thick batter using your silicone spatula. Use broad, sweeping motions from the bottom of the bowl upward to distribute the fruit evenly without crushing the soft berry pieces or releasing too much juice into the batter. The resulting batter should be quite thick, rich, and full of bright red strawberry specks.
Eighth, scrape the prepared batter into your parchment lined baking pan using your spatula. Smooth out the top surface of the batter so it forms an even layer from corner to corner. Sprinkle the coarse sparkling sugar evenly across the top of the unbaked cake. This optional step gives the top crust an amazing crunchy texture and a pretty, shiny appearance once it comes out of the oven.
Ninth, place the pan onto the center rack of your preheated oven. Bake at 175 degrees Celsius or 350 degrees Fahrenheit for approximately fifty to sixty minutes. The exact baking time can vary depending on your specific oven and the moisture level of your berries. Start checking the progress around the forty five minute mark.
Tenth, test for doneness by inserting a long wooden toothpick or skewer directly into the thickest center part of the cake. The cake is fully done when the toothpick comes out clean or with just a few moist crumbs attached. If you see wet batter on the stick, leave the cake in the oven for another five to eight minutes and check again. If the top crust begins to brown too quickly before the center is cooked through, lay a loose piece of aluminum foil over the top to protect it.
Eleventh, once fully baked, carefully remove the pan from the oven using thick oven mitts. Set the baking pan on a wire cooling rack and let the cake rest untouched inside the pan for about twenty minutes. This cooling period lets the delicate hot crumb firm up so the cake does not fall apart when you move it.
Twelfth, use the parchment paper handles to lift the cake out of the baking pan and transfer it directly onto the wire cooling rack. Allow the cake to cool down to room temperature for at least one hour before slicing. Slicing too early while the cake is still hot can cause the warm crumb to turn gummy. Once cooled, slice into thick pieces and serve to your family.
Why This Recipe Is Special
This particular sourdough discard strawberry cake stands out from typical dessert recipes because of its wonderful depth of flavor, excellent texture, and smart use of simple kitchen staples. The combination of sweet fruit and fermented starter produces a rich taste profile that is both sophisticated and deeply comforting.
From a practical perspective, this recipe helps reduce food waste in your household. Every time you feed your active sourdough starter, you are left with a portion of discard that often goes straight into the trash. Using that discard in sweet baking projects gives you a productive way to save money on ingredients while creating high quality food for your home.
Additionally, using fermented sourdough discard offers subtle digestive advantages. The natural wild yeasts and lactic acid bacteria present in the starter have already started breaking down the starches and proteins in the flour during its long resting period. This mild breakdown process makes the finished cake easier to digest for many people compared to treats made purely with unfermented flour.
The texture of this cake is another reason why it is so remarkable. The acidity in the sourdough discard works alongside the baking soda to create a delicate, tender crumb that stays amazingly moist for days. While ordinary sponge cakes often dry out quickly after baking, the extra moisture from both the fermented starter and the fresh strawberries keeps this cake soft and delicious even on the third or fourth day after baking.
It is also an incredibly versatile recipe that accommodates busy schedules. You do not need to wait for your sourdough starter to peak or bubble up like you would when baking a loaf of traditional bread. You can use cold discard straight out of your refrigerator, making this a quick and low stress project that you can pull together whenever you have a free hour in your kitchen.
Extra Tips for Better Taste
To take your strawberry sourdough cake to an even higher level of quality, consider trying a few simple creative variations and baking techniques.
-
Use fresh berries whenever possible because frozen strawberries release a large amount of extra liquid during baking, which can make the center of your cake heavy or soggy. If you must use frozen strawberries, do not thaw them beforehand; toss them in flour while still frozen and add a few extra minutes to your total baking time.
-
Bring all cold ingredients to room temperature before starting the recipe. Warm eggs, room temperature butter, and room temperature milk combine together much smoother than cold ingredients, preventing the batter from breaking or separating during the creaming stage.
-
Add a small touch of citrus zest to boost the berry flavor. Grating the fresh outer peel of one lemon or orange directly into the sugar before creaming it with the butter releases natural aromatic oils that complement the sweet strawberries perfectly.
-
If you do not have coarse sparkling sugar for the top crust, you can make a simple sweet glaze instead. Whisk together one cup of powdered sugar with two tablespoons of fresh lemon juice or milk until smooth, then drizzle it over the top of the completely cooled cake before slicing.
-
Store any leftover cake proper to preserve its wonderful texture. Keep the cake wrapped tightly in plastic wrap or placed inside an airtight container at room temperature for up to three days. If you live in a very warm or humid environment, keep the container in the refrigerator to prevent the fresh fruit from spoiling, and warm each slice slightly in the microwave before eating.
Final Thoughts
Baking a homemade sourdough discard strawberry cake is a simple and rewarding way to bring joy to your kitchen while making good use of your extra sourdough starter. The combination of sweet juicy fruit, tender fermented crumb, and a warm vanilla flavor makes this recipe an absolute winner for bakers of any experience level. Gathering basic pantry ingredients and turning them into a beautiful fruit filled dessert gives you an easy way to treat yourself and your loved ones to a wholesome homemade snack. Give this delightful recipe a try during your next baking session and enjoy every single delicious slice.
Nutrition Details
Here is an estimated nutrition breakdown for one slice of sourdough discard strawberry cake, assuming the total loaf is sliced into ten equal portions.
| Nutrient Name | Amount Per Serving | Daily Value Percentage |
| Calories | 260 kcal | 13 percent |
| Total Fat | 10 grams | 13 percent |
| Saturated Fat | 6 grams | 30 percent |
| Trans Fat | 0 grams | 0 percent |
| Cholesterol | 45 milligrams | 15 percent |
| Sodium | 180 milligrams | 8 percent |
| Total Carbohydrates | 38 grams | 14 percent |
| Dietary Fiber | 2 grams | 7 percent |
| Total Sugars | 20 grams | 40 percent |
| Protein | 4 grams | 8 percent |
| Vitamin D | 0.2 micrograms | 1 percent |
| Calcium | 40 milligrams | 4 percent |
| Iron | 1.2 milligrams | 7 percent |
| Potassium | 110 milligrams | 2 percent |
Disclaimer
This article and its nutritional information are provided for general educational and informational purposes only. Everyone has a unique body, different health conditions, and specific dietary needs, which means individual results and nutritional requirements can vary widely from person to person. The nutritional values listed in the table above are rough estimates calculated using standard ingredient databases and may change based on the exact brands, measurements, or substitutions you use in your own kitchen. If you have specific food allergies, severe gluten sensitivities, or medical conditions that require special dietary management, please consult with a qualified doctor or a registered dietitian before making changes to your regular eating habits.