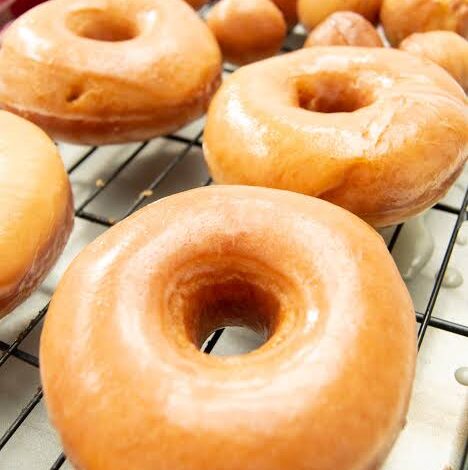
Welcome to the wonderful world of baking where warm and sweet treats bring pure joy right into your kitchen. If you have ever wanted to make bakery style snacks that melt in your mouth then this ultimate homemade glazed yeast donuts recipe is exactly what you need. Making bread based pastries at home might sound hard or messy at first glance but it is actually a very relaxing and rewarding adventure. You get to mix simple pantry staples into a soft dough and watch it grow in size like magic. The sweet aroma of rising yeast and warm vanilla will fill every corner of your home making your living space feel extra cozy and inviting. This guide is written in very simple words so that absolute beginners can follow along without feeling stressed or confused. You do not need any fancy cooking school training to pull this off successfully today. All you need is a little bit of patience and a love for delicious homemade food that you can share with your favorite people. Let us dive deep into the wonderful art of frying up golden brown rings of pure happiness that will blow your mind.
People absolutely love these homemade treats because they taste so much better than anything you can buy in a box or at a drive thru window. Store bought versions often sit on shelves for hours or days losing their fresh texture and wonderful moisture. When you make them yourself right in your own kitchen you get to enjoy them while they are still warm and wonderfully soft on the inside. The secret lies in using yeast which gives the dough an airy and fluffy texture that commercial cake donuts simply cannot match. Every single bite offers a pillow like softness combined with a sweet and shiny sugar coating that cracks slightly when you press your teeth into it. Families adore this weekend project because it turns a regular morning into a special celebration without spending a fortune at a fancy bakery. Children especially get super excited watching the plain dough transform into puffy golden circles that are ready for sweet decoration. It is a timeless classic dessert that never goes out of style and always brings huge smiles to the faces of everyone around the dining table.
You should consider making this delightful recipe whenever you want to treat yourself or your loved ones after a long and tiring week. Maybe it is a rainy Sunday morning and you want to stay indoors while sipping hot coffee or tea with a sweet companion. Perhaps you are hosting a birthday brunch or a casual family gathering and you want to impress your guests with your baking skills. While these sweet treats are certainly rich and indulgent you can still enjoy them as part of a balanced lifestyle by eating just one or two portions. Baking from scratch also lets you control every single ingredient that goes into your food ensuring there are no hidden chemicals or weird preservatives. The simple act of kneading dough and waiting for it to rise can also act as a wonderful form of therapy to lower your daily stress levels. There is a deep sense of emotional comfort that comes from sharing freshly baked goods with friends and neighbors who appreciate your hard work and care. Whenever life feels a little too busy or stressful taking a couple of hours to bake sweet yeast rings can ground you and bring pure joy back into your routine.
This comprehensive guide will walk you through every single phase of the cooking process so you never feel lost or unsure about what to do next. We will cover how to activate your yeast properly how to knead the dough until it is smooth and elastic and how to fry them to golden perfection. You will also learn how to mix up a simple glossy sugar glaze that hardens just enough to give you that classic bakery experience at home. We have designed this article specifically for everyday cooks who want foolproof results on their very first try without any complicated kitchen jargon or difficult techniques. By the time you finish reading through these steps you will feel like a true professional pastry chef ready to conquer any baking challenge. So roll up your sleeves wash your hands thoroughly and get ready to create the most delicious sweet treat your kitchen has ever seen. Your family and friends are going to be so impressed with your amazing new baking talent once they taste these incredible homemade creations.
Ingredients You Will Need
To make these wonderful homemade glazed yeast donuts you will need to gather a few basic baking ingredients that you probably already have in your pantry. Here is the complete list of everything required to create this masterpiece from scratch.
-
Warm milk: 1 cup (make sure it is warm like bathwater and not too hot or it will kill the yeast)
-
Active dry yeast: 2 and 1 quarter teaspoons (this is usually one standard packet)
-
Granulated white sugar: 1 quarter cup for the dough plus 1 extra tablespoon to help feed the yeast
-
Large eggs: 2 whole eggs at room temperature so they mix easily into the dough
-
Unsalted butter: 1 third cup melted and slightly cooled so it does not cook the eggs
-
Salt: 1 teaspoon to balance out the sweetness of the pastry
-
All purpose flour: 3 and half to 4 cups total (measured carefully)
-
Vegetable oil: For deep frying the dough rings until they turn golden brown
-
Confectioners powdered sugar: 2 cups for making the sweet glaze
-
Milk or water: 3 to 4 tablespoons for thinning out the glaze
-
Vanilla extract: 1 teaspoon to add a lovely warm flavor to both the dough and the glaze
Step by Step Method
Follow these detailed steps very carefully to ensure your homemade glazed yeast donuts turn out light, fluffy, and completely delicious every single time you make them.
Preparing the Yeast Mixture
First of all you need to wake up your yeast so it can help your dough grow big and puffy. Take a large mixing bowl and pour in your warm milk along with your one tablespoon of sugar and your active dry yeast packet. Stir everything gently with a spoon and let the mixture sit undisturbed on your kitchen counter for about five to ten minutes. After a few minutes you should see a thick layer of foam or bubbles forming on top of the liquid. This bubbly foam proves that your yeast is alive and active and ready to do its important job of making your dough rise. If the mixture does not get foamy at all it means your water was too hot or your yeast is too old and you will need to start over with a fresh packet.
Mixing the Dough
Once your yeast is nice and bubbly add in the remaining granulated sugar, the melted butter, the salt, and your two eggs. Whisk these wet ingredients together thoroughly using a hand whisk or a fork until they are fully combined and smooth. Now slowly start adding in your all purpose flour one cup at a time while stirring with a wooden spoon or a rubber spatula. As the flour absorbs the liquid the mixture will turn into a thick and sticky dough that starts pulling away from the sides of the bowl. Turn the sticky dough out onto a clean and lightly floured kitchen counter so you can begin the fun process of kneading.
Kneading and Rising
Kneading is very important because it develops the gluten which gives the treats their wonderful chewy and soft texture. Push the dough away with the heels of your hands, fold it back over itself, and press it down again in a steady rhythm. Keep kneading for about eight to ten minutes until the dough feels smooth, elastic, and slightly tacky but no longer sticks to your fingers. Form the kneaded dough into a nice round ball and place it inside a large bowl that has been lightly coated with a bit of vegetable oil. Cover the top of the bowl with a clean kitchen towel or plastic wrap to keep out any drafts. Place the bowl in a warm and dark spot in your kitchen and let the dough rest and rise for about one and a half to two hours. You will know it is ready when it has doubled nicely in size.
Shaping the Donuts
Punch the risen dough down gently with your fist to release any trapped air bubbles inside. Transfer the dough back to your floured countertop and roll it out gently with a rolling pin until it is about half an inch thick. Do not roll it too thin or your finished treats will turn out flat instead of plump and fluffy. Cut out your donut shapes using a large round cookie cutter or the rim of a drinking glass. To make the center holes you can use a much smaller round cutter or the cap of a soda bottle. Gather all the leftover dough scraps, press them back together, roll them out again, and cut more shapes until you have used all the dough. Place your cut shapes onto a baking sheet lined with parchment paper, cover them loosely with a towel, and let them rest for another thirty minutes so they puff up even more.
Frying to Perfection
Pour enough vegetable oil into a deep heavy bottomed pot or Dutch oven so that it is about two inches deep. Heat the oil over medium heat until a kitchen thermometer reads three hundred fifty degrees Fahrenheit or until a small piece of dough sizzles immediately. Carefully pick up your shaped dough pieces one by one and drop them into the hot oil without overcrowding the pot. Fry them for about one to two minutes on the first side until they turn a gorgeous golden brown color. Use a slotted spoon or metal tongs to gently flip them over and cook the other side for another minute. Once they are evenly golden and cooked through, lift them out of the oil and let them drain on a wire rack lined with paper towels.
Glazing the Treats
While your freshly fried snacks are cooling down slightly, prepare your simple sugar glaze in a wide shallow bowl. Whisk together the powdered sugar, vanilla extract, and three tablespoons of milk until the mixture is completely smooth and glossy. If the glaze feels too thick you can add a tiny splash more milk, and if it feels too runny add a bit more powdered sugar. Dip each warm donut into the sweet glaze one at a time, making sure to coat the top completely. Let any excess glaze drip off back into the bowl before placing the glazed treat onto a wire rack to set. Enjoy them immediately while they are still warm and fresh for the absolute best taste experience possible.
Why This Recipe Is Special
This particular recipe stands out from many others because it relies on simple techniques that deliver professional bakery quality right inside your residential kitchen. One of the main benefits is the incredible texture which balances a crispy exterior crust with an unbelievably light and airy interior crumb. Unlike traditional cake versions that can sometimes turn out dense or dry, yeast raised varieties offer that classic melt in your mouth sensation. From a health perspective, making these at home allows you to avoid artificial trans fats and mystery chemicals commonly found in ultra processed commercial snacks. You get pure ingredients like real milk, fresh eggs, and quality butter which offer wholesome nutrition when consumed in moderation. Furthermore, the psychological and emotional benefits of baking from scratch are huge because it encourages mindfulness, creativity, and sharing within families. There is also unmatched satisfaction in mastering a traditional cooking technique that has brought joy to people across generations. You can truly taste the love and effort in every single bite making this a standout recipe you will want to repeat often.
Extra Tips for Better Taste
If you want to take your homemade creations to the next level, try out some of these creative improvement tips from experienced home bakers. First, make sure your oil temperature remains stable throughout the frying process because oil that is too hot will burn the outside while leaving the inside raw. If your oil is too cold, the dough will absorb too much grease and turn out heavy and soggy. Second, you can add a tiny pinch of ground nutmeg or cinnamon into your flour mixture if you want a subtle hint of warm spice flavor. Third, feel free to divide your glaze and add natural food coloring or fruit juice to create vibrant colors for birthday parties or special holiday events. Fourth, if you prefer a different finish, you can toss the warm fried rings in a bowl of cinnamon sugar instead of using the traditional wet glaze. Finally, always serve these treats fresh on the same day they are made because yeast pastries taste best when they have not been stored for too long.
Final Thoughts
Baking your own sweet treats from scratch is truly one of the most rewarding culinary projects you can ever take on at home. Even though the process requires a little bit of time and patience, seeing those golden rings puff up and hearing compliments from your family makes every single minute worthwhile. Do not worry if your very first batch does not look like it came straight out of a magazine display window because practice makes perfect. The most important part is the delicious taste and the happy memories you create while spending time in the kitchen. We hope this simple guide inspires you to put on your apron, heat up some oil, and create a batch of pure sweetness today. Happy baking to you and your loved ones as you enjoy this wonderful homemade culinary adventure together.
Nutrition Details
Here is a detailed breakdown of the nutritional values for this recipe, including a complete nutrition table and specific per serving calculations based on an average yield of twelve standard sized pastries.
Nutrition Table
| Nutrient Category | Amount Per Serving | Daily Value Percentage |
| Total Calories | 280 kcal | 14 percent |
| Total Fat | 12 grams | 18 percent |
| Saturated Fat | 4 grams | 20 percent |
| Cholesterol | 35 milligrams | 12 percent |
| Sodium | 180 milligrams | 8 percent |
| Total Carbohydrates | 38 grams | 13 percent |
| Dietary Fiber | 1 gram | 4 percent |
| Sugars | 18 grams | Not Established |
| Protein | 4 grams | 8 percent |
Per Serving Information
-
Serving Size: One medium sized glazed pastry (approximately seventy five grams)
-
Servings Per Recipe: Twelve individual portions
-
Preparation Time: Thirty minutes active work time plus two hours rising time
-
Cooking Time: Fifteen minutes total frying time
Disclaimer
Please keep in mind that nutritional information provided in this article is only an estimate and can vary based on the specific brand of ingredients you choose to use in your kitchen. Every single person has a unique body, different dietary needs, and distinct health goals, so results or physical reactions may change from person to person. If you have specific medical conditions, food allergies, or strict dietary restrictions, it is always best to consult with a qualified healthcare professional or registered dietitian before making major changes to your regular meal plan. Enjoy these sweet treats responsibly as part of a balanced and healthy lifestyle.