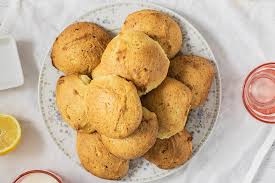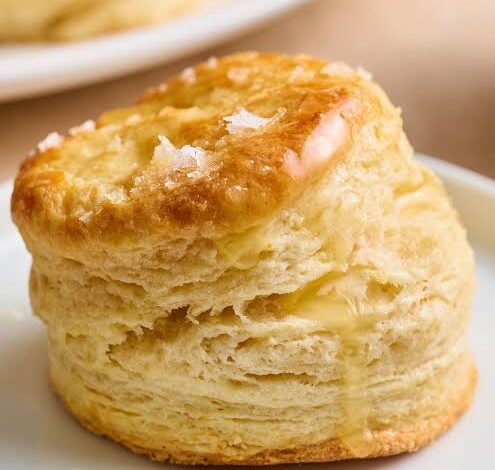
There is something truly magical about the aroma of fresh baking that fills a home on a quiet morning. This recipe for golden buttermilk biscuits is all about capturing that pure comfort and bringing it straight to your kitchen table. We are talking about biscuits that have a beautiful golden crust on the outside while remaining incredibly soft, airy, and flaky on the inside. Many people think that making bread or biscuits from scratch is a difficult task that requires years of professional baking experience. However, this recipe is designed to prove that anyone can create bakery quality treats with just a few basic pantry ingredients and some simple movements. It focuses on the traditional method of blending cold fat into flour to create dozens of wonderful layers that rise up high in the oven. By the time you finish reading this guide and trying it out for yourself, you will know exactly how to transform simple flour and butter into a magnificent treat.
People all over the world absolutely love these biscuits because they satisfy our deepest cravings for rich and comforting food. The secret behind this universal love lies in the perfect contrast of textures and flavors that you experience with every single bite. When you pull a fresh biscuit apart, you can actually see the distinct layers separating beautifully, releasing a cloud of warm steam. The taste is a wonderful balance between the rich creaminess of high quality butter and the subtle pleasant tanginess of real buttermilk. It is a versatile food that fits perfectly into any meal of the day, whether you want to slice it open and slather it with sweet strawberry jam or use it to soak up savory chicken gravy. This recipe does not rely on fancy tools or complicated tricks, which makes it a favorite for busy home cooks who want reliable and delicious results every single time. It brings a sense of pride because you are serving something real and wholesome that you made with your own hands.
You might wonder when is the best time to make these golden delights, and the truth is that they are perfect for almost any occasion you can imagine. They are the ultimate addition to a lazy weekend morning breakfast when you want to slow down and enjoy life with your family and friends. Making these biscuits is also a wonderful way to practice emotional self care, as the rhythmic process of measuring, mixing, and shaping the dough can be incredibly relaxing and therapeutic after a long week of work. From a taste perspective, you should make them whenever you want to elevate a simple weeknight soup or stew into a grand and hearty feast. Even if you are someone who watches your fitness closely, these homemade biscuits serve a wonderful purpose in a balanced lifestyle. They provide a comforting reward that is completely free from the strange chemical preservatives and artificial additives found in store bought options, allowing you to enjoy a mindful treat.
Baking these biscuits creates a wonderful bridge between traditional comfort food and modern home cooking where we care about what goes into our bodies. When you control the ingredients yourself, you can ensure that you are using the freshest flour, the purest butter, and genuine buttermilk packed with natural goodness. This recipe is a celebration of simple ingredients working together in perfect harmony to create something far greater than the sum of its parts. It encourages you to step away from fast food and processed snacks, inviting you to embrace the joyful experience of slow baking. As the biscuits bake to a beautiful golden brown color, your kitchen will fill with a scent that brings back fond memories of childhood and old family gatherings. It is a delicious reminder that the best things in life are often the simplest things, made with love and shared with the people who matter most to you.
Ingredients You Will Need
Before you begin your baking journey, it is important to gather all your ingredients and measure them out carefully. Having everything ready on your kitchen counter will make the process smooth and enjoyable. Here is exactly what you will need to create these beautiful biscuits:
-
Four cups of premium all purpose flour
-
Two tablespoons of baking powder
-
One teaspoon of baking soda
-
One and a half teaspoons of fine sea salt
-
One cup of unsalted butter which must be completely cold
-
One and a half cups of real whole milk buttermilk
-
Two tablespoons of melted butter for brushing on the tops
Step by Step Method
Preparing Your Kitchen and Tools
The very first step to successful biscuit baking is to make sure your environment and your tools are ready. Start by turning on your oven and setting the temperature to four hundred and twenty five degrees Fahrenheit. A hot oven is absolutely crucial because it causes the cold butter in the dough to melt rapidly, creating steam pockets that force the layers to rise high. Next, take a large baking sheet and line it with a piece of parchment paper to prevent any sticking. If you do not have parchment paper, you can lightly grease the baking sheet with a tiny amount of butter or oil. Take your unsalted butter out of the refrigerator, measure the one cup needed, and cut it into small cubes about the size of peas. Put these butter cubes back into the refrigerator or even the freezer for about ten minutes while you work on the dry ingredients. Keeping the butter cold is the ultimate secret to getting those beautiful flaky layers.
Mixing the Dry Ingredients
Now take a very large mixing bowl because you want plenty of room to move your hands without spilling. Sift your four cups of all purpose flour directly into the bowl to remove any large lumps and to introduce air into the flour. Add the two tablespoons of baking powder, the one teaspoon of baking soda, and the one and a half teaspoons of fine sea salt. Use a large wire whisk to stir these dry ingredients together for at least thirty seconds. You want to ensure that the baking powder and baking soda are distributed perfectly throughout the flour. If these leavening agents are not mixed well, your biscuits might rise unevenly or have spots that taste bitter. Take your time with this step to create a uniform dry mixture that is ready to welcome the cold fat.
Integrating the Cold Butter
Retrieve your cold butter cubes from the refrigerator and drop them directly into the flour mixture. Now you will use your fingertips or a specialized pastry blender to work the butter into the flour. If you are using your hands, gently rub the butter pieces between your thumbs and fingers, coating them in flour as you flatten them. You must work quickly during this stage so that the warmth from your hands does not start to melt the butter. The goal is not to make a smooth dough yet, but rather to create a mixture that looks like coarse crumbs with some pieces of butter still the size of small peas. These tiny pockets of intact butter are what will melt during baking to form the steam that pushes the dough apart into layers. If the mixture starts to feel warm or greasy at any point, place the whole bowl in the freezer for five minutes to chill down.
Adding the Liquid Gold
Create a small hollow space or a well in the center of your flour and butter mixture. Pour the one and a half cups of cold real buttermilk straight into that well. Use a large wooden spoon or a sturdy rubber spatula to gently stir the mixture starting from the center and working outward. You only want to stir until the flour is just moistened and a shaggy dough begins to form. It is vital that you do not overmix the dough at this point because overworking the flour activates the gluten, which will make your biscuits tough and chewy instead of light and fluffy. The dough should look a bit messy and loose, with some dry flour patches still visible at the bottom of the bowl. Trust the process, as the next step will bring everything together into a beautiful cohesive mass.
Turning and Folding the Dough
Dust a clean kitchen counter or a large cutting board with a generous amount of all purpose flour so the dough does not stick. Gently turn the shaggy dough out onto this floured surface, making sure to scrape all the bits from the bowl. Dust the top of the dough lightly with a bit more flour, and use your hands to gently pat it into a rough rectangle shape about one inch thick. Now you will use a brilliant technique called laminating to create dozens of flaky layers. Fold the right third of the dough over into the center, and then fold the left third over that, just like you are folding a letter to put into an envelope. Turn the dough ninety degrees, pat it down gently into a rectangle again, and repeat this folding process four more times. Each fold creates separate layers of butter and flour that will expand beautifully inside the oven.
Cutting the Biscuits
After your final fold, pat the dough down one last time until it is an even thickness of about three quarters of an inch to one inch. Take a round biscuit cutter that is about two and a half inches wide and dip the edges deep into some extra flour to prevent sticking. Press the cutter straight down into the dough with a firm movement, and pull it straight back up without twisting it. This is a very important detail because twisting the cutter will pinch the edges of the dough together, sealing them shut and preventing the biscuit from rising up high. Cut your biscuits as close to each other as possible to minimize waste. Gather any remaining scrap pieces of dough, pat them together gently one time, and cut out the final few biscuits. Place the shaped biscuits onto your prepared baking sheet, making sure their sides are just touching each other. When they touch, they actually help support each other as they rise, forcing them to grow upward rather than spreading out wide.
Baking to Perfection
Slide your baking sheet into the center rack of your preheated oven and close the door immediately to keep the high heat trapped inside. Let them bake undisturbed for about fifteen to eighteen minutes. Keep a close eye on them through the oven window during the last few minutes of baking. You are looking for the tops to turn a glorious, deep golden brown color and for the sides to look dry and beautifully layered. Once they reach this perfect state, carefully remove the baking sheet from the oven and place it on a heatproof surface. While the biscuits are still piping hot, take your two tablespoons of melted butter and use a pastry brush to coat the top of each biscuit generously. This extra touch adds a wonderful shine, softens the top crust slightly, and delivers an incredible boost of pure buttery flavor. Allow them to cool down for just five minutes before serving them warm.
Why This Recipe Is Special
This recipe stands out from ordinary baking methods for several reasons that make it incredibly special for both beginners and experienced cooks. First of all, it embraces simplicity by focusing on core kitchen techniques rather than relying on expensive machinery or rare specialty ingredients. You do not need a stand mixer or a food processor to achieve greatness here, as your own hands are the best tools for feeling the texture of the dough. This physical connection to the food makes the process deeply satisfying and teaches you how to read the dough by touch. It is a wonderful skill that builds real confidence in the kitchen, proving that traditional methods often yield the most spectacular results.
Another beautiful aspect of this recipe is its clean and honest nature when it comes to ingredients and health. When you purchase packaged biscuits from a local supermarket, you are often consuming hydrogenated oils, artificial flavors, and preservatives designed to extend shelf life for months. This homemade version uses pure butter which contains natural fats that your body can process easily, and real buttermilk which offers a dose of calcium and beneficial lactic acid. Because you are adding the salt yourself, you can control the sodium levels to suit your personal health goals. It is a wonderful way to enjoy comfort food with absolute peace of mind, knowing exactly what went into the food you are sharing with your loved ones.
Finally, the sheer culinary excellence of these biscuits makes them a standout addition to your recipe collection. The taste profile is sophisticated yet deeply familiar, offering a comforting warmth that appeals to people of all ages. The texture is engineered through the folding process to provide a light and airy structure that never feels heavy or dense in your stomach. They hold their shape perfectly when sliced, making them an excellent vehicle for breakfast sandwiches filled with eggs and bacon, or as a base for sweet desserts like strawberry shortcake. This reliability and versatility ensure that the recipe becomes a treasured tradition in your home, passed down through generations.
Extra Tips for Better Taste
To ensure that your biscuits turn out absolutely flawless every single time you make them, it is wonderful to know a few extra tips and creative improvements. One of the greatest tricks you can use is to grate your cold butter using a standard box grater instead of cutting it with a knife. If you freeze your stick of butter for about twenty minutes beforehand, it will grate into perfect little curls that mix into the flour effortlessly. This technique guarantees that the fat is distributed evenly throughout the dough without any risk of overworking it or melting it with the heat of your hands. It is a game changer for beginners who might be worried about their hand technique.
You can also experiment with adding creative flavors to the dry mixture before you pour in the buttermilk to create unique variations. For example, tossing in one cup of sharp white cheddar cheese and a tablespoon of chopped fresh chives creates an incredible savory biscuit that pairs perfectly with roasted meats. If you prefer a touch of sweetness, you can add a tablespoon of organic honey directly into the buttermilk before mixing. Another wonderful option is to sprinkle some coarse sea salt or cracked black pepper onto the buttered tops right after they come out of the oven to add an extra layer of texture and visual appeal.
When it comes to storing and reheating any leftovers, you can easily maintain that fresh from the oven quality with the right method. Keep the cooled biscuits in an airtight container at room temperature for up to three days. When you are ready to enjoy one, avoid the microwave as it can make the dough rubbery and tough. Instead, wrap the biscuit loosely in a piece of aluminum foil and place it in a toaster oven or a regular oven at three hundred and fifty degrees Fahrenheit for about five to eight minutes. This gentle heat will melt the internal butter again, restoring the flaky layers and making the crust beautifully crisp once more.
Final Thoughts
Baking a batch of these golden buttermilk biscuits is truly one of the most rewarding experiences you can have in your kitchen. It is a simple journey that starts with basic flour and ends with a beautiful plate of warm, comforting goodness that brings smiles to everyone around the table. Do not worry if your first few biscuits do not look perfectly round or completely symmetrical, because the rustic charm is part of what makes homemade food so beautiful. The more you practice the gentle folding technique and get used to working with the cold dough, the more confident you will become. Gather your ingredients, clear off your kitchen counter, and enjoy every single moment of creating this delicious treat from scratch.
Nutrition Details
Here is an approximate look at the nutritional breakdown for one single serving of these delicious homemade biscuits. This table is based on dividing the total batch into twelve equal portions using the standard ingredients listed above:
| Nutrient Type | Amount Per Serving |
| Calories | Three hundred and ten calories |
| Total Fat | Fifteen grams |
| Saturated Fat | Nine grams |
| Cholesterol | Forty milligrams |
| Sodium | Four hundred and eighty milligrams |
| Total Carbohydrates | Thirty eight grams |
| Dietary Fiber | One gram |
| Sugars | Two grams |
| Protein | Six grams |
| Calcium | Ten percent of daily value |
Disclaimer
Please keep in mind that everyone has a unique body with individual health requirements, dietary needs, and medical considerations. The nutritional information provided in this article is an estimate calculated using standard ingredient databases, and the actual values may change depending on the specific brands of butter, flour, and buttermilk that you choose to use in your kitchen. If you have specific health goals, medical conditions, or strict dietary restrictions, it is always a wise idea to consult with a professional healthcare provider or a registered dietitian. Enjoy your baking journey safely and mindfully by choosing ingredients that align perfectly with your personal wellness goals and physical needs.