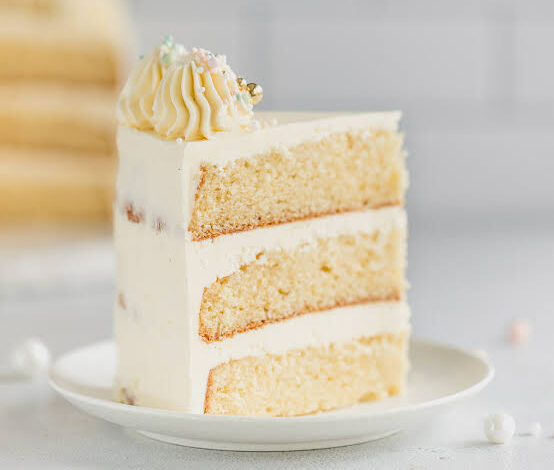
This magnificent vanilla layer cake recipe is all about creating the ultimate classic dessert completely from scratch right in your own home. If you think that baking a tall, beautiful bakery style cake is something only professional chefs can do, this friendly guide will change your mind forever. We are going to take simple, everyday baking items like flour, sugar, real cream butter, and fresh eggs and transform them into a spectacular dessert that stands high on a cake platter. The core of this recipe relies on a traditional mixing method that locks tiny air pockets into the batter, ensuring your cake layers rise up beautifully straight, soft, and uniform inside your hot baking pans. You will learn how to make two matching golden cake rounds that are incredibly moist and tender, meaning they will never taste dry or crumbly like standard boxed cake mixes from the supermarket shelf. This is a complete guide that will show you how to build a luxurious dessert with a silky sweet buttercream icing layer running right through the middle and coating the entire outside surface beautifully.
People all across the world absolutely adore a proper vanilla layer cake because it brings a massive feeling of warm nostalgia and pure comfort food happiness to any dinner table. While chocolate treats and fruit desserts are wonderful in their own ways, vanilla remains the absolute king of flavors because its sweet aroma appeals to every single age group from young kids to grandparents. There is an incredible visual joy in cutting through a thick layer of smooth white frosting to reveal the clean, golden yellow cake crumbs hidden inside. This specific recipe has earned a massive amount of love from home cooks because it uses real, wholesome pantry ingredients that you can actually pronounce instead of artificial chemical stabilizers or fake processed oils. It solves the classic problem of homemade cakes drying out by balancing the dairy fats and natural sugars in a smart way that keeps the bread fresh and soft for days. When you serve a tall slice of this homemade masterpiece to your guests, they can immediately taste the genuine care, love, and effort that went into building it from scratch.
You should definitely choose to bake this wonderful vanilla layer cake whenever your life enters a moment that calls for a true sense of celebration, family warmth, or emotional comfort. It is the absolute quintessential dessert choice for milestone family events such as a child’s birthday party, a romantic wedding anniversary, a beautiful baby shower, or a festive weekend holiday dinner. There is a deep emotional magic in presenting someone you care about with a tall, hand frosted cake that you created yourself, as it shows them they are worth far more than a quick trip to a commercial grocery store bakery. Even if you are someone who strictly tracks your daily fitness nutrients and follows a clean eating schedule, enjoying a decadent slice of real cake on a special evening acts as a beautiful mental reward that keeps your relationship with food healthy and balanced. Whenever you find yourself stuck inside on a rainy Sunday afternoon, turning on your kitchen oven to bake these golden rounds acts as a therapeutic escape that fills your entire living space with a heavenly sweet perfume.
Engaging in the creative process of building this beautiful layered dessert will bring an immense wave of pride, artistic expression, and newfound confidence to your daily cooking journey. You do not need to possess an expensive culinary school degree, master chef background, or fancy professional decorating tools to get this classic recipe right on your very first attempt today. The basic hand movements and mixing steps are written in plain, accessible English so that even an absolute beginner can follow along without feeling overwhelmed or confused by complex kitchen terms. As you watch the liquid pale yellow batter expand inside the hot oven heat into a gorgeous fluffy structure, you will feel a genuine thrill of creative accomplishment. This massive article will act as your personal, patient baking companion, guiding your hands through every single turn of the spoon and swipe of the frosting spatula so you can enjoy yourself completely. Let us begin this wonderful sweet adventure by looking closely at the clear list of ingredients you will need to gather from your local food store.
Ingredients You Will Need
-
All purpose flour: Three full cups of high quality white baking flour
-
Granulated white sugar: Two cups of clean white granulated sugar
-
Sweet cream butter: One cup of unsalted butter softened at room temperature
-
Whole fresh eggs: Four large eggs kept at room temperature
-
Whole dairy milk: One cup of full fat whole milk at room temperature
-
Pure vanilla extract: Three full teaspoons of liquid vanilla bean extract
-
Baking powder: One tablespoon of fresh double acting baking powder
-
Fine table salt: Half a teaspoon of salt to balance the intense sweetness
-
Powdered confectioners sugar: Four cups of sifted sugar for the sweet buttercream frosting
-
Extra sweet cream butter: One cup of unsalted butter softened for the frosting base
-
Heavy whipping cream: Three tablespoons of rich heavy cream for smoothing the icing
Step by Step Method
Start your baking journey by walking over to your kitchen wall oven and turning the temperature dial to preheat the appliance to three hundred and fifty degrees Fahrenheit. Take your two matching nine inch round metal cake baking pans and place them flat on your clean kitchen counter surface. Take a small piece of soft butter or a quick spray of cooking oil and coat the entire interior bottom and side walls of both metal pans thoroughly. Sprinkle a tablespoon of white flour into each greased pan, shake it around continuously until the metal is completely covered in a thin white layer, and tap the excess flour out into your sink.
Take a large clean glass mixing bowl and place a fine wire sifter right over the top rim of the bowl. Pour your three cups of all purpose flour, one tablespoon of baking powder, and half a teaspoon of fine table salt directly into the sifter. Tap the side of the sifter gently with your hand until all the dry powders pass through the mesh into the bowl, creating a very light, airy mixture without any lumps. Set this dry flour mixture aside on your counter for a few moments while you prepare the wet batter base in a separate container.
Place your one cup of softened sweet cream butter and your two cups of granulated white sugar into a second large mixing bowl or into the bowl of your electric stand mixer. Turn the mixer machine onto a medium high speed setting and let the paddles beat the butter and sugar together continuously for about four to five minutes. Watch the mixture closely as it changes from a yellow sandy texture into an incredibly light, fluffy, and pale white cream that looks like thick whipped frosting. This step is incredibly important because beating the butter traps tiny micro bubbles of air that will help your cake rise up soft and fluffy inside the oven heat.
Turn your mixer machine down to a low speed setting so nothing splashes out of the bowl as you begin adding your fresh whole eggs. Drop the first egg into the creamed butter and mix thoroughly for fifteen seconds until it is completely absorbed into the white cream before adding the next one. Repeat this exact slow process for the remaining three eggs, dropping them into the bowl one by one to ensure the rich batter stays completely smooth and does not separate or curdle. Pour in your three full teaspoons of pure vanilla extract and stir for ten seconds until the dark liquid is fully integrated and smells amazing.
Keep the mixer machine running on its absolute lowest speed setting as you prepare to combine your dry sifted flour and your one cup of whole dairy milk. Add about one third of your dry flour mixture into the wet batter, stirring gently just until the white powder disappears from sight. Next, pour in half a cup of your whole dairy milk and mix lightly for a few seconds until the liquid blends into the thick dough. Add another third of the flour, followed by the remaining half cup of milk, and finish by adding the final portion of your dry flour mixture.
Be extremely careful not to over mix the batter at this stage; you only want to stir until the ingredients are just combined and look smooth. If you mix the batter for too long after the flour goes in, you will develop tough gluten strands that will make your baked cake rounds dense and heavy like bread instead of light and tender. Divide the smooth pale yellow cake batter evenly between your two prepared round metal baking pans, using a soft silicone spatula to scrape every last drop out of the mixing bowl. Use the back of your spoon to smooth the top surface of the batter flat inside both pans so they bake evenly.
Carefully lift both filled cake pans with your hands and place them side by side on the middle rack of your hot preheated wall oven. Let the cake rounds bake continuously for twenty eight to thirty two minutes without opening the oven door during the first twenty minutes so the cold air does not disturb the rising dough. You can check if the cake is fully cooked by gently inserting a clean wooden toothpick directly into the absolute center of the cake round. If the toothpick comes out completely clean or with just a few dry crumbs attached, your cake layers are perfectly done and ready to come out.
Remove the hot pans from the oven carefully using thick insulated oven mitts and place them flat on a wire cooling rack on your counter. Let the hot cakes rest quietly inside their metal pans for exactly ten minutes, which allows the delicate structure to firm up slightly so the bread does not crack apart. Run a thin butter knife carefully around the interior edge of the pans to loosen any stuck spots, then flip the pans upside down gently to release the cakes onto the wire rack. Let the two golden cake rounds cool completely for at least one full hour until they are cold to the touch.
While your cake layers are cooling down naturally on the counter, you can begin preparing your sweet homemade vanilla buttercream frosting. Place your one cup of softened extra sweet cream butter into a clean mixing bowl and beat it on high speed for two minutes until it looks incredibly smooth and creamy. Turn the machine to low and add your four cups of sifted powdered confectioners sugar one single cup at a time, alternating with a tablespoon of heavy whipping cream. Once all the sugar is inside the bowl, turn the mixer to high and beat for three minutes until the frosting looks like a cloud, then stir in an extra teaspoon of vanilla.
Take your first completely cooled cake round and place it flat side down onto the center of your beautiful serving plate or a rotating cake stand. Scoop about one cup of your fluffy white buttercream frosting directly onto the top center of this first cake layer using a large spoon or an offset spatula. Spread the sweet frosting outward smoothly in a neat even layer that reaches all the way to the outer edges of the round bread surface. Carefully pick up your second cooled cake round and place it directly on top of the frosted first layer, aligning the edges perfectly straight.
Scoop a large mound of the remaining buttercream frosting onto the top of the second layer and use your spatula to push the icing downward along the sides. Smooth the frosting gently around the entire circumference of the tall cake and across the top surface until the whole dessert is encased in a beautiful white blanket. You can leave the frosting looking rustic and swirly with simple spoon marks, or you can use a flat plastic scraper to make the edges perfectly smooth like a bakery cake. Serve this magnificent creation immediately to your happy family, or store it under a large glass bowl until party time.
Why This Recipe Is Special
This vanilla layer cake recipe is extraordinarily special because it relies on the pure, timeless foundations of traditional home baking to deliver a superior sensory experience. By rejecting the convenience of chemical box mixes, you prevent your family from consuming artificial preservatives, fake emulsifiers, and excessive amounts of processed sodium. This scratch method utilizes the natural protein structure of fresh whole eggs and all purpose flour to create a tender, velvety crumb that holds its shape beautifully when sliced into tall triangles. The use of real dairy butter provides a rich, mouthcoating fat profile that elevates the simple flavor of vanilla into something deeply luxurious and complex.
From a structural standpoint, the process of creaming the butter and sugar together creates a natural leavening network that works in harmony with the baking powder. This double action ensures that your cake layers rise up with a flat flat top surface that makes stacking and frosting the cake incredibly stable and easy for beginners. The homemade buttercream icing is a magnificent touch because it uses real heavy cream to achieve a smooth texture that melts on your tongue without leaving a greasy or waxy residue behind. It is a dessert that honors the slow, joyful traditions of the home kitchen while remaining completely approachable for individuals who are just starting their baking journey.
Extra Tips for Better Taste
If you want to take this classic vanilla layer cake to an even higher level of gourmet beauty and flavor, there are several wonderful creative tips you can try. You can scrape the inside seeds of a real whole vanilla bean pod directly into your butter mixture, which will fill your white frosting with gorgeous tiny black specks and an incredibly intense woody aroma. For an extra moist texture that stays fresh for a long time, you can brush a small amount of sweet simple sugar syrup over the baked cake rounds right before you apply the frosting. This is a secret trick used by high end pastry chefs to guarantee that every single bite of a wedding cake remains perfectly soft and juicy.
If you are baking this cake for a colorful holiday celebration, you can fold half a cup of rainbow sprinkles directly into the final batter right before pouring it into the pans to create a fun confetti look. You can also slice fresh red strawberries or sweet raspberries into thin pieces and layer them right inside the middle frosting layer to add a bright fruit acidity that balances the heavy sugar notes. If you happen to have leftovers from your party, you can store the sliced cake inside an airtight plastic container in your refrigerator for up to five whole days with ease. Always remember to take the cold cake slices out of the refrigerator about twenty minutes before eating them because real butter frosting needs time to soften up at room temperature to regain its wonderful creamy texture.
Final Thoughts
Baking a magnificent vanilla layer cake from scratch should always be a calm, joyful, and deeply rewarding experience that brings a sense of magic into your home kitchen. This reliable recipe proves that you do not need a massive amount of complicated skills or expensive professional equipment to create a spectacular dessert that delights your loved ones. It is a foundational dish that will build your kitchen confidence instantly and create beautiful memories around your dining table for years to come. Gather your cake pans this weekend, follow these friendly steps slowly, and enjoy the wonderful magic of turning simple flour and sugar into a golden homemade masterpiece.
Nutrition Details
Here is the estimated average nutritional information for one single serving of this homemade vanilla layer cake with buttercream frosting. This recipe makes twelve generous slices in total.
| Nutritional Component | Value Per Serving |
| Calories | 580 calories |
| Total Protein | 5 grams |
| Total Fat | 26 grams |
| Saturated Fat | 16 grams |
| Cholesterol | 115 milligrams |
| Sodium | 240 milligrams |
| Total Carbohydrates | 84 grams |
| Dietary Fiber | 1 gram |
| Total Sugars | 62 grams |
| Calcium | 8 percent of daily value |
Disclaimer
Please keep in mind that every single human body possesses a completely unique metabolic rate, distinct health targets, and individual tolerances for sugars, dairy, and grains. The clear nutritional estimations and general domestic baking advice shared throughout this food blog article are intended exclusively for educational, recreational, and home lifestyle purposes. Because this specific dessert recipe contains traditional quantities of real dairy butter, whole eggs, and processed sugars, it should be enjoyed as an occasional celebratory treat within a balanced lifestyle. If you are currently managing any long term health conditions such as diabetes, navigating severe gluten allergies, or following a restricted diet plan from a doctor, please consult your personal healthcare professional before introducing rich desserts into your regular weekly meal routine.