People absolutely love this recipe because it delivers a soft, pillowy texture and exceptional structural integrity that completely redefines expectations for allergen-friendly baking. There is something profoundly satisfying about watching a simple bowl of liquid batter rise gracefully over the rim of a loaf pan and bake into a beautiful, rustic masterpiece that smells exactly like a traditional neighborhood bakery. Home cooks and busy parents swear by this method because it completely eliminates the exhausting physical labor of kneading dough, as the absence of gluten means you simply mix the wet and dry components into a smooth, pourable batter. It holds its structural shape beautifully when sliced thin, making it the perfect vehicle for classic turkey clubs, grilled cheese sandwiches, or a simple spread of sweet berry jam. Cleanup is remarkably swift since the entire dough comes together with a standard hand mixer or a single mixing bowl, saving you precious time to spend relaxing with your family. It is a stress-free, empowering recipe that takes the intimidation out of alternative baking, letting you fill your home with the unmatched aroma of fresh-baked bread any day of the week.
This is the absolute perfect recipe to master when you want to connect with feelings of warmth, creative accomplishment, and simple comfort in your daily routine. Food should be a source of nourishment and connection, and being able to slice into a fresh, warm loaf of homemade bread provides a wonderful sense of physical well-being and kitchen independence. From a flavor and texture standpoint, it satisfies your deepest cravings for a satisfying lunch staple because the earthy sweetness of sorghum and rice flours is balanced beautifully by the rich addition of whole eggs and apple cider vinegar. If you are focused on providing clean, allergen-friendly options for your household, this recipe is a spectacular choice because it avoids the dense fillers, heavy sugars, and artificial stabilizers commonly found in commercial store-bought gluten-free loaves. You can easily adapt the flavor profile by incorporating a handful of flaxseeds or a sprinkle of oats on the top crust to match your family’s exact culinary goals. It serves as an excellent daily reminder that embracing alternative ingredients can open the door to exciting, deeply rewarding kitchen discoveries.
You should bake this gluten-free loaf whenever you want a reliable, high-quality staple to power your weekly meal prep, elevate a weekend brunch, or pack into school lunchboxes. It is an exceptional option for daily convenience because you can easily slice the cooled loaf completely, freeze the individual slices, and pop them straight into a hot toaster for an instant, crispy breakfast on busy mornings. It also turns an ordinary sandwich routine into a genuinely exciting meal that you can look forward to all morning, as the bread retains its soft, flexible moisture without crumbling apart under pressure. If you have been disappointed by dense, dry, or tiny store-bought gluten-free options and want a full-sized, authentic loaf that brings true satisfaction back to your plate, this recipe comes to the rescue beautifully. It is a highly versatile foundation that adapts perfectly to your unique pantry items, meaning you can adjust the grain blends or add savory herbs to match your exact taste preferences. Ultimately, this dish is all about bringing ease, confidence, and immense culinary joy back to alternative baking, proving that simple everyday ingredients can create an extraordinary kitchen success.
Ingredients You Will Need
To create this soft and beautifully structured gluten-free sandwich bread, you will need to gather a few specialized ingredients from your grocery baking and natural foods aisles. This recipe yields one standard 8.5 x 4.5-inch loaf, which provides about twelve generous slices.
-
1.5 cups of white rice flour or brown rice flour, finely ground to ensure a smooth, non-gritty texture
-
1 cup of sorghum flour or millet flour to add a lovely depth of flavor and traditional grain structure
-
1 half cup of tapioca starch or arrowroot powder to provide lightness, flexibility, and a delicate crumb
-
1 half cup of potato starch (not potato flour) to help retain moisture and keep the bread pillowy soft
-
1 tablespoon of xanthan gum, which acts as the crucial structural binder to mimic the elasticity of gluten
-
1 packet (2.25 teaspoons) of active dry yeast or instant rapid-rise yeast to provide a beautiful, lofty lift
-
1.25 cups of warm water (around 110°F or 43°C) to activate the yeast perfectly without killing it
-
2 tablespoons of pure honey or maple sugar to feed the yeast and add a subtle hint of golden sweetness
-
3 tablespoons of avocado oil or melted butter to introduce healthy fats and preserve the bread’s moisture
-
3 large eggs, at room temperature, to provide structure, richness, and natural leavening power
-
1 teaspoon of apple cider vinegar to create an optimal acidic environment that helps the yeast thrive
-
1 teaspoon of fine sea salt to season the dough perfectly and control the fermentation process
Step by Step Method
Preparing Your Kitchen and Tools
Before you handle any of your ingredients, clean your kitchen counter surfaces and wash your hands thoroughly with warm water and soap. Lightly grease a standard 8.5 x 4.5-inch metal loaf pan with avocado oil or line it neatly with a sheet of parchment paper. Ensure your eggs are sitting out at room temperature; using cold eggs directly from the refrigerator can shock the warm water and prevent the yeast from rising to its full, majestic height.
Activating the Golden Yeast
In a small bowl or measuring cup, combine the one and a quarter cups of warm water with the two tablespoons of pure honey. Sprinkle the active dry yeast uniformly over the surface of the liquid and give it a quick stir with a fork. Let the mixture sit undisturbed on your counter for about 5 to 7 minutes; you will know the yeast is alive and perfectly activated when a thick, frothy, and highly aromatic tan foam develops across the top of the water.
Whisking the Dry Foundation
In a large mixing bowl or the bowl of a stand mixer fitted with the paddle attachment, combine the rice flour, sorghum flour, tapioca starch, potato starch, xanthan gum, and fine sea salt. Use a wire whisk to stir the dry ingredients together vigorously for about one minute. This ensures that the xanthan gum is distributed completely and uniformly throughout the flours, which is an absolute requirement for avoiding large air pockets or structural collapse during the baking process.
Blending the Wet Components
In a separate medium bowl, whisk together the three room-temperature eggs, avocado oil or melted butter, and the teaspoon of apple cider vinegar until completely smooth. Once your yeast mixture is beautifully frothy, pour both the liquid yeast and the egg mixture directly into the bowl with the dry flour foundation. Turn your mixer onto low speed to gradually incorporate the liquids, then increase to medium-high speed and beat the batter vigorously for a full three to four minutes.
Understanding the Unique Batter
As the mixer runs, you will notice that this mixture looks completely different from traditional wheat dough; rather than forming a tight, smooth ball that pulls away from the sides, gluten-free bread dough resembles a very thick, sticky cake batter or a thick paste. Beating it thoroughly for several minutes is a vital step because it forces the xanthan gum to hydrate fully and traps tiny bubbles of air into the wet starches, which creates the foundation for a uniform, soft crumb structure.
Shifting to the Rise and Bake
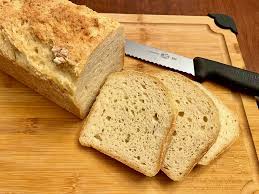
Scrape the thick batter into your prepared loaf pan using a rubber spatula, smoothing the top surface into a neat, rounded dome with wet fingers. Cover the pan loosely with a clean, dry kitchen towel and place it in a warm, draft-free spot in your kitchen to rise for about 45 to 60 minutes, or until the dough crowns about one inch over the rim of the pan. While it rises, preheat your oven to 350°F (175°C). Slide the risen loaf onto the center rack and bake for 45 to 50 minutes until the crust is deeply golden brown and an internal thermometer registers 205°F (96°C). Transfer to a wire rack to cool completely before slicing.
Why This Recipe Is Special
This gluten-free sandwich bread recipe is exceptionally special because it utilizes modern food science to completely eliminate the common pitfalls of alternative baking, resulting in a full-sized loaf that rivals conventional bakery bread. It provides home cooks with an empowering, highly rewarding kitchen project that takes the mystery out of allergen-free starch ratios. By pairing high-protein alternative grains like sorghum with light, flexible starches like tapioca, the recipe creates a beautifully balanced network that allows the carbon dioxide from the yeast to expand perfectly, resulting in a high-rising, beautifully domed crust that holds its structure without collapsing into a dense block.
From a health and nutritional perspective, this homemade loaf is a magnificent, clean alternative that supports a variety of gentle, anti-inflammatory, and allergen-conscious lifestyles. Choosing to bake your own daily bread at home allows you to completely bypass the industrial preservatives, chemical emulsifiers, and excess refined sugars that commercial manufacturers rely on to extend the shelf life of frozen gluten-free products. Grains like sorghum and brown rice offer a fantastic source of plant-based protein, dietary fiber, and essential B vitamins, which support steady energy production and healthy digestion. The natural inclusion of fresh, whole eggs introduces high-quality choline and healthy fats, making each slice a nourishing powerhouse that fuels your physical wellness goals with genuine food goodness.
The flavor and texture profile of this dish is a spectacular masterpiece of pure baking harmony that immediately delights the senses and satisfies the palate. As you take your first bite, the delicate outer crust delivers a beautiful, satisfying bite that gives way to a texturally perfect, melt-in-your-mouth crumb that is exceptionally soft and flexible. The pleasant, subtle nuttiness of the alternative grains is balanced beautifully by the clean sweetness of the honey, creating a versatile flavor profile that feels deeply nostalgic and comforting. It delivers an authentic, satisfying bread experience that carries the true heart of wholesome home cooking, leaving everyone at your table feeling deeply nourished, physically comfortable, and immensely happy with their healthy homemade choice.
Extra Tips for Better Taste
-
Use a metal or cast-iron loaf pan rather than glass or silicone, as metal conducts heat much more efficiently, helping the gluten-free batter develop a beautiful, crisp outer crust.
-
Ensure you measure your alternative flours by weight using a digital kitchen scale if possible; scooping directly with a measuring cup can easily pack down the dense starches, leading to a heavy, dry loaf.
-
Brush the top of the unbaked loaf gently with a tablespoon of melted butter or egg wash just before it slides into the oven to encourage a gorgeous, glossy golden color on the crust.
-
Let the baked bread cool completely on a wire rack for at least two full hours before slicing; slicing into a hot gluten-free loaf will trap the remaining steam inside, causing the interior crumb to become gummy.
-
Store the completely cooled bread in a tightly sealed airtight container on your counter for up to three days, or slice it entirely and freeze it with sheets of parchment paper between the slices for long-term convenience.
-
Use a sharp, finely serrated bread knife and a gentle sawing motion when cutting the loaf to ensure perfect, uniform sandwich slices that do not tear or crumble.
-
Add a half cup of toasted sunflower seeds, pumpkin seeds, or whole flaxseeds directly into the dry mix to easily transform this recipe into a spectacular, rustic multi-grain loaf.
-
If your kitchen is cool or drafty, place the covered loaf pan inside your turned-off oven next to a large mug of boiling water to create the absolute perfect warm, humid environment for a rapid rise.
Final Thoughts
Baking a homemade loaf of Gluten-Free Sandwich Bread is a beautiful and inspiring way to show yourself that a life focused on allergen-conscious choices can be filled with absolute abundance, softness, and pure culinary joy. This simple recipe serves as a comforting reminder that you do not need to settle for dense, frozen alternatives when you possess the creative power to craft a magnificent, high-rising masterpiece right in your own kitchen. It is a peaceful, straightforward process that transforms humble alternative starches into a flexible, pillowy celebration of textures that brings comfort back to your breakfast table. We hope this step-by-step guide brings a sense of ease, excitement, and confidence to your home baking adventures, filling your house with cozy, mouthwatering aromas and your plate with golden goodness. Mix your batter with care, watch your loaf rise with confidence, and enjoy the magnificent balance of soft and wholesome comfort in every single slice.
Nutrition Details
The nutritional estimates provided in the table below are calculated per individual serving, assuming the entire loaf is cut into twelve uniform slices and prepared using standard avocado oil and honey. These specific numbers can shift slightly depending on the exact grain blend you select and the size of your eggs.
| Nutrient Type | Amount Per Serving | Daily Percentage Value |
| Calories | 185 calories | 9 percent |
| Total Fat | 6 grams | 8 percent |
| Saturated Fat | 1 gram | 5 percent |
| Cholesterol | 45 milligrams | 15 percent |
| Sodium | 210 milligrams | 9 percent |
| Total Carbohydrates | 29 grams | 11 percent |
| Dietary Fiber | 2 grams | 8 percent |
| Sugars | 3 grams | 0 percent |
| Protein | 4 grams | 8 percent |
| Vitamin A | 80 international units | 2 percent |
| Vitamin C | 0.2 milligrams | 1 percent |
| Calcium | 15 milligrams | 2 percent |
| Iron | 1.1 milligrams | 6 percent |
| Potassium | 110 milligrams | 3 percent |
Disclaimer
This specialized baking recipe and its detailed nutritional breakdowns are intended exclusively for home cooking, educational, and informational purposes. Every individual human body features its own completely unique metabolic structure, and personal nutritional requirements will vary significantly based on your age, sex, weight, physical activity level, and general health background. The health benefits and digestive comfort discussed in this article can vary from person to person based on broader lifestyle choices and specific ingredient selections. If you are managing a significant medical condition like severe celiac disease, navigating multiple food allergies, or tracking strict carbohydrate restrictions, you should consult with a certified clinical dietitian or a licensed medical professional. Always practice excellent kitchen safety measures by ensuring your baking tools are completely free from cross-contamination with wheat or gluten products before beginning preparation