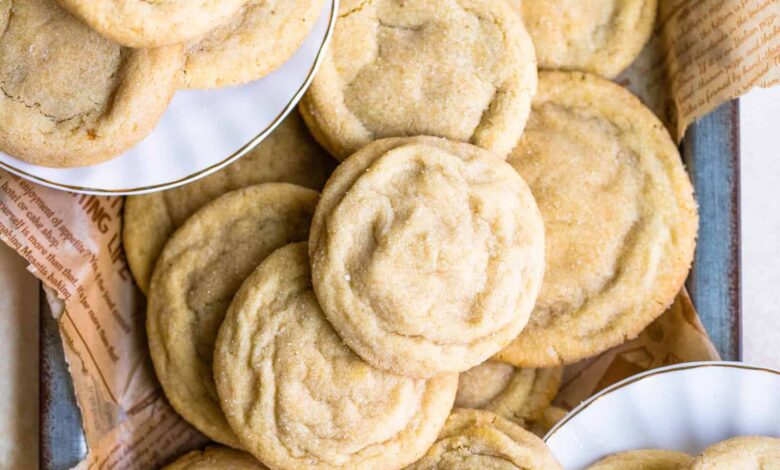
Imagine walking into a kitchen that smells like sweet vanilla and rich cream. That is the magic of making fresh butter sugar cookies at home. This recipe is all about creating the most wonderful treats with just a few simple items from your pantry. You do not need to be a professional baker or have fancy kitchen tools to make these cookies turn out beautiful. It is a very basic and honest recipe that focuses on the true joy of baking from scratch. Every single bite offers a crisp edge and a soft center that melts away perfectly on your tongue. When you bake these, you are not just making food, you are creating a cozy feeling that fills the entire house with warmth. It is the kind of recipe that you will want to keep in your family notebook forever because it never fails to bring smiles.
People absolutely love these sweet treats because they bring back fond memories of childhood and simpler times. There is something incredibly comforting about a classic biscuit that does not hide behind too many wild flavors or strange ingredients. The rich taste of real cream butter shines through as the main star, balanced perfectly with just the right amount of sweetness. Kids love them because they are fun to shape and decorate, while adults love them because they pair beautifully with a hot cup of coffee. They are not hard or dry like the versions you buy at the grocery store, which often sit on shelves for weeks. Instead, these homemade delights possess a tender texture that feels like a luxury but costs very little money to make. It is a crowd pleasing dessert that disappears from the serving platter faster than you can count.
There are so many wonderful reasons to whip up a batch of these golden baked goods right now. You might want to celebrate a holiday, cheer up a friend who is having a difficult week, or simply treat yourself after a long workday. Baking can be a wonderful form of stress relief because it forces you to slow down and focus on the pleasant textures of flour and sugar. From a fitness point of view, making your own snacks means you have total control over what goes into your body. You can completely avoid the strange chemicals, fake colors, and heavy preservatives found in factory made snacks. It is a wonderful way to practice mindful eating because you know exactly how much love and clean ingredients went into the mixing bowl. Whether you need a sweet reward for your workout goals or a fun weekend activity with your children, this recipe fits every occasion.
Ingredients You Will Need
To make these delicious treats, you will need to gather a few basic items from your kitchen counter and refrigerator. Please make sure your cold items sit out for a bit so they reach room temperature before you start mixing them together.
-
Two hundred and twenty five grams of unsalted butter
-
Two hundred grams of white granulated sugar
-
One large whole chicken egg
-
Two teaspoons of pure vanilla extract
-
Three hundred and sixty grams of all purpose white flour
-
One teaspoon of baking powder
-
Half a teaspoon of fine kitchen salt
-
Two tablespoons of extra sugar for sparkling tops
Step by Step Method
Step One: Getting Everything Ready
Before you get your hands dirty, you need to prepare your baking space. Turn on your kitchen oven and set the heat to one hundred and eighty degrees Celsius so it can get nice and hot while you work. Take two large flat baking sheets and line them with parchment paper so your dough will not stick to the bottom. Set these sheets aside for later.
Step Two: Creaming the Base
Take your soft room temperature butter and place it into a large mixing bowl. Add the white granulated sugar into the same bowl. Use a big wooden spoon or an electric hand mixer to beat them together very well. You want to mix this for about three whole minutes until the mixture looks pale yellow, fluffy, and smooth. This step is very important because it traps air in the fat, which makes your finished cookies light instead of heavy.
Step Three: Adding the Liquids
Crack your large egg into a small cup first to make sure no shell pieces get inside, then pour it into your fluffy butter mixture. Add the two teaspoons of pure vanilla extract as well. Stir the mixture gently until the egg and vanilla are fully blended into the cream. The batter might look a little wet at this point, but that is exactly how it should look.
Step Four: Mixing the Dry Goods
In a separate medium bowl, combine your all purpose white flour, your baking powder, and your fine kitchen salt. Use a fork to stir them around for a few seconds so the lifting powder and salt are spread evenly through the white flour. This prevents you from getting a big clump of salt in one single bite later on.
Step Five: Bringing the Dough Together
Slowly pour your dry flour mixture into the wet butter bowl. Do this in three small parts rather than dumping it all in at once. Stir gently after each addition using a spatula. Keep mixing until the white powder disappears and a soft dough forms. Be careful not to overmix the dough, or your cookies will become tough like bread instead of tender.
Step Six: Chilling the Dough
Shape your cookie dough into a large flat round disc using your hands. Wrap the dough tightly in clear plastic wrap to keep it clean and moist. Place the wrapped dough inside your refrigerator for at least thirty minutes. Chilling the dough helps the butter firm up again, which stops your shapes from spreading out into flat puddles when they hit the hot oven.
Step Seven: Shaping Your Cookies
Take your chilled dough out of the refrigerator and remove the plastic wrap. Pinch off small pieces of dough and roll them between your palms to form balls that are about the size of a golf ball. Place each ball onto your prepared baking sheets, leaving about five centimeters of space between each one so they have room to breathe.
Step Eight: The Final Touch
Take a clean glass cup with a flat bottom and dip the base into water, then into your extra sparkling sugar. Gently press the flat bottom of the glass onto each dough ball to flatten it slightly until it is about one centimeter thick. The sugar will stick to the top and create a beautiful crunchy crust when baked.
Step Nine: Baking to Perfection
Slide your loaded baking sheets into the middle rack of your preheated oven. Bake them for about ten to twelve minutes. Keep a very close eye on them through the oven glass. You want the edges to look lightly golden brown while the tops stay pale and soft.
Step Ten: Cooling Down
Remove the baking sheets from the hot oven using thick kitchen mitts. Let the hot cookies sit undisturbed on the hot tray for five minutes because they are very delicate when they first come out. After five minutes, use a flat spatula to lift them onto a wire cooling rack so air can circulate underneath. Let them cool completely before eating.
Why This Recipe Is Special
This recipe stands out because it relies on simplicity and pure ingredients to deliver a superior taste experience. In a world full of complicated desserts with exotic components, this classic biscuit reminds us that basic baking is often the most rewarding. The rich dairy notes from the cream butter blend beautifully with the caramelized sugar notes to create a comforting flavor profile that satisfies your sweet tooth instantly. It provides an excellent base for creativity, allowing beginners to build confidence in the kitchen without feeling overwhelmed by complex techniques.
From a health standpoint, making these at home offers a much cleaner alternative to store bought options. You have full power over the quality of the ingredients, meaning you can choose organic flour, fresh farm eggs, and grass fed butter if you prefer. There are no hidden hydrogenated oils, high fructose corn syrup, or artificial freshness chemical stabilizers hidden in this dough. You can easily modify the portion sizes by rolling smaller balls if you are tracking your energy intake for fitness goals. Eating a homemade cookie made with real whole food ingredients satisfies cravings more effectively, which prevents you from overeating later in the day.
Extra Tips for Better Taste
To take your baking to the next level, always choose the best quality butter you can find at your local market. Since fat is the primary flavor carrier in this recipe, using a rich European style product with a high fat content will make your treats taste incredibly luxurious. You can also experiment with different flavors by swapping out the vanilla extract for almond extract or fresh lemon zest. Adding a tiny pinch of sea salt flakes on top right after baking can create an amazing sweet and salty contrast that makes the flavors pop.
Another wonderful trick is to chill your shaped dough balls for ten minutes in the freezer right before they go into the hot oven. This extreme temperature change creates a lovely contrast between a crisp outer shell and a gooey interior. If you love texture, you can roll the dough balls in brown coconut sugar or colored sprinkles instead of plain white sugar before flattening them. For an elegant look, you can press a single pecan nut or a dried cranberry into the center of each disc before baking. Always store your finished cooled treats in an airtight ceramic jar with a piece of fresh white bread to keep them soft for days.
Final Thoughts
Baking these classic butter sugar cookies is a joyful journey that fills both your kitchen and your heart with simple happiness. It proves that you do not need complicated instructions or expensive luxury items to create something truly wonderful for the people you care about. We hope this guide inspires you to put on an apron, turn on your oven, and enjoy the peaceful art of traditional baking. Share these sweet creations with your neighbors, pack them in school lunchboxes, or enjoy them quietly with a warm drink at night. May your kitchen always be a place of warmth, laughter, and delicious homemade treats.
Nutrition Details
The values provided below are close estimates for one single cookie based on cutting the dough recipe into twenty four equal servings. Your final numbers might change depending on the specific brands of ingredients you buy at your grocery store.
| Nutrient Name | Amount Per Serving | Percentage of Daily Value |
| Calories | One hundred and forty calories | Seven percent |
| Total Fat | Seven grams | Nine percent |
| Saturated Fat | Four grams | Twenty percent |
| Cholesterol | Twenty five milligrams | Eight percent |
| Sodium | Sixty milligrams | Three percent |
| Total Carbohydrates | Seventeen grams | Six percent |
| Dietary Fiber | Zero grams | Zero percent |
| Total Sugars | Nine grams | Eighteen percent |
| Protein | Two grams | Four percent |
| Calcium | Ten milligrams | One percent |
| Iron | Zero point five milligrams | Three percent |
Disclaimer
Please remember that every human body is unique and reacts differently to various types of food items. The nutritional facts provided in this article are meant for general educational purposes only and should not replace professional medical advice. If you have specific health conditions, food allergies, or strict fitness goals, please consult with a certified doctor or a registered dietitian. The final texture, size, and caloric value of your baked goods may change based on your kitchen environment, altitude, and preparation methods. Always practice safe food handling when working with raw eggs and unbaked flour in your home kitchen.