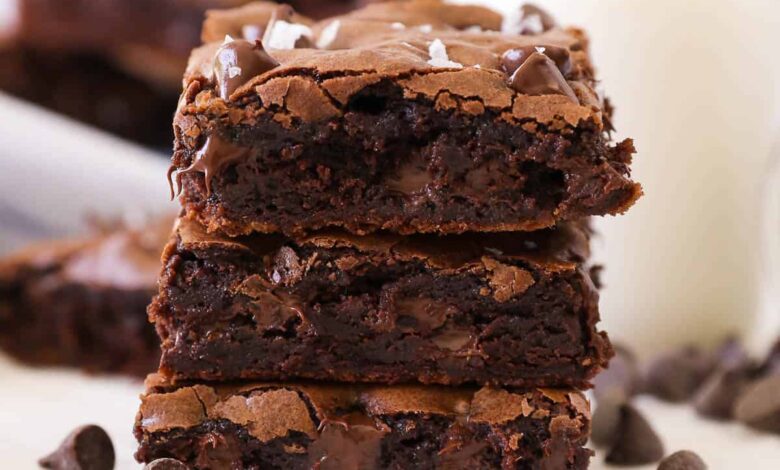
Chocolate is one of those magical things that can instantly make any bad day feel a whole lot better and turn a regular moment into a grand celebration. When it comes to chocolate treats, absolutely nothing compares to a batch of freshly baked brownies that are warm and gooey right out of the oven. This recipe is all about creating the ultimate chocolate experience in your own kitchen without any need for fancy bakery equipment or hard to find ingredients. We are diving deep into the art of making the perfect brownie, which means a treat that has a rich flavor, a dense texture, and that beautiful shiny crinkled top that everyone loves. This guide will walk you through every single part of the process so that you can make a dessert that tastes like it came from a high end pastry shop. You do not need to be an expert baker to follow along because this entire recipe is broken down into very simple steps that anyone can master in no time at all. By the end of this article, you will know exactly how to mix, bake, and serve these amazing chocolate squares to your family and friends.
People all over the world absolutely love brownies because they offer the perfect combination of textures and flavors that satisfy our deepest sweet cravings. There is something incredibly comforting about biting into a thick square of chocolate goodness that is soft on the inside but has a slight crunch on the outer edges. Unlike regular cakes which are light and fluffy, a great brownie is heavy and packed with real chocolate flavor which makes it feel much more indulgent. Kids adore them because they are sweet and fun to eat with a big glass of cold milk, while adults appreciate the complex flavors that come from using good quality cocoa powder and real butter. It is a universal dessert that crosses cultures and generations, bringing people together around the kitchen table to share a moment of pure joy. Another reason for the immense popularity of this treat is how customizable it can be for different taste preferences. You can enjoy them completely plain, or you can toss in handfuls of nuts, chocolate chips, white chocolate chunks, or even a swirl of creamy peanut butter depending on what you feel like eating that day.
There are so many wonderful reasons and occasions to whip up a fresh batch of these delicious chocolate squares, ranging from emotional comfort to fun social gatherings. When you are feeling down or stressed out after a long week of work, spending time in the kitchen mixing up a sweet batter can be a very relaxing and therapeutic activity. The rich aroma of baking chocolate filling up your entire home is enough to lift anyone’s spirits and create an atmosphere of warmth and comfort. These treats are also the absolute best choice for birthday parties, school bake sales, holiday dinners, or casual weekend picnics with the people you love the most. If you are someone who follows a strict fitness routine, you can use these homemade treats as a well deserved reward after a week of hard workouts and clean eating. Making your own desserts at home means you have total control over the quality of the ingredients, so you can avoid all the artificial preservatives and strange chemicals found in store bought box mixes. It is an amazing feeling to present a tray of beautiful homemade bars to your guests and watch their faces light up with pure happiness as they take their very first bite.
Baking is a wonderful way to express love and care for your family, and this specific recipe is designed to give you consistent results every single time you use it. You do not have to worry about the dessert turning out too dry or too cakey because the balance of fat, sugar, and flour here is tuned perfectly for a fudgy texture. This article will serve as your ultimate resource, answering all the questions you might have about baking times, mixing techniques, and ingredient choices. We will look at how simple changes in your kitchen routine can lead to massive improvements in how your final dessert looks and tastes. You will learn the secret to getting that perfect shiny top crust and how to slice the bars cleanly without making a giant messy pile of crumbs. So put on your favorite apron, preheat your oven, gather your measuring cups, and get ready to embark on a fun baking adventure that will delight your senses and satisfy your sweet tooth completely. Let us explore the wonderful world of home baking together and create something truly spectacular.
Ingredients You Will Need
Before you start mixing your batter, it is very important to gather all your ingredients and measure them out carefully to ensure your baking project is a total success. Here is a complete list of everything you will need to make a standard batch of twelve large chocolate squares.
-
Unsalted butter melted and cooled slightly: 115 grams or half a cup
-
White granulated sugar: 200 grams or one cup
-
Brown sugar packed firmly: 110 grams or half a cup
-
Large eggs at room temperature: 2 pieces
-
Pure vanilla extract: 5 milliliters or one teaspoon
-
All purpose flour: 65 grams or half a cup
-
Unsweetened cocoa powder: 50 grams or half a cup
-
Salt: 2 grams or one quarter of a teaspoon
-
Semisweet chocolate chips: 90 grams or half a cup
Step by Step Method
Follow these detailed steps carefully to create your perfect batch of homemade chocolate bars from scratch.
Step 1: Prepare Your Kitchen and Oven
Start by preheating your kitchen oven to 175 degrees Celsius or 350 degrees Fahrenheit so it is perfectly hot when your batter is ready. Take an eight inch square baking pan and grease the inside surfaces with a little bit of extra butter or cooking spray. Line the pan with a piece of parchment paper, leaving some extra paper hanging over the sides so you can easily lift the baked bars out later.
Step 2: Melt the Butter
Place your unsalted butter into a microwave safe bowl and heat it in short intervals until it is completely melted into a liquid. Alternatively, you can melt the butter in a small saucepan over low heat on your stove top. Let the melted butter cool down for a couple of minutes so it is warm to the touch but not boiling hot.
Step 3: Combine Butter and Sugars
Pour the warm melted butter into a large mixing bowl and add both the white granulated sugar and the brown sugar. Use a whisk to stir the mixture together vigorously for about one full minute until the sugars start to dissolve into the butter. The mixture might look a bit grainy at this point, which is completely normal.
Step 4: Add the Eggs and Vanilla
Crack your two large room temperature eggs directly into the sugar and butter mixture one at a time, whisking very well after each addition. Add your pure vanilla extract now and continue to beat the mixture with your whisk for another two minutes. Whisking air into the eggs at this stage is the secret technique that creates that beautiful, thin, crinkly top crust on your finished dessert.
Step 5: Sift the Dry Ingredients
Place a fine mesh strainer or sifter over your wet ingredients bowl. Pour in your all purpose flour, unsweetened cocoa powder, and salt. Sift them gently into the bowl to break up any stubborn lumps of cocoa powder, which ensures your batter will be perfectly smooth and easy to mix.
Step 6: Fold the Batter Gently
Put away your whisk and switch to using a rubber spatula or a large wooden spoon for this stage. Gently fold the dry ingredients into the wet mixture, moving your spatula in a circular motion from the bottom of the bowl to the top. Stop mixing the exact moment you can no longer see any dry white flour streaks, because overmixing will make your dessert tough instead of tender and fudgy.
Step 7: Toss in the Chocolate Chips
Gently drop your semisweet chocolate chips into the thick batter. Use your spatula to fold them in with just two or three quick movements so they are distributed evenly throughout the mixture. These chips will melt during baking and create wonderful little pockets of gooey chocolate inside your bars.
Step 8: Bake to Perfection
Scrape the thick chocolate batter out of your bowl and into your prepared eight inch baking pan using your spatula. Smooth out the top surface so it is completely flat and even. Place the pan on the center rack of your preheated oven and bake for exactly twenty two to twenty five minutes.
Step 9: Test for Doneness
To check if they are done, insert a wooden toothpick into the center of the pan. The toothpick should come out with a few moist crumbs attached to it, but it should not have wet, runny batter on it. If the toothpick comes out completely clean, they might be slightly overbaked, so keep a close eye on the clock.
Step 10: Cool and Slice
Remove the pan from your oven and place it on a wire cooling rack. Let the bars cool completely inside the pan for at least one hour because they will continue to set as they sit. Once cooled, use the parchment paper handles to lift the entire block out of the pan, place it on a cutting board, and use a sharp knife to slice it into twelve even squares.
Why This Recipe Is Special
This particular recipe stands out from the rest because it strikes a perfect balance between simplicity and incredible gourmet flavor. You do not need to purchase expensive baking chocolate bars or melt things in a complicated double boiler because high quality cocoa powder does all the heavy lifting here. The combination of white sugar and brown sugar is a deliberate choice that creates a unique depth of flavor, where the brown sugar adds a subtle caramel note and loads of moisture.
From a texture perspective, this method guarantees an incredibly fudgy interior that melts in your mouth while maintaining a stable structure that does not crumble apart when you hold it. It is also a fantastic recipe for beginner bakers because it is highly forgiving and does not require any special electric mixers or complicated kitchen skills.
While this is certainly an indulgent dessert, making it from scratch means you are avoiding the artificial oils, corn syrups, and chemical freshness preservatives found in industrial snacks. You are using real, whole ingredients like genuine butter, fresh eggs, and pure cocoa which provides natural antioxidants that are good for your body. It is a honest, old fashioned treat that delivers maximum chocolate satisfaction with minimal effort.
Extra Tips for Better Taste
If you want to take your baking skills to the highest level, there are several clever tricks you can use to enhance the flavor of your chocolate squares. One of the best secrets used by professional pastry chefs is adding one teaspoon of instant espresso powder or fine coffee powder to the dry ingredients. You will not taste any coffee flavor at all, but the coffee acts as a flavor enhancer that makes the chocolate taste twice as deep and rich.
Another fantastic upgrade is to sprinkle a few flakes of coarse sea salt over the top of the batter right before you slide the pan into the hot oven. The contrast between the crunchy salt crystals and the sweet, rich chocolate creates an incredible flavor balance that will make your taste buds dance.
If you love different textures in your food, try adding half a cup of chopped walnuts or pecans to the batter along with the chocolate chips for a wonderful nutty crunch. For an ultra fudgy experience, you can place the completely cooled chocolate squares into your refrigerator for two hours before slicing them. The cold temperature solidifies the fats and sugars, creating an incredibly dense, fudge like texture that tastes like premium chocolate truffles.
Final Thoughts
Baking a perfect tray of homemade brownies is one of the most rewarding and joyful experiences you can have in your kitchen. This simple recipe proves that you do not need complicated instructions or expensive culinary tools to create a dessert that brings smiles to everyone around you. Whether you are baking to celebrate a special milestone or simply want to treat yourself after a long and busy week, these chocolate squares are guaranteed to deliver pure happiness. Sharing food made with your own two hands is a timeless way to connect with friends, family, and neighbors. So go ahead and enjoy the process of mixing, the wonderful aroma of baking, and that first delicious bite of warm chocolate perfection.
Nutrition Details
Here is an approximate breakdown of the nutritional content for this recipe, calculated per individual serving assuming the entire batch is cut into twelve equal squares.
| Nutrient Type | Amount Per Serving | Percentage of Daily Value |
| Calories | 240 calories | 12 percent |
| Total Fat | 11 grams | 14 percent |
| Saturated Fat | 7 grams | 35 percent |
| Cholesterol | 45 milligrams | 15 percent |
| Sodium | 65 milligrams | 3 percent |
| Total Carbohydrates | 32 grams | 11 percent |
| Dietary Fiber | 2 grams | 7 percent |
| Sugars | 24 grams | 48 percent |
| Protein | 3 grams | 6 percent |
| Calcium | 15 milligrams | 1 percent |
| Iron | 1.5 milligrams | 8 percent |
Disclaimer
Please keep in mind that nutritional values can change depending on the specific brands of ingredients you choose to buy at your local grocery store. Every individual person has a unique body with different metabolic rates, dietary requirements, and health conditions, so your personal health results and nutritional needs may vary from these general estimates. If you have specific medical questions, food allergies, or strict dietary restrictions, it is always a smart idea to consult with a professional doctor or a certified nutritionist. Enjoy your homemade treats responsibly as part of a balanced and healthy lifestyle.