Imagine waking up to the rich aroma of freshly baked bread wafting through your entire home on a quiet Saturday morning. There is something truly magical about a warm bread item that is crisp on the outside and wonderfully soft on the inside. For many people who have to avoid gluten due to allergies or health choices, finding a good bread alternative feels like a massive challenge. Traditional bread relies heavily on gluten to get that chewy texture and those beautiful air pockets that hold butter so well. This special recipe changes the game completely by giving you all the classic taste without any of the discomfort. You will learn how to create the most amazing breakfast treat right in your own kitchen with very simple tools. Whether you are a master baker or someone who has never touched yeast before, this guide will walk you through every single part of the journey. You do not need to buy expensive store bought versions that taste like cardboard anymore because this homemade version is far better.
People absolutely love this specific recipe because it brings back the joy of a comforting breakfast without any of the digestive worry. Many commercial gluten free products are dry, crumbly, and lose their structure the moment you try to slice them. This recipe stands out because it uses a clever combination of ingredients to keep the dough moist, flexible, and full of traditional flavor. When you split one of these muffins open with a fork, you will see all those wonderful nooks and crannies that are perfect for catching pools of melted honey or fruit jam. It is a massive crowd pleaser for families where only one person eats gluten free, because everyone else will still love the taste. You will find that your friends and family cannot even tell the difference between this version and the classic wheat version. The satisfaction of pulling a golden brown muffin off the hot skillet and hearing that perfect crunch is something that will make you want to bake every single week.
There are so many wonderful reasons and moments to make these delicious muffins for yourself and your loved ones. You might want to prepare a big batch on a Sunday evening so that you have a quick and healthy breakfast ready for those chaotic weekday mornings. They are also perfect for a slow, luxurious weekend brunch where you want to impress your friends with an elegant eggs benedict. From a fitness perspective, making your own bread from scratch lets you control exactly what goes into your body without any strange chemicals or extra preservatives. Many people make these because they want to enjoy a hearty sandwich that does not make them feel heavy, bloated, or tired later in the afternoon. It is an amazing feeling to bite into a breakfast sandwich knowing that every single ingredient is clean, wholesome, and completely safe for your stomach. This recipe connects you to the old tradition of baking while fitting perfectly into a modern, health conscious lifestyle.
Baking your own bread is also a fantastic way to practice mindfulness and reduce stress after a long and busy week. The simple act of mixing the flour, watching the yeast bubble, and seeing the dough rise can be incredibly calming for the mind. It teaches us patience and rewards us with a physical, delicious treat that nourishes our bodies and satisfies our deepest comfort food cravings. You will find that this process brings a sense of pride that you just cannot get from buying a plastic bag of bread at the local supermarket. It is a wonderful activity to share with young children or partners, as it turns your kitchen into a joyful space of creation and learning. Every time you make these, you can adjust the little details to match your mood, whether you want a savory garlic herb muffin or a sweet cinnamon raisin version. This recipe is more than just a list of instructions, it is an invitation to fall in love with the art of simple, healthy, and happy cooking.
Ingredients You Will Need
To make these wonderful gluten free English muffins, you will need to gather a few simple ingredients. It is best to measure everything carefully using standard measuring cups and spoons to ensure the perfect texture.
-
3 cups of high quality gluten free baking flour blend with xanthan gum included
-
1 packet or 2 and a quarter teaspoons of active dry yeast
-
1 cup of warm whole milk heated to around 105 degrees Fahrenheit
-
2 tablespoons of pure honey or organic maple syrup
-
1 large egg at room temperature
-
3 tablespoons of unsalted butter melted and slightly cooled
-
1 teaspoon of fine sea salt
-
1 teaspoon of apple cider vinegar
-
4 tablespoons of cornmeal for dusting the baking sheet and skillet
Step by Step Method
Step 1: Activate the Yeast
Start by taking your warm milk and pouring it into a large mixing bowl. The milk must be warm to the touch but not boiling hot, as extreme heat will kill your yeast. Add your honey and the active dry yeast into the warm milk and give it a gentle stir with a spoon. Let this mixture sit completely undisturbed for about 10 minutes. You will know it is ready when a thick, bubbly foam forms on the top surface, which shows the yeast is alive and working.
Step 2: Combine the Wet Ingredients
Once your yeast mixture is nice and bubbly, it is time to add the other liquid components. Whisk in your room temperature egg, the melted unsalted butter, and the apple cider vinegar. The vinegar is a secret trick that helps activate the dough and gives it a better rise. Mix everything together thoroughly until the egg is completely broken up and the liquid looks uniform.
Step 3: Add the Dry Ingredients
Sift your gluten free baking flour blend and the fine sea salt directly into the wet ingredients bowl. Use a sturdy wooden spoon or a silicone spatula to stir the mixture together. Gluten free dough is much stickier and wetter than regular bread dough, so do not worry if it looks like a thick cake batter instead of a traditional kneadable dough. Keep stirring for about three minutes until all the pockets of dry flour disappear completely.
Step 4: Let the Dough Rise
Scrape down the sides of your bowl and shape the sticky dough into a loose mound in the center. Cover the top of the bowl tightly with a piece of plastic wrap or a clean, damp kitchen towel. Place the bowl in a warm, draft free area of your kitchen, such as inside an turned off oven. Let the dough rise for about 1 hour or until it has noticeably expanded in size and looks puffy.
Step 5: Shape the Muffins
Sprinkle half of your cornmeal evenly over a large baking sheet lined with parchment paper. Dust your hands with a little extra flour because the dough will be quite sticky to handle. Divide the risen dough into 8 equal portions using a large spoon or an ice cream scoop. Shape each portion into a smooth round ball using your hands and place them onto the cornmeal covered sheet. Gently press down on the top of each ball to flatten it into a classic muffin disc shape. Sprinkle the remaining cornmeal over the tops of the muffins.
Step 6: The Second Rise
Cover the shaped muffins very loosely with a lightweight cloth so they do not dry out on top. Let them rest on the baking sheet for another 20 minutes to allow them to puff up a second time. This second rise is crucial for creating those famous light and airy air pockets inside the bread.
Step 7: Cook on the Skillet
Heat a large cast iron skillet or a heavy nonstick frying pan over medium low heat on your stove. You do not need to add any oil or grease to the pan if it is nonstick or well seasoned. Carefully lift each puffy muffin using a spatula and place them into the hot skillet, leaving some space between them. Cook the muffins for about 7 to 8 minutes on the first side until the bottom turns a beautiful golden brown color.
Step 8: Flip and Finish
Flip the muffins over carefully using your spatula to cook the other side. Let them cook for another 7 to 8 minutes on this second side until they are golden brown and sound slightly hollow when you tap them. If you feel the outside is browning too fast while the inside stays wet, lower your heat immediately. Transfer the cooked muffins to a wire cooling rack and let them cool down completely for at least 30 minutes before opening.
Why This Recipe Is Special
This recipe is incredibly special because it solves the biggest problems people face with gluten free baking. It delivers a texture that is light, airy, and remarkably soft without relying on any wheat proteins. The addition of apple cider vinegar reacts beautifully with the rising agents to give the bread a fantastic lift. This prevents the muffins from becoming dense, heavy bricks like many store bought alternatives.
From a health perspective, this recipe is wonderful because it is completely free from artificial preservatives and mystery stabilizers. You know exactly what goes into your food, which is a massive relief for anyone with food sensitivities or allergies. It provides a wholesome source of carbohydrates to fuel your morning activities without causing sluggishness. The use of natural honey instead of refined white sugar adds a gentle sweetness that pairs perfectly with the savory notes of the bread.
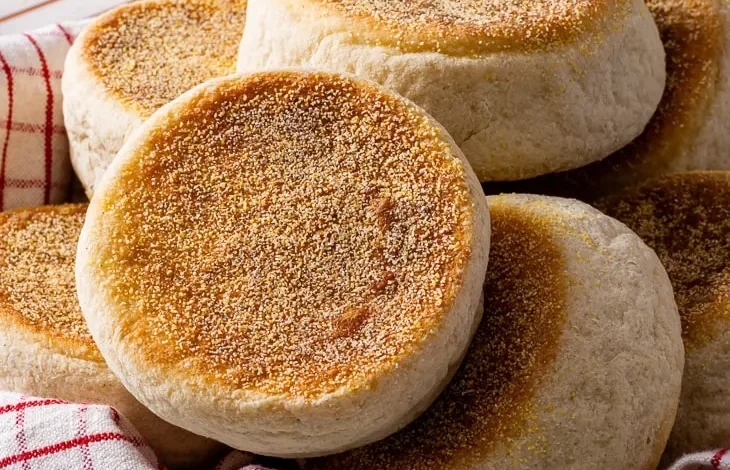
The taste of these homemade English muffins is truly unmatched by anything you can buy in a grocery store. The cornmeal on the outside creates a spectacular crunch that contrasts wonderfully with the tender interior crumb. They have that authentic, slightly tangy sourdough style flavor note that makes breakfast feel like a gourmet experience. This recipe empowers you to take control of your diet while enjoying the comforting textures of classic bakery items.
Extra Tips for Better Taste
To get the absolute best results from this recipe, always use a fork to split your muffins open instead of a knife. Piercing the edges with a fork and pulling the halves apart preserves all the unique nooks and crannies inside the dough. If you use a sharp knife, you will slice right through those pockets and create a flat surface that cannot hold butter well.
If you want to add a fun flavor twist, try mixing half a cup of raisins and a teaspoon of ground cinnamon into the dough during the mixing stage. This creates a sweet cinnamon raisin muffin that tastes incredible when toasted and slathered with creamy almond butter. For a savory option, you can add a pinch of garlic powder, dried rosemary, and some grated parmesan cheese to the dry flour blend.
Always toast your English muffins before eating them, even if they are fresh from the skillet. Toasting crisps up the interior air pockets and creates the perfect surface for catching your toppings. If you have extra muffins left over, you can wrap them tightly and store them in your freezer for up to three months. When you are ready to eat one, just pop the frozen muffin directly into your toaster for a quick and easy breakfast.
Final Thoughts
Making your own gluten free English muffins at home is a deeply rewarding experience that will elevate your breakfast routine to a whole new level. It shows that you do not have to sacrifice flavor, texture, or joy just because you are choosing to live a gluten free lifestyle. This simple recipe proves that with a little patience and some everyday ingredients, anyone can become an excellent home baker. Gather your ingredients, clear off your kitchen counter, and enjoy the wonderful process of baking something beautiful from scratch today.
Nutrition Details
The values listed below are estimations per individual serving based on dividing the recipe into eight equal muffins. Actual numbers may vary slightly depending on the specific brands of flour and ingredients you choose to use in your kitchen.
| Nutrient Type | Amount Per Serving |
| Calories | 210 calories |
| Total Fat | 6 grams |
| Saturated Fat | 3 grams |
| Cholesterol | 35 milligrams |
| Sodium | 310 milligrams |
| Total Carbohydrates | 34 grams |
| Dietary Fiber | 3 grams |
| Sugars | 4 grams |
| Protein | 5 grams |
Disclaimer
Please remember that everyone has a unique body, and individual health requirements can vary greatly from person to person. The nutritional information provided in this article is meant for educational and informational purposes only and should not replace professional medical advice. If you have severe celiac disease or highly sensitive food allergies, always ensure that your ingredients are certified gluten free by official testing organizations. Results can change based on kitchen conditions, altitude, and ingredient substitutions, so please use your personal judgment while cooking.