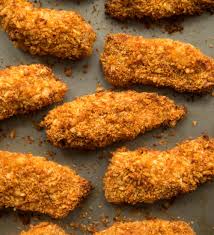
Crispy baked chicken tenders are one of those amazing meals that everyone seems to enjoy no matter their age or where they come from. This recipe is all about taking simple chicken strips and turning them into something that feels like it came from a fancy restaurant or a popular fast food spot. The main goal here is to get that perfect crunch on the outside while keeping the meat inside very soft and full of flavor. Many people think that you need a big pot of hot oil to get chicken really crunchy but that is actually not true at all because the oven can do a fantastic job if you know the right tricks. We use special breadcrumbs and a bit of seasoning to create a coating that turns golden brown and stays firm even after the chicken is fully cooked through. This dish is perfect for a busy weeknight when you want something tasty but do not want to spend hours standing over a stove or cleaning up greasy splatters from a deep fryer. It is a meal that brings comfort to the table and makes everyone smile because it is familiar yet feels like a special treat every single time you serve it.
People love this recipe so much because it balances health and taste in a way that very few other fried foods can manage to do. Usually when we think of chicken tenders we think of high calories and heavy oils that make us feel tired or bloated after eating them. However this baked version is much lighter and uses only a tiny bit of spray or oil to get that satisfying texture we all crave so much. Parents love it because it is a great way to feed kids protein without the additives found in frozen bags of nuggets from the store. Home cooks love it because the preparation is very straightforward and does not require any advanced kitchen skills or expensive equipment to get right. It is also a very versatile meal since you can change the spices to make it spicy or smoky or even cheesy depending on what your family likes best. The joy of biting into a piece of chicken that makes a loud crunching sound is hard to beat and this recipe delivers that exact experience without the guilt or the mess of traditional frying methods.
You might find yourself making this recipe during a rainy weekend when you want some cozy finger food to eat while watching a movie with your friends. Or perhaps you are starting a new fitness journey and you really miss the taste of fried chicken but you want to stay on track with your healthy eating goals for the year. This meal is the perfect solution for those moments because it provides the protein your muscles need while satisfying the emotional craving for something crispy and savory. It is also an excellent choice for a quick lunch during a work day because you can prepare a big batch and then simply reheat them in a toaster oven to bring back the crunch. There is something very nostalgic about eating chicken tenders as it reminds many of us of childhood birthday parties or fun trips to the mall. Cooking this at home allows you to control the quality of the meat and the amount of salt which makes it a much more mindful way to enjoy a classic favorite. Whether you are celebrating a small win or just trying to get through a long Monday this chicken will definitely make your day feel a little bit better.
The reason this specific recipe stands out is because of the technique used to ensure the breading does not get soggy or fall off the meat during baking. We focus on a three step process that creates a strong bond between the chicken and the coating so every bite is perfect from start to finish. You will learn how to season the flour so the flavor goes deep into the meat and how to use eggs as a glue that holds everything together tightly. The final layer of breadcrumbs is where the magic happens and we choose a specific type of crumb that is designed to stay airy and crisp in the heat of the oven. By the time you pull the tray out of the oven the aroma of toasted bread and savory spices will fill your whole house and make everyone run to the kitchen. It is a recipe that builds confidence in the kitchen because it works every time and gives you consistent results that look as good as they taste. Once you try this method you might never go back to the frozen version again because the difference in freshness and quality is truly massive.
Ingredients You Will Need
To make these delicious tenders you will need to gather a few simple items from your local grocery store. Make sure your chicken is fresh for the best results.
-
One pound of fresh chicken breast cut into long strips
-
One cup of Panko breadcrumbs for maximum crunch
-
Half a cup of all purpose flour for the base coating
-
Two large eggs beaten well in a small bowl
-
One teaspoon of garlic powder for a savory aroma
-
One teaspoon of onion powder to add depth
-
Half a teaspoon of smoked paprika for a nice color
-
Half a teaspoon of salt or more depending on your taste
-
Quarter teaspoon of black pepper for a tiny bit of heat
-
Two tablespoons of melted butter or olive oil for the coating
-
Cooking spray to prevent sticking on the baking sheet
Step by Step Method
-
The first thing you need to do is get your oven ready by heating it up to four hundred degrees Fahrenheit. While the oven is getting hot you should take a large baking sheet and place a wire rack on top of it. Using a rack is a secret trick that helps the air move all around the chicken so the bottom stays crispy instead of getting soggy on the pan.
-
Now you need to set up your coating station which involves three separate shallow bowls. In the first bowl you will put the flour mixed with the salt and the pepper. In the second bowl you will crack the eggs and whisk them until the yolks and whites are fully combined. In the third bowl you will mix the Panko breadcrumbs with the garlic powder and onion powder and paprika and the melted butter.
-
Take one strip of chicken and dip it into the flour bowl first. Make sure the chicken is fully covered in flour and then shake off any extra so the layer is very thin. Next dip the floured chicken into the egg bowl until it is completely wet. The egg acts like a glue that will hold the crunchy parts onto the meat.
-
Press the chicken into the breadcrumb mixture and make sure you push down a little bit so the crumbs really stick to the egg layer. Place the coated chicken strip onto the wire rack on your baking sheet.
-
Repeat this process for all the pieces of chicken and make sure they are not touching each other on the tray. If they are too close together they will steam instead of getting crispy.
-
Once the tray is full you can put it into the center of the oven and bake for about fifteen to twenty minutes. You can check the internal temperature with a thermometer to make sure it reaches one hundred sixty five degrees Fahrenheit.
-
When the time is up you will see that the chicken is a beautiful golden color. Take the tray out of the oven and let the chicken sit for about three or five minutes before you eat it. This short wait allows the juices inside the meat to settle. Serve them hot with your favorite dipping sauce.
Why This Recipe Is Special
This recipe is special because it allows you to enjoy a classic comfort food without the heavy feeling that comes from eating grease. Since we are baking the chicken instead of frying it you are consuming much less fat while still getting all the protein your body needs to stay strong. The use of Panko breadcrumbs is another reason why this version is better than others. Panko is a Japanese style of breadcrumb that is lighter and crispier than the traditional round crumbs you find in most stores. Because they are flaky they create more surface area which means more crunch in every single mouthful. This recipe also lets you control exactly what goes into your food which is great if you are trying to avoid preservatives or high levels of sodium. It is a clean way to eat a fun meal and it fits perfectly into a balanced lifestyle. Plus the fact that it is made in one tray means you have very little cleaning to do after dinner is over.
Extra Tips for Better Taste
If you want to take this recipe to the next level you can try marinating the chicken in some pickle juice or buttermilk for an hour before you start the coating process. This makes the meat incredibly tender and adds a slight tang that balances the savory crust perfectly. Another great tip is to add some freshly grated Parmesan cheese into the breadcrumb mixture for a salty and nutty flavor. If you like heat you can add a pinch of cayenne pepper or some red chili flakes to the flour. For an even more golden color you can toast the breadcrumbs in a dry pan for two minutes before you put them on the chicken. This ensures they look dark and delicious even if your oven cooks a bit slowly. Always remember to use fresh spices because old powders lose their flavor over time and will not give you that punch you are looking for.
Final Thoughts
Making crispy baked chicken tenders at home is a rewarding experience that proves healthy food can be just as exciting as the less healthy options. It is a simple joy to see your friends and family enjoying a meal that you made from scratch with fresh ingredients. This recipe is a solid foundation that you can build upon as you become more comfortable in the kitchen. Whether you are cooking for one person or a whole group these tenders are sure to be a hit and will probably become a regular part of your meal rotation. Enjoy the process of cooking and remember that the best meals are the ones shared with people you love. Happy cooking and enjoy your crunchy chicken!
Nutrition Details
| Nutrient | Amount Per Serving | Daily Value % |
| Calories | 285 kcal | 14% |
| Total Fat | 8 grams | 10% |
| Saturated Fat | 3 grams | 15% |
| Cholesterol | 125 mg | 42% |
| Sodium | 450 mg | 20% |
| Total Carbohydrates | 18 grams | 7% |
| Dietary Fiber | 1 gram | 4% |
| Sugars | 1 gram | 0% |
| Protein | 32 grams | 64% |
The nutrition values listed above are estimates based on a serving size of three or four chicken tenders. These numbers can change if you use different brands of breadcrumbs or if you choose a different type of oil for the coating process.
Disclaimer
Please remember that everyone has a different body and different nutritional requirements based on their age and activity level. The health results and benefits of this recipe may change from person to person depending on your unique metabolism and lifestyle choices. This article is for informational purposes only and is not meant to replace professional medical or nutritional advice. If you have specific health concerns or allergies please talk to a doctor or a qualified health expert before making big changes to your diet.