Welcome to the ultimate guide for making the most fudgy and delicious chocolate treats using your leftover baking starter. If you love baking at home and hate wasting food, this wonderful recipe is going to become your absolute favorite thing to make in your kitchen. Sourdough discard brownies combine the deep and rich flavor of dark chocolate with a wonderfully chewy texture that melts in your mouth with every single bite. Many home bakers often wonder what to do with the extra batter they leave behind after feeding their wild yeast culture, and instead of throwing it away, turning it into a batch of rich brownies is the most satisfying solution you can possibly imagine. This brilliant baking method transforms what would normally go into the trash bin into a decadent dessert that rivals any fancy bakery item you might buy at a high end cafe. You do not need any special professional skills or advanced baking equipment to get incredible results because the process is designed to be friendly for absolute beginners who are just starting their baking journey.
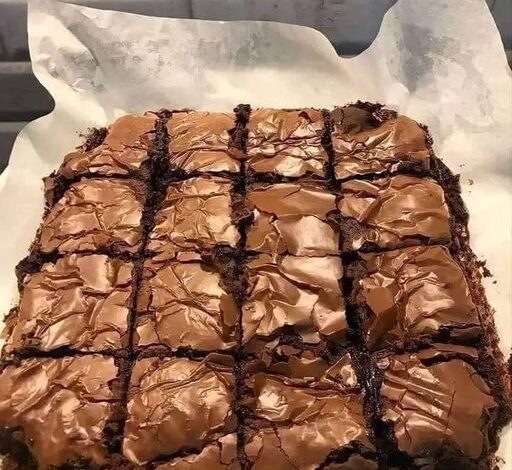
People all over the world fall completely in love with these chocolate squares because they offer a brilliant balance of sweet and slightly tangy flavors that keep you coming back for more. The magic happens when the natural acidity of your leftover starter reacts with the other ingredients, creating a remarkably moist crumb while cutting through the heavy sweetness of traditional chocolate desserts. Unlike standard boxed mixes that often taste flat and overly sugary, this homemade creation brings layers of rich cocoa taste and a glossy crackly top that every true chocolate lover dreams about. Furthermore, using up your extra baking starter feels like a small victory in the kitchen, helping you reduce food waste while treating your family and friends to something truly special. The aroma of melted butter and rich cocoa filling your home while these bake in the oven creates an atmosphere of pure comfort and warmth that brings everyone running to the kitchen.
You should consider making this delightful treat whenever you have accumulated a jar of leftover starter in your refrigerator and want a quick yet impressive dessert to share with your loved ones. Whether you are hosting a weekend gathering, celebrating a cozy movie night, or simply needing a sweet reward after a long and tiring week, these rich chocolate squares fit every single occasion. From an emotional standpoint, baking from scratch is a wonderful way to decompress and practice self care, letting you focus on the simple joy of creating something beautiful with your own hands. The taste profile is deeply satisfying, offering a rich chocolate punch that comforts the soul and satisfies even the most intense sugar cravings without feeling overly heavy. While this is certainly an indulgent treat rather than a strict health food, using natural fermentation leftovers adds a wholesome homemade touch that makes you feel good about what you are feeding the people you care about most.
Getting started with this wonderful baking project requires very little preparation, and you likely already have most of the necessary items sitting comfortably in your pantry shelves. The instructions are written in plain and simple language so that you never feel confused or intimidated by fancy culinary terms that only professional pastry chefs usually understand. As you move through the measuring and mixing stages, you will notice how forgiving the batter is, allowing you to relax and enjoy the entire creative process from start to finish. By the time you pull the shining pan out of the oven and let the warm chocolate scent fill your living room, you will feel an immense sense of pride and accomplishment. Let us dive right into the details so you can preheat your oven and start baking the most comforting chocolate treats of your life today.
Ingredients You Will Need
One cup of all purpose flour
Half cup of unsweetened cocoa powder
One cup of granulated white sugar
Half cup of brown sugar packed firmly
Three fourths cup of unsalted butter melted and cooled
Two large eggs at room temperature
One teaspoon of pure vanilla extract
Half cup of unfed sourdough discard straight from the fridge
Half teaspoon of table salt
One cup of semi sweet chocolate chips
Step by Step Method
Begin your baking adventure by gathering all the ingredients listed above on your kitchen counter so you can reach for them easily without any stressful searching. Preheat your oven to three hundred fifty degrees Fahrenheit, which is roughly one hundred seventy five degrees Celsius, and let it heat up thoroughly. Take an eight by eight inch metal baking pan and line it carefully with parchment paper, leaving a little bit hanging over the sides so you can lift the finished squares out easily later. Grab a medium sized mixing bowl and whisk together your all purpose flour, unsweetened cocoa powder, and table salt until every little lump is completely gone and the mixture looks uniform. In a separate large mixing bowl, combine the melted unsalted butter, granulated white sugar, and packed brown sugar by stirring them vigorously with a wire whisk or wooden spoon. Add the two large eggs one at a time to the butter and sugar mixture, beating well after each addition until the liquid turns pale and slightly creamy. Pour the pure vanilla extract and your cold sourdough discard straight into this wet mixture, stirring gently until everything is fully incorporated and smooth. Gently dump your dry flour and cocoa mixture into the large bowl containing the wet ingredients, using a rubber spatula to fold the batter together with slow circular motions. Stop folding as soon as you no longer see streaks of dry flour, keeping in mind that overmixing will make your treats tough instead of soft and chewy. Fold in three fourths of a cup of the semi sweet chocolate chips, saving the remaining chips to sprinkle right on top of the batter before it goes into the oven. Pour the thick and glossy chocolate batter into your prepared baking pan, using your spatula to spread it evenly into all four corners and smoothing the top. Sprinkle the reserved chocolate chips evenly across the surface of the batter so they bake into shiny pockets of melted goodness on top of the crust. Place the baking pan on the middle rack of your preheated oven and bake for twenty five to thirty minutes, watching closely so the edges do not burn. Insert a wooden toothpick into the exact center of the pan to check for doneness, looking for a few moist crumbs attached to the stick rather than wet batter. Remove the pan from the oven and place it on a wire cooling rack, allowing the treats to cool completely inside the pan before you attempt to cut them. Once cooled, use the hanging parchment paper to lift the entire block out onto a cutting board, and slice it into neat squares using a sharp knife.
Why This Recipe Is Special
This wonderful recipe stands out from ordinary baking instructions because it offers a brilliant way to repurpose kitchen leftovers while delivering unmatched flavor and texture. The natural wild yeast culture helps create a wonderfully tender crumb that stays moist for days without drying out on your kitchen counter. You get the deep and intense satisfaction of a gourmet bakery dessert using basic pantry staples that do not cost a fortune to buy at your local grocery store. The slight tang from the fermentation process balances the rich sweetness of the chocolate, ensuring that each bite tastes complex and incredibly satisfying rather than just overwhelmingly sugary. Furthermore, baking from scratch gives you total control over every single ingredient that goes into your body, letting you avoid artificial preservatives and mystery additives found in store bought treats. It is a comforting ritual that brings joy to your household, fills your kitchen with an amazing aroma, and teaches you new ways to use your baking starters creatively.
Extra Tips for Better Taste
Always use room temperature eggs because they blend much more smoothly into the butter and sugar mixture without hardening the warm butter prematurely. If you prefer a richer and more intense chocolate flavor, try adding a quarter teaspoon of instant espresso powder to your dry ingredients to elevate the cocoa notes. Do not skip the cooling process entirely, because warm chocolate squares are very fragile and need time to set their structure before you slice them cleanly. For an extra touch of luxury, sprinkle a small pinch of flaky sea salt right over the top of the batter immediately before placing the pan into the oven. Store your finished treats in an airtight container at room temperature with a small piece of plain white bread inside to keep them remarkably soft for days.
Final Thoughts
Baking these wonderful chocolate squares is a joyful experience that brings warmth and sweetness into your daily routine while making clever use of your kitchen leftovers. Taking a moment to slow down and create something delicious with your own two hands is a wonderful reward for all your hard work throughout the week. Sharing these homemade treats with your family and friends creates happy memories around the kitchen table that last long after the last crumb has vanished. Enjoy every single bite of your freshly baked creation, and may your kitchen always be filled with the wonderful aroma of melting chocolate and baking love.
Nutrition Details
| Nutrient | Per Serving |
| Calories | Two hundred sixty |
| Total Fat | Fourteen grams |
| Saturated Fat | Eight grams |
| Sodium | One hundred ten mg |
| Total Carbohydrates | Thirty two grams |
| Dietary Fiber | Two grams |
| Sugars | Twenty two grams |
| Protein | Three grams |
Disclaimer
Please remember that everyone has a unique body, different dietary needs, and distinct health conditions that influence how various foods affect their overall well-being. The nutritional information provided above is only a close estimate calculated using standard ingredients and standard serving sizes, so your actual results may vary depending on exact brands used. If you have specific medical concerns, severe food allergies, or strict dietary restrictions, you should always consult with a qualified healthcare professional before making major changes to your diet. Enjoy your homemade treats mindfully as part of a balanced lifestyle, and listen to your body to find what works best for your personal health journey.